
ARTICLE AD
Improve apps by making basic customizations in Power Apps
100 XP
10 minutesIn the previous module, you generated the Flooring Estimates app and started to explore its default design. While the default screens make a useful app out of the box, you'll often want to customize a generated app to suit your needs.
This unit explains basic changes for each screen in the app. You can do a lot more to customize an app, but the best way to start learning is to take a generated app and make common customizations. This will allow you to become familiar with the controls, layouts, and functions.
Before you begin, watch the following video for a brief overview of what to expect when customizing your app.
Browse screen
The Flooring Estimates app already shows an image and text for each product, but the layout could be better.
To improve the layout, use the following procedure:
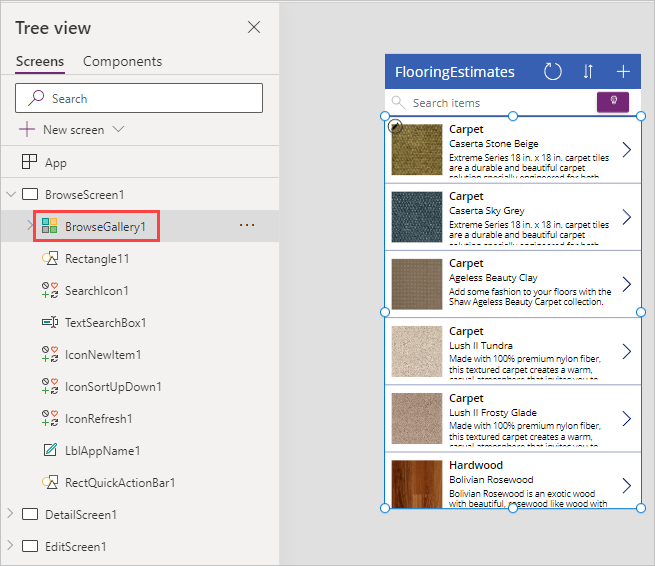
On the Screens pane on the left, select BrowseGallery1.
The selection box around the gallery confirms your choice.
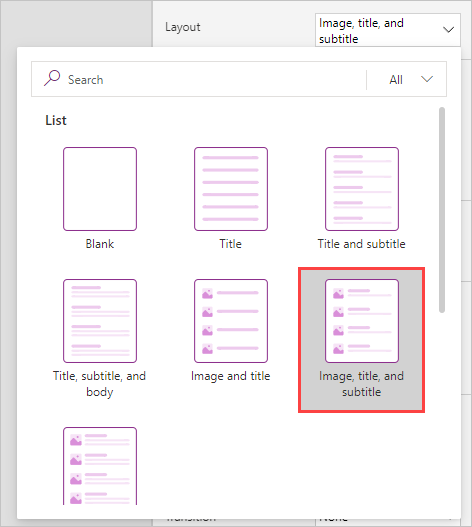
On the properties pane on the right, open the Layout pane by selecting the drop-down menu next to Layout.
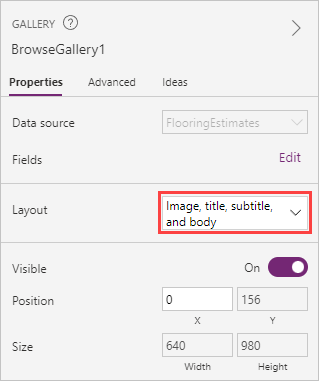
Select a different layout, such as the one that shows the image, the title, and the subtitle but not the body.
Select the Title1 text label in the Tree view or at top of your gallery.
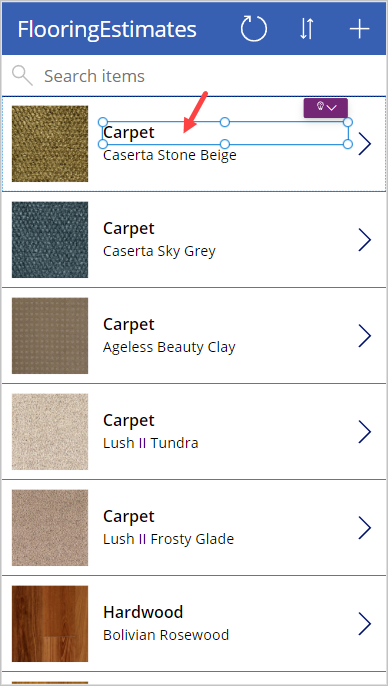
Change the Text property in the formula bar to: ThisItem.Name.
Next select your Subtitle1 text label control within the gallery and modify the Text property to show the price (ThisItem.Price) for each item.
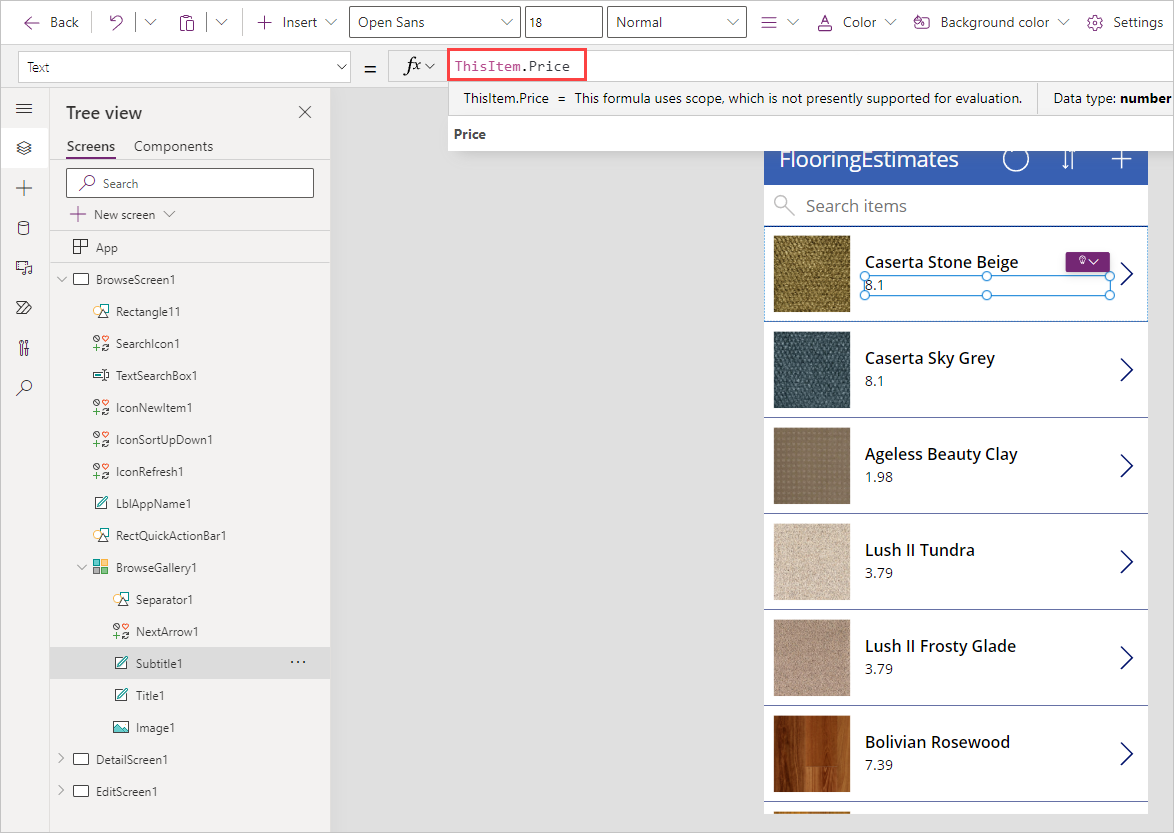
Changing the layout of a gallery and the types of data that it shows is that simple, and you might find that it's fun, too.
Details screen
On the details screen, you want to change the order of the fields. The controls on this screen differ from the controls on the browse screen, so the process for changing them is also slightly different.
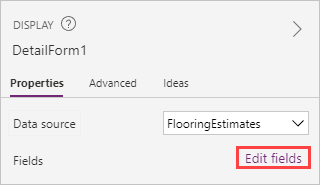
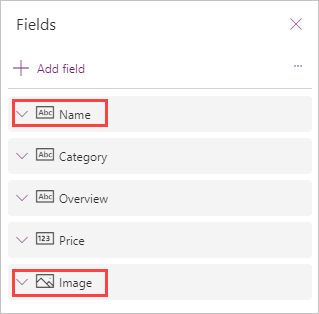
On the Tree view pane on the left, select/expand DetailScreen1 > DetailForm1.
On the properties pane on the right, select Edit fields.
Drag the Name field to the top of the list of fields and then drag the Image field to the bottom, so that your Fields pane looks like this:
Edit/create screen
On the screen where your users edit and create entries, you want to make it easier for them to enter information in a text box.
From the Tree view on the left, select/expand EditScreen1 > EditForm1.
On the right pane, select Edit fields.
Expand the field Overview. Select the drop-down arrow for the Control type and then select Edit multi-line text.
A multi-line edit control will simplify your user's ability to add more than a few words in this field.

A few basic steps can greatly improve the appearance and experience of using an app, and Power Apps Studio provides many options for customizing those apps.
Create a navigation model for your canvas app
100 XP
7 minutesFor a user, a navigation menu gives an overall perspective of the services an app has to offer. So, it's also important to have such a menu available throughout the app. From the maker standpoint, the menu needs to be easy to make and easy to update.
Overview of a navigation menu
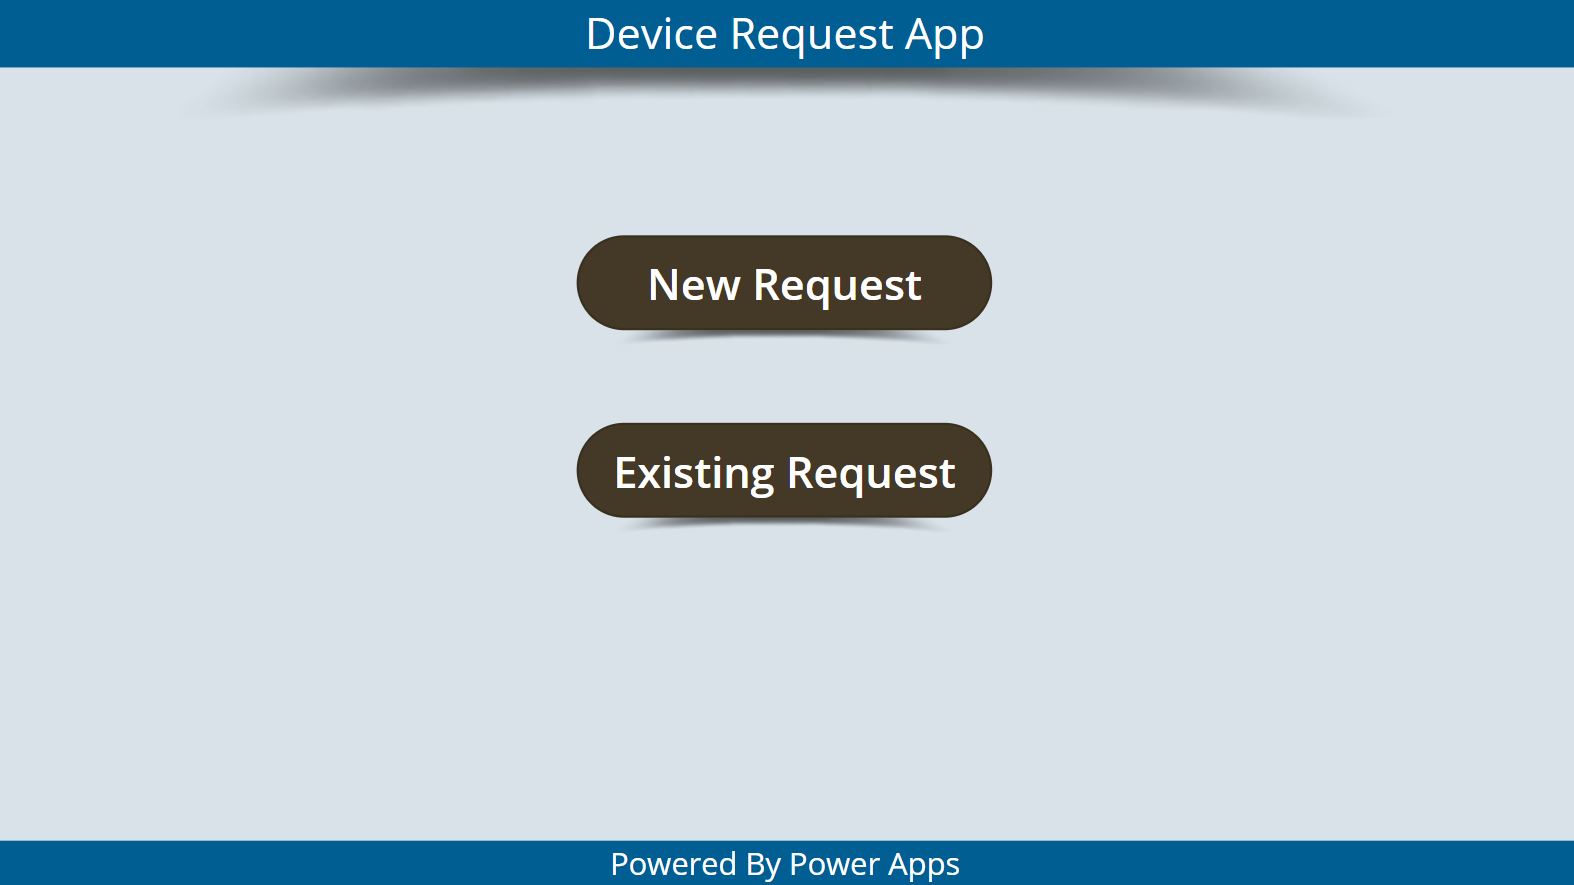
A navigation menu can be built using individual buttons or using a collection in a gallery. Adding individual buttons takes more time and effort to align their X and Y positions and to match their height and width. However, button navigation is still required for scenarios where only one or two buttons are needed. Here's an example of a home screen for a Device Request app that has two buttons.
When a navigation menu contains multiple options, then using a combination of a collection (or data source) and a gallery is a better option. This way formatting the X and Y location and the height and width is automatically taken care of.
Use a data source
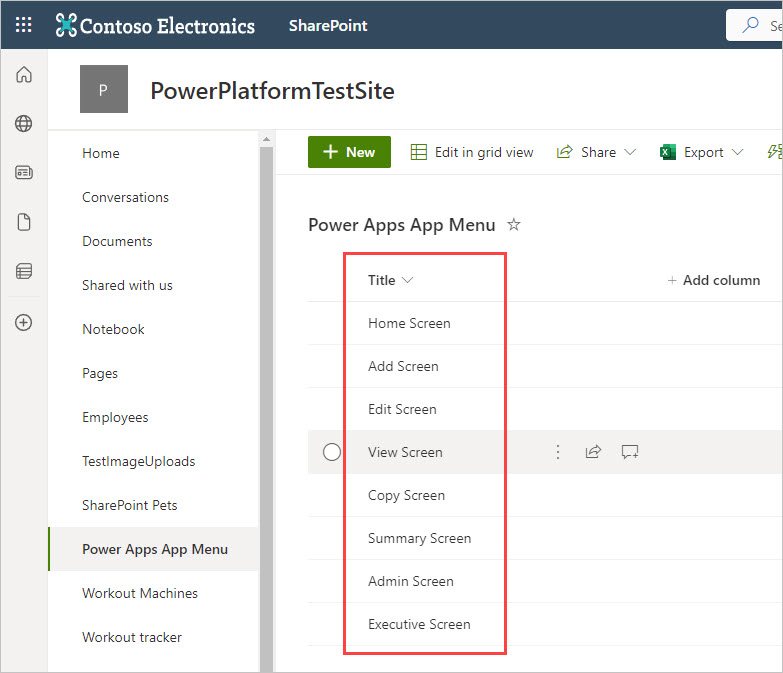
Having the menu content connected to the data source gives the flexibility to modify the menu without having to modify the app design in the canvas studio. Take, for example, a list created using Microsoft Lists like the one in this image. The menu can be added as items in a single-column list.
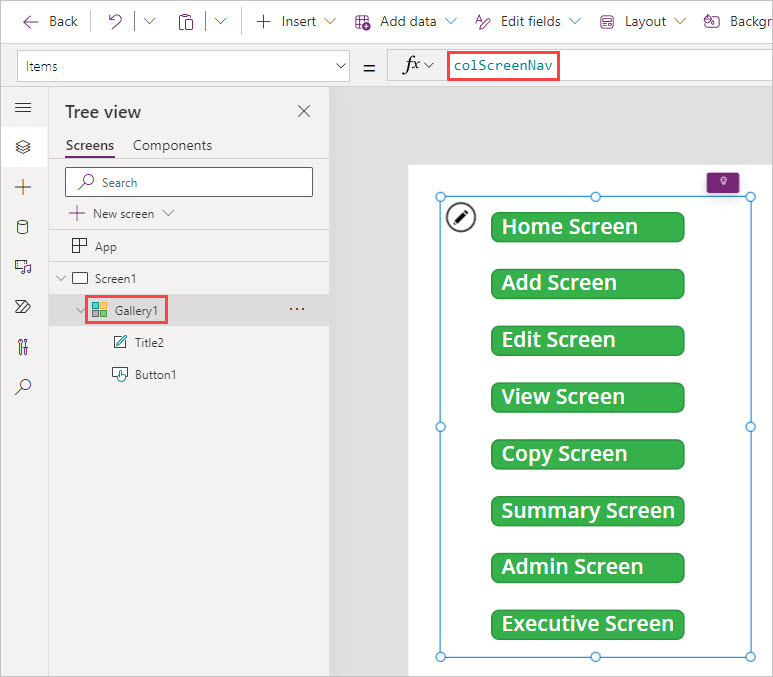
This list is then connected to Power Apps as a SharePoint data source. You can then insert a blank gallery into whatever screen you wish to have your menu in and assign it the list created using Microsoft Lists as the data source (the Items property for the gallery). You then can insert a button control into the gallery.
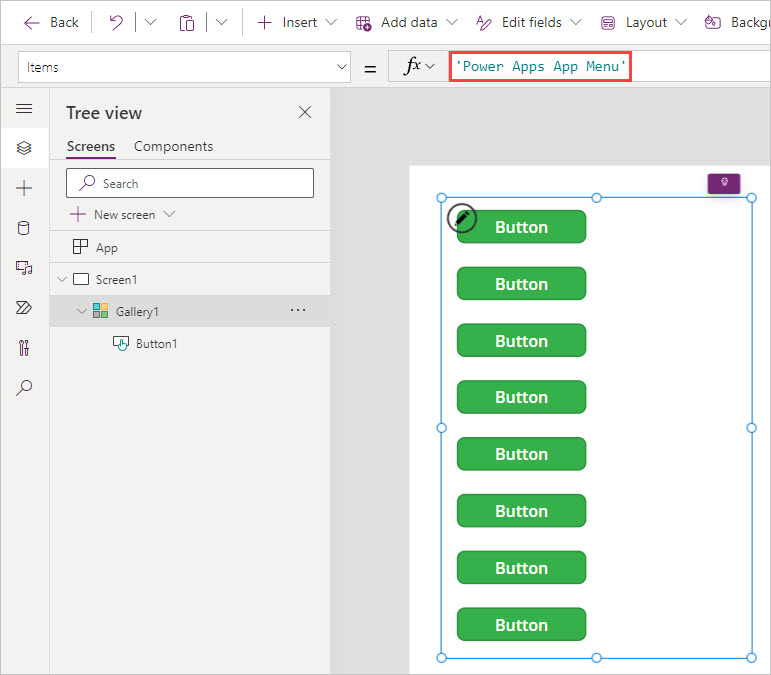
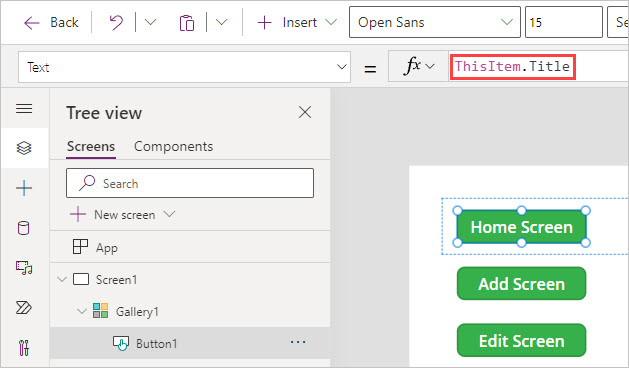
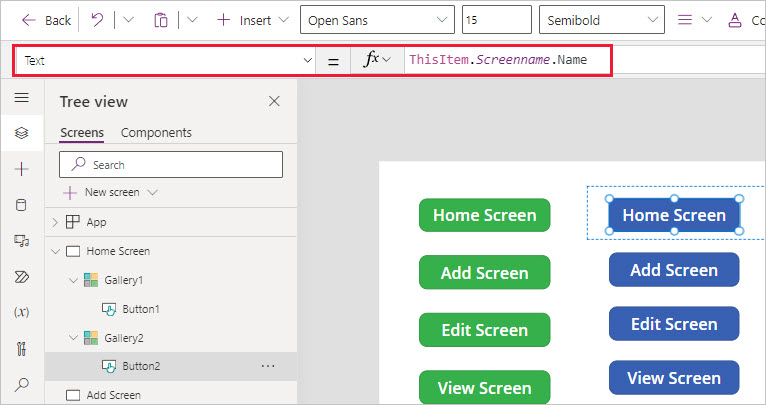
Notice how there's one button per item in your list. Now, you can complete the menu by renaming the Text property of the button to make it: ThisItem.Title.
You would then add some screens to the app (or use your existing screens) to match your navigation pattern, by selecting + New screen, and then renaming the screens to correspond to your navigation list.
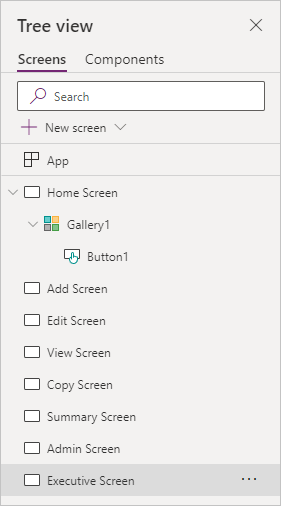
Finally, to make the navigation work, modify the OnSelect property of the button inside your gallery control by adding conditional logic around ThisItem.Title to navigate to the chosen screen. You could do it with an If or Switch statement. Either statement serves the same purpose. However, you must enter screen names that are actually in the app and in your list for it to work.
Here's an example of the OnSelect formula using If logic:
PowerApps FormulaCopy
If(ThisItem.Title = "Home Screen", Navigate('Home Screen'), ThisItem.Title = "Add Screen", Navigate('Add Screen'), ThisItem.Title = "Edit Screen", Navigate('Edit Screen'), ThisItem.Title = "View Screen", Navigate('View Screen'), ThisItem.Title = "Copy Screen", Navigate('Copy Screen'), ThisItem.Title = "Summary Screen", Navigate('Summary Screen'), ThisItem.Title = "Admin Screen", Navigate('Admin Screen'), ThisItem.Title = "Executive Screen", Navigate('Executive Screen'))
Here's an example of the OnSelect formula using a Switch function:
PowerApps FormulaCopy
Switch(ThisItem.Title, "Home Screen", Navigate('Home Screen'), "Add Screen", Navigate('Add Screen'), "Edit Screen", Navigate('Edit Screen'), "View Screen", Navigate('View Screen'), "Copy Screen", Navigate('Copy Screen'), "Summary Screen", Navigate('Summary Screen'), "Admin Screen", Navigate('Admin Screen'), "Executive Screen", Navigate('Executive Screen'))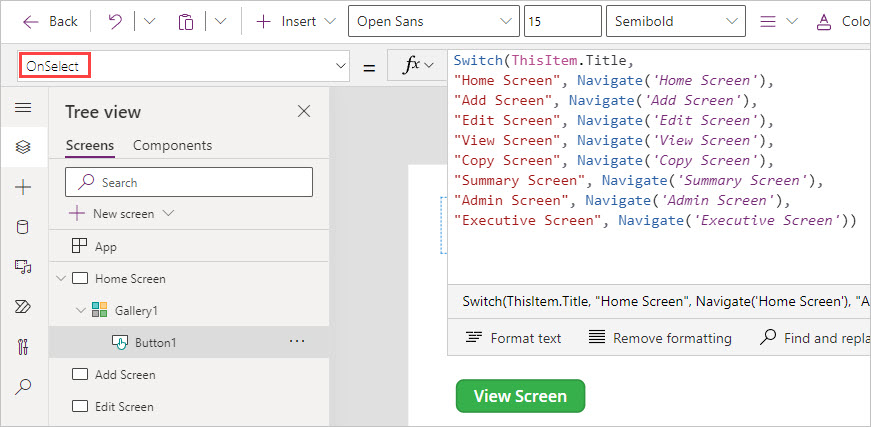
Use a collection
You also have the flexibility to create a collection inside the canvas app using the App OnStart property. Then you can populate that collection in a gallery as a menu like a list in Microsoft Lists. Remember that a collection is simply a temporary table of data, that your app can refer to as a data source.
Here's an example of a two-column collection that you can add to the OnStart property for your app. The "Id" and "Screenname" values will help you provide navigation from a gallery tied to the collection. Once you enter the code in OnStart, you can select the ellipsis next to App and select Run on start to get the collection into memory for the app.
PowerApps FormulaCopy
ClearCollect(colScreenNavigation, {Id: 1, Screenname: "Home Screen"}, {Id: 2, Screenname: "Add Screen"}, {Id: 3, Screenname: "Edit Screen"}, {Id: 4, Screenname: "View Screen"}, {Id: 5, Screenname: "Copy Screen"}, {Id: 6, Screenname: "Summary Screen"}, {Id: 7, Screenname: "Admin Screen"}, {Id: 8, Screenname: "Executive Screen"})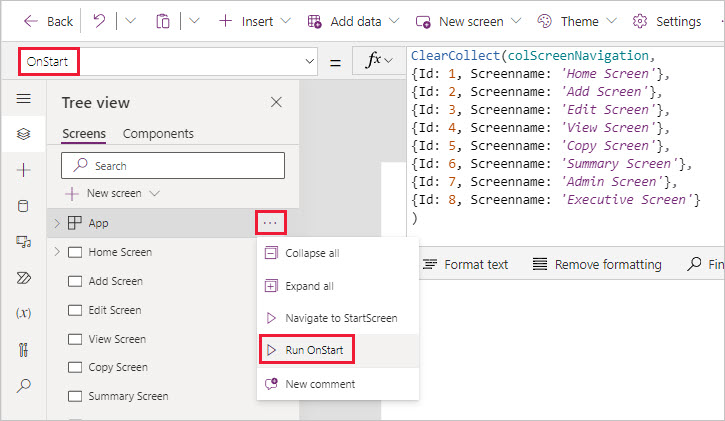
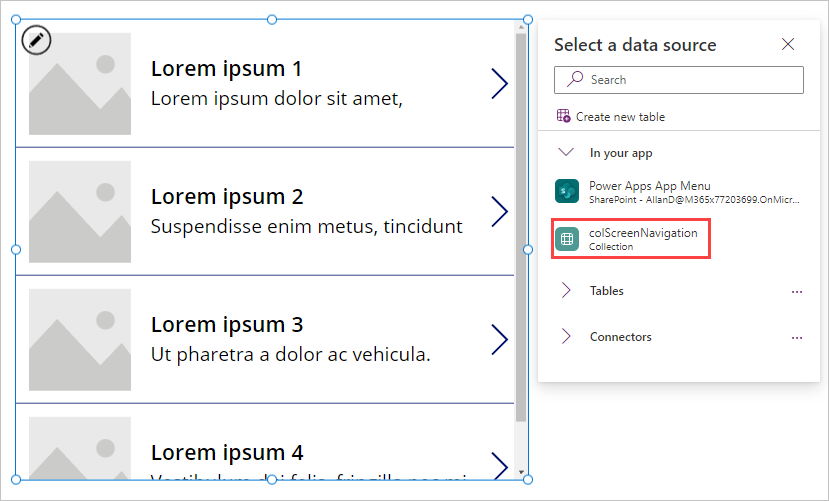
Next, you can insert a Vertical gallery, and with the gallery selected, you can choose your collection as the data source for your gallery.
Add a button control to your gallery and delete the remaining controls. Then select the button and change its Text property to: ThisItem.ScreenName
To complete your navigation ability, you can then write code into your OnSelect property of your button with a Switch statement like this:
PowerApps FormulaCopy
Navigate( Switch(ThisItem.Id, 1,'Home Screen', 2,'Add Screen', 3,'Edit Screen', 4,'View Screen', 5,'Copy Screen', 6,'Summary Screen', 7,'Admin Screen', 8,'Executive Screen' ) )
In this case, we used the "Id" field of our collection, but we could have used the "Screenname" as well. If you followed along with this example, you can now hold the Alt key and test your new collection-based navigation buttons.
So now we've seen how you can create a navigation menu inside your app using a gallery control navigation menu that's tied to a single-column list created using Microsoft Lists or a collection. Hopefully, you can see some amazing possibilities!
Explore screens and controls in Power Apps
100 XP
5 minutesThis unit examines the screens and other controls that define the behavior of apps that Microsoft Power Apps generates. All the details won't be covered; however, knowing more about how these apps work will help you build your own apps.
Controls in Power Apps
A control is a UI element that produces an action or shows information. Many controls in Power Apps are similar to controls that you've used in other apps: labels, text-input boxes, drop-down lists, navigation elements, and so on.
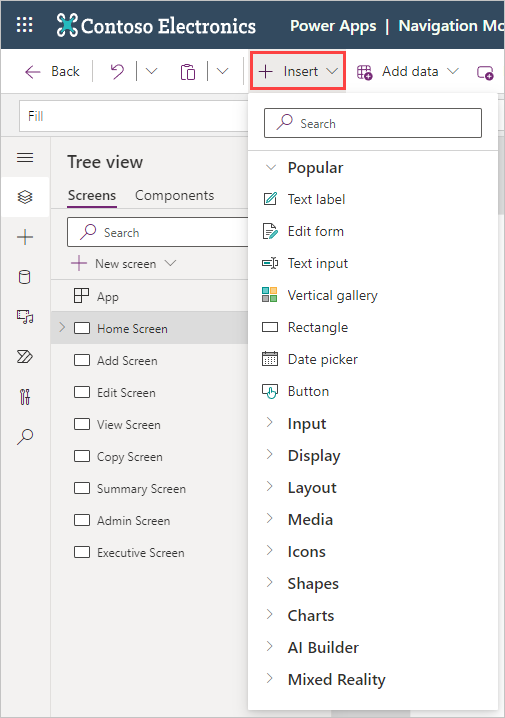
In addition to these typical controls, Power Apps has more specialized controls, which you can find on the + Insert tab, which includes a search field to help you find what you're looking for.
A few controls that can add interest and impact to your apps include:
Galleries - Controls that are layout containers that hold a set of controls that show records from a data source.Forms - Controls that show details about your data and let you create and edit records.Media - Controls that let you add background images, include a camera button (so that users can take pictures from the app), a barcode reader for quickly capturing identification information, and more.Charts - Controls that let you add charts, including Power BI data, so that users can perform instant analysis of their data.To see what controls are available, select the + Insert tab, and then expand the different fields. As you do, you'll see the utility of the search field to assist you in quickly finding what you're looking for. Try entering a few values in the search field to see the behavior.
Explore the browse screen
Each screen in the app has multiple controls, but one control takes up most of the screen space. If we can return to the Flooring Estimates app that we generated in the previous module for a moment, we'll examine the content created by Power Apps when we created that app.
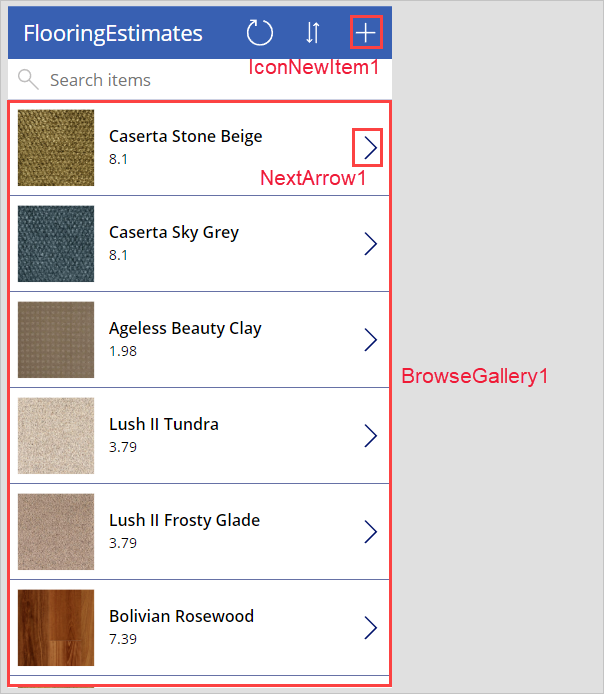
The first screen in the app is the browse screen, which is named BrowseScreen1 by default. Some of the other controls in the browse screen that you'll want to become familiar with include:
BrowseGallery1 - A control that takes up most of the screen and shows data from your data source.
NextArrow1 - A control that is inside of BrowseGallery1 and that, when selected, opens the details screen.
IconNewItem1 - When this control is selected, it opens the edit screen to create a new item.
Explore the details screen
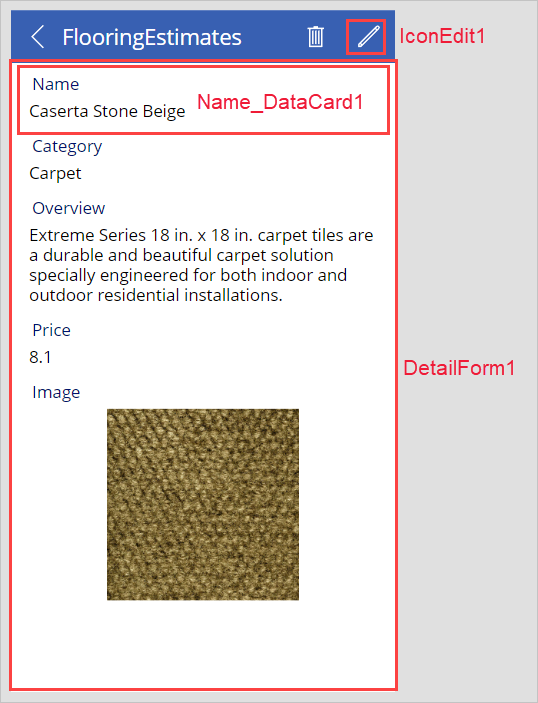
The details screen is named DetailScreen1 by default. Notable controls include:
DetailForm1 - A Form control that contains other controls and contains a data card for each field of the record that is being displayed.
Name_DataCard1 - A Card control, automatically created when a form is added into your app. Each card represents a single field of the record. In this case, it shows a flooring category from the Flooring Estimates table, as shown in the previous unit.
IconEdit1 - A control that opens the edit/create screen so that the user can edit the current item.
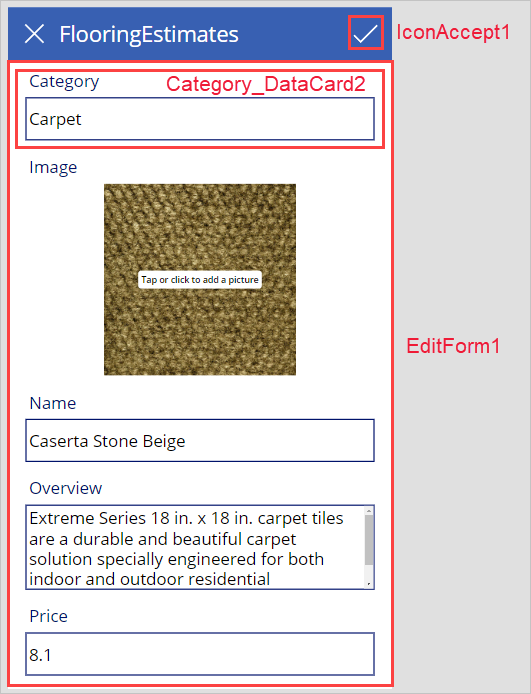
Explore the edit screen
The third screen in the app is EditScreen1. Notice how these controls allow your user to edit the item portrayed, via text input fields and some prompting dialog over the image. Even though you see similar controls to the browse screen, the properties of these controls are different. Some of the edit screen controls include:
EditForm1 - A Form control containing other controls, and it contains a data card for each field of the record that is being edited.
Category_DataCard2 - A card control that shows a flooring category from the Flooring Estimates table.
IconAccept1 - A control that saves the user's changes when selected.
With this introduction to the new screens and controls, we can learn about using some functions in Power Apps in the next unit.
Exercise - Get started with functions in Power Apps
100 XP
15 minutesWhen using Microsoft Power Apps, you don't have to write complicated application code the way that a traditional developer does. However, you must express logic in an app and control its navigation, filtering, sorting, and other functionalities. This is where formulas come in.
If you've used Microsoft Excel functions, you should recognize the approach that Power Apps takes. This unit shows a couple of basic formulas for text formatting and then describes three of the formulas that Power Apps includes when it generates an app. With this information, you'll have a better idea of what formulas can do, and then you can also start to write your own.
Get started with formulas and properties
The previous unit explored controls in all three screens of an app that Power Apps generated. In this section, you’ll modify the properties of the label control to format the item price in the gallery.
By default, the price appears as a plain number without a currency symbol. Suppose that you want to add a dollar sign and change the text color based on the item's cost. For example, red if it's more than $5, but green otherwise. The following graphic shows the expected result.
By default, Power Apps pulls in a price value for each item. This value is set as the Text property of the label that shows the price.
Note
Be sure to complete the steps in unit 1 of this module as the description field is changed to price as reflected in the next steps.
In BrowseScreen1, select the price of the first item. In your Tree view, it's the label control inside of BrowseGallery1 called Subtitle1.

In the drop-down list of properties, select Text (the default property for a label control).
To add the currency symbol for US dollars, set the Text property to this formula:
PowerApps FormulaCopy
Text(ThisItem.Price, "$ ##.00")Note
If your formula returns an error, then please note that the language setting of your Power Apps environment can affect some separators and operators. For example, the above formula is expressed in a language and region that uses dot or period as the decimal separator, such as Japan or the United Kingdom.
However, this same formula in a language and region where a comma is used for the decimal separator, such as France or Spain, would need to be: Text(ThisItem.Price; "$ ##,00")
The property selection operator "." (dot or period) in ThisItem.Price is always the same, no matter what the decimal separator is; but notice that the decimal separator and the chaining operation separator changed to a comma and semicolon, respectively. Internally the formula doesn't change, all that changes is how it's displayed and edited by the author. For more information, see Formula separators and chaining operator.
The Text function specifies how to format the number. The formula is like an Excel function, but Power Apps formulas refer to controls and other app elements instead of cells in a workbook.
If you select a control and then open the property drop-down list, a list of properties that are relevant to the control appears. For example, the following is a partial list of the properties for a Label control. Some properties are relevant across a wide range of controls, but others are relevant only for a specific control.
The Color property of a label control affects the color of the text. Colors can be portrayed as RGBA, HEX or HTML color names. In our Flooring Estimates app, let's conditionally format the price's color. Select the price label (or Subtitle1), choose the Color property and set it to this formula:
PowerApps FormulaCopy
5, Color.Red, Color.Green) " style="box-sizing: inherit; outline-color: inherit; font-family: SFMono-Regular, Consolas, "Liberation Mono", Menlo, Courier, monospace; font-size: 1em; direction: ltr; border-width: 0px; border-style: initial; line-height: 1.3571; display: block; position: relative;">If(ThisItem.Price > 5, Color.Red, Color.Green)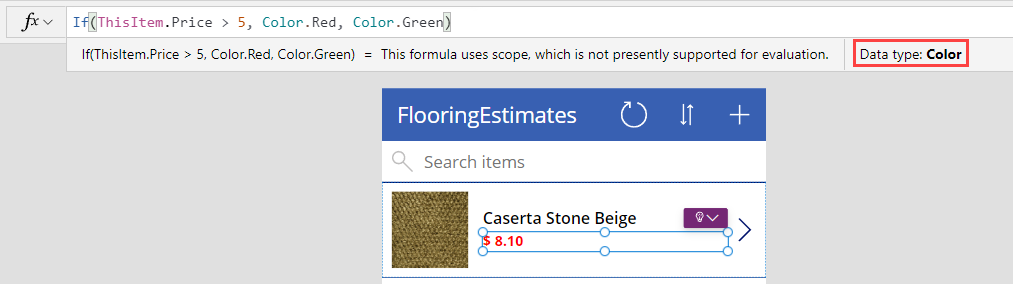
Notice how the color of the text was originally an RGBA value equating to the color black, and we changed it to named colors - Color.Red and Color.Green, based on our formula condition. For the formula to work, Power Apps is expecting a value that is a color. As long as your formula provides color data as an output, you can add any working formula as an input.
Formulas included in the generated app
Power Apps includes formulas in every app that it generates, so let's explore two of them. Both examples are from the browse screen and work with the OnSelect property. This property defines what happens when a user selects a control.
The first formula is associated with the IconNewItem1 control new item icon (+). When a user selects this control, the app opens the edit/create screen where they can create an item. To view the formula, let's select the new item icon (+) and then look at the OnSelect property in the formula bar. Place your cursor in the formula bar and you'll see the formula is as follows:
PowerApps FormulaCopy
NewForm(EditForm1);Navigate(EditScreen1, ScreenTransition.None)The formula instantiates an edit form on the edit/create screen so that users can create an item. A value of ScreenTransition.None means that there's no transition, such as a fade, between screens.
The second formula is associated with the IconSortUpDown1 control (button with up and down arrows). The user selects this control to sort the items in the gallery. With the app in edit mode, go ahead and select it. The formula is as follows:
PowerApps FormulaCopy
UpdateContext({SortDescending1: !SortDescending1})The formula uses UpdateContext to update a variable called SortDescending1. The exclamation "!" symbol in the formula is a shortcut for the Not function. The value of the variable switches back and forth as you select the control. This variable tells the gallery on this screen how to sort the items, either in descending order or the opposite of descending order.
This app contains many other formulas, so take some time to select different controls and discover the formulas that are currently set for various properties.
For more information about these and other functions, see formula reference for Power Apps page. This page is a good one to bookmark for future use!
For more information on customizing a canvas app, see Use the UI and controls in a canvas app in Power Apps learning path and the Use basic formulas to make a better canvas app in Power Apps learning path.
Check your knowledge
200 XP
6 minutesAnswer the following questions to see what you've learned.
1.
How do you specify what happens when a user selects a button or control?
Use the click wizard
Set the OnSelect property to the formula that you want to run.
You can set the OnSelect property to the formula that you want to run.
Set the OnClick property to the formula that you want to run.
Power Apps can't run formulas based on user selections.
2.
When you create an app from data, which of the following statements best describes your ability to customize?
The app is read only.
You can modify the formulas but not the screens or layouts.
You can modify all aspects of the app including screens, layouts, and formulas.
All aspects of the app including screens, layouts, and formulas can be modified.
You can modify the layout of the app, but you can't customize the functionality.
3.
What is the purpose of the Gallery control?
To edit a single record
To display a single record
To display and select all records from the data source
The purpose of the Gallery control is to display and select all records from a data source.
To show images that might or might not be related to your app


 Bengali (Bangladesh) ·
  English (United States) ·