ARTICLE AD
Introduction to client-side scripting
100 XP
5 minutes
Client scripting allows you to use JavaScript in Power Apps model-driven apps to implement custom business logic. Client scripting should be an alternative when declarative business rules don't meet the requirements. Client scripting runs on a model-driven form in response to form events. The following are the most common events you can register event handlers for:
Form load
Data in a column changed
Form is saved
In addition, you can configure a command bar button to invoke a client script function when pressed.
Some of the common tasks that you can accomplish using client scripting include:
Get or set column values on the form.
Show and hide user interface elements.
Reference multiple controls per column.
Switch between forms where multiple forms are available for a table.
Open forms, views, dialogs, and reports.
Interact with the business process flow control.
Using the provided client scripting API, you should implement your interaction with data, form content changes, or app behavior modifications. While you write your logic in JavaScript, it's important to note that even though the form uses standard HTML, direct manipulation of the form content isn't supported. Client scripting provides an object model with methods for interacting with the various form components. This approach ensures any changes in the layout or specific HTML used in the form rendering don't affect your business logic. It's equally important to only use documented objects and functions, not any that you may discover, as these can change or not be available at any time. For more information about supported and unsupported customizations, see Microsoft Dataverse app building practices - Power Apps in the Dataverse developer guide.
This is the high-level structure of the client scripting API object model and namespaces:
App - Enables adding event handlers for any app level notifications.
Device - Allows, with consent, access to device content such as image, video, audio, location, and more.
Encoding - Quick access to HTML encode/decode functions.
Navigation - Provides platform-independent navigation functions including open dialogs, forms, files, and URLs.
Panel - Displays the web page represented by a URL in the static area in the side pane, which appears on all pages in the model-driven apps web client.
Utility - Collection of utility functions including access to metadata and several context objects.
WebAPI - Provides properties and functions to use Web API to create and manage records and execute Web API actions and functions.
Another key high-level concept is the context objects that are available as event handler parameters or can be retrieved using special methods. These context objects help avoid writing code that you hard-wire to a particular form control layout or specific control. The following are the contexts you work with:
Execution - Defines the event context in which your code executes. The execution context is passed when an event occurs on a form or grid, which you can use in your event handler to perform various tasks such as determine formContext or gridContext or manage the save event.
Form - Provides a reference to the form or to an item on the form, such as, a quick view control or a row in an editable grid, against which the current code executes. Form context is retrieved using getFormContext() method of the execution context or included as an argument when code is executed from a ribbon action. Form context has the following key namespaces within it:
data - This namespace gives access to the data for the table row that is presented on a form. Includes functions like save and refresh. For example, formContext.data.entity.save("saveandnew");
ui - This namespace allows you to manipulate controls on the form such as tabs, sections, and controls. Common tasks include hiding, showing, and making required or not required. For example, formContext.ui.refreshRibbon(true);
Grid - Provides context information to event handlers registered on subgrids on a form.
As you can tell from the high-level descriptions, using the client scripting API gives you much flexibility to implement client-side logic. It's important to remember that logic implemented with client-side scripting only enforces your logic when the user is using the application. In many cases, client scripting must be paired with the server-side implementation to ensure the logic always runs regardless of the method used to access the data and functionality. The rest of this module dives deeper into how to use client scripting.
Next unit: Upload scripts
Upload scripts
100 XP
4 minutes
The script must first be uploaded as a script web resource to use client scripting on a form. You can use script web resources to maintain libraries of client script functions written in JavaScript or TypeScript, and you can use them from within a model-driven app form or from the command bar definition. When using TypeScript, it must be transpiled to JavaScript before uploading as a web resource.
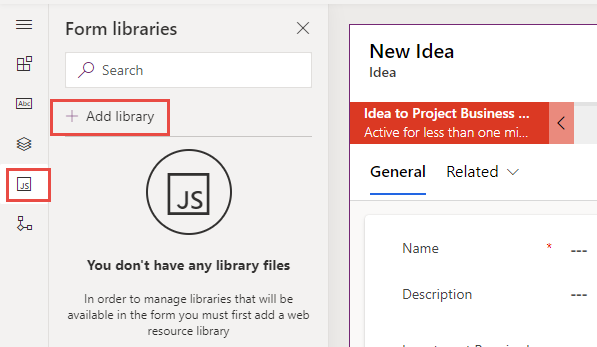
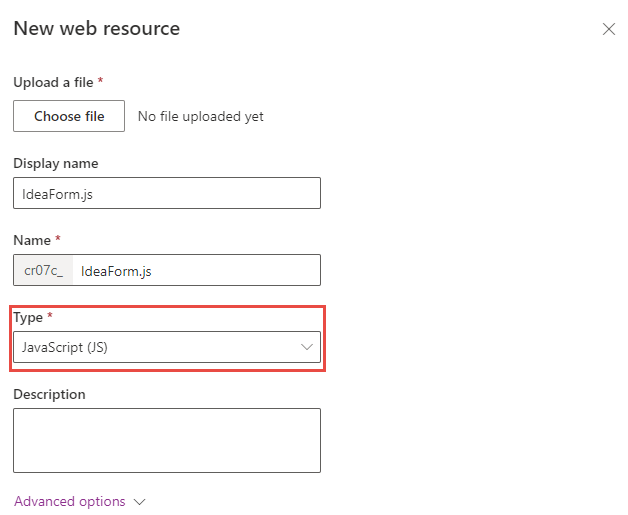
To upload a script web resource, create a new Forms Library from the form editor.
Make sure to select Script(JScript) as the type.
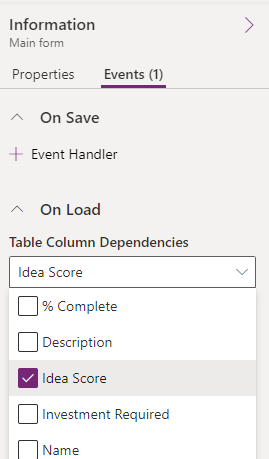
For table column data to be available to include in a script's logic, you must ensure you configure the form to use the column on the form. In addition to having to add the column as a control on the form, you risk somebody removing it and causing your script to break because the referenced column is no longer available. You can add the column as a dependency to ensure the column data is always available for your script logic. The following image shows adding the Idea Score column from the Idea table as a dependency.
Web resource dependencies
In addition to data dependencies, you can also configure dependencies on other web resources. This dependency saves time and simplifies loading logic because the form doesn't need to explicitly load multiple dependent web resources when you register a script for a form event, ribbon command, or ribbon enable rules. With dependency configuration, you can register the primary script and let the dependency configuration load the other resources your code depends on.
It's important to note that web resource dependencies don't provide any control over the order in which the web resources load. All the web resources are loaded asynchronously and in parallel. If you have a JavaScript web resource that depends on another JavaScript web resource to load and initialize before it can initialize, you need to manage that dependency in another way.
Use client script libraries
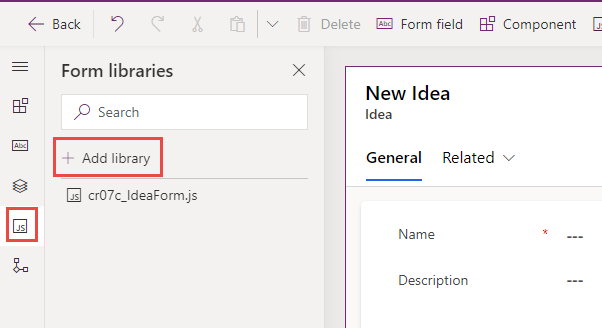
Once configured as a script web resource, client script libraries can be associated with ribbon commands and form events. To associate a script with a form, select the Form libraries in the tool bar and then Add library.
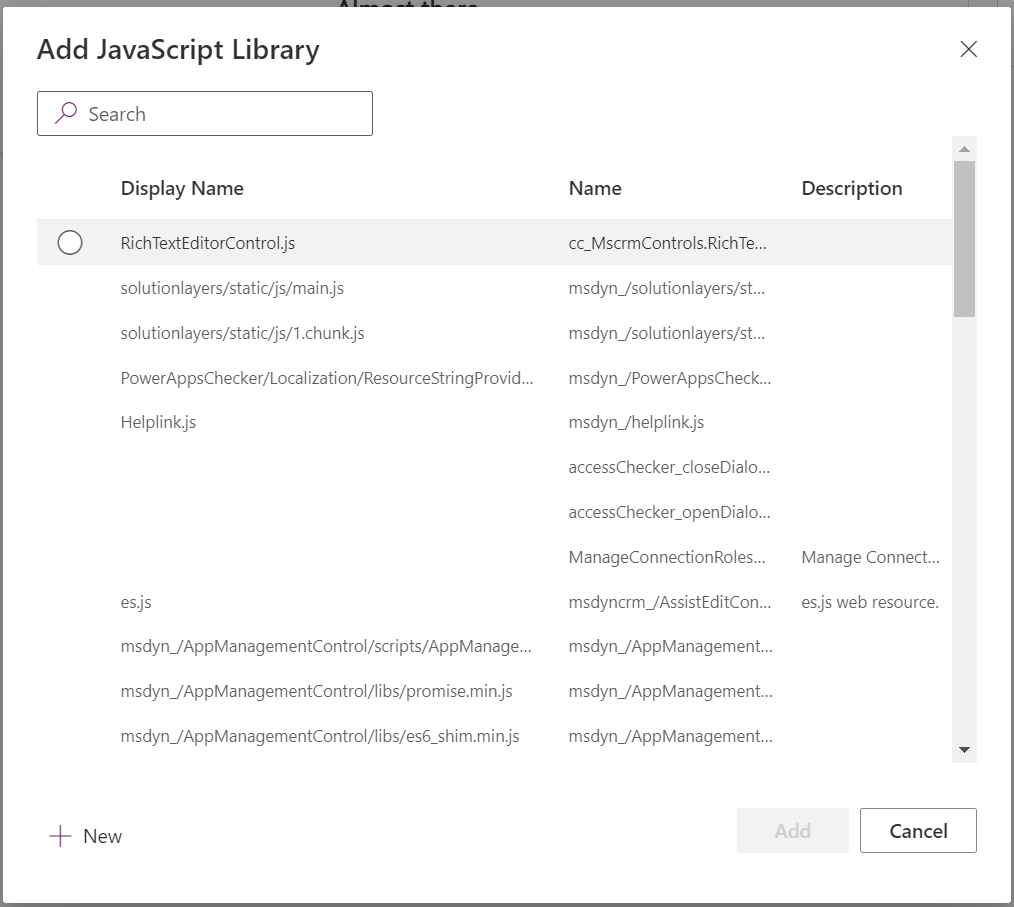
From the Add library dialog, you can either associate an existing uploaded script web resource or create a new one.
Associating the script library with the form is only required once per script for each form, regardless of how many event handlers you register on that form.
As you're building your client script logic and need to make changes after the initial upload, you would return to the script web resource in the solution and upload the new version of the file. After uploading, you must publish the script web resource so the app uses the latest changes.
Next unit: Event handlers
Event handlers
Client scripting logic runs as event handlers for form events. You must register your event handlers to have your logic executed. Registration for common events can be done via the form properties dialog or from code. Some events can only register with code. Event handlers can run on multiple forms but must be registered separately on each form.
Register via form properties
Registering event handlers using form properties creates a static configuration of event handlers at design time. Each time the form loads, the same event handlers run. Unlike when you register the event handler with code, logic can determine what should be registered.
In the form designer you can register event handlers for the following events:
Form - This handler allows you to register OnLoad and OnSave event handlers.
Tabs - This handler allows you to register events for each tab on the form for tab state change. Commonly this is used to know if a tab is expanded so you can do something like dynamically load data.
Columns - This handler allows you to register an event handler if column data is changed.
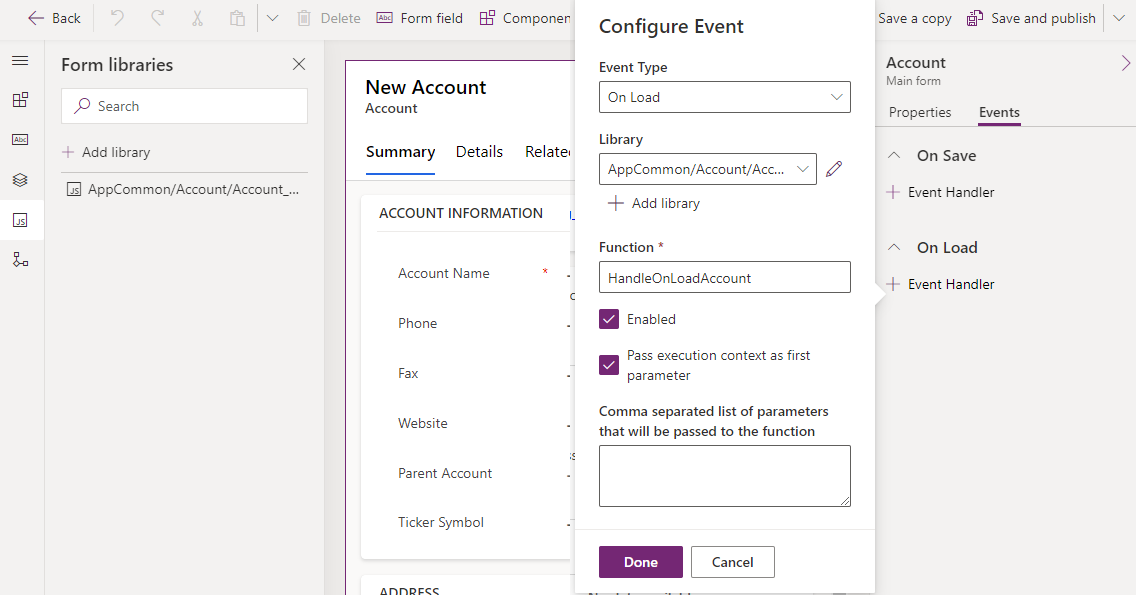
The following is an example of registering an OnLoad event handler for the account table.
One common pattern is registering an OnLoad handler and then registering the remaining event handlers via code in the OnLoad event handler logic. The benefit of this approach is that when you need your logic to run on multiple forms, you don't have to register all the event handlers on each form. Another advantage is if you need to dynamically determine some of the event handlers, you can use logic to decide whether to register a handler. For example, you may want to skip registering an event handler for a column if you can determine when the form is loaded and if this column is read-only or hidden.
Register using code
Registering event handlers using code is possible for all handlers except OnLoad, which must be registered using configuration. You can then use the OnLoad handler to register other handlers in code. The following is an example of registering an OnChange handler on the account number column in the account table by performing the following steps:
Create a function that runs in the OnLoad event of the account form.
In that function, call addOnChange to register the function to call when the account number column changes.
Register the OnLoad event handler on the account form properties.
This code displays a form level notification whenever the account number column data changed.
There are many other client side events for which you can register handlers.
Next unit: Context objects
Context objects
When creating event handlers and using the client scripting API, you should understand the context objects available and how to use them. The purpose of the context objects is to give you information about the context in which your code is executing. This context ensures you don't have to hardcode the information in your logic. This context allows you to create more generic functions and makes your functions less sensitive to the specific layout structure of the UI components you're working with.
Execution context
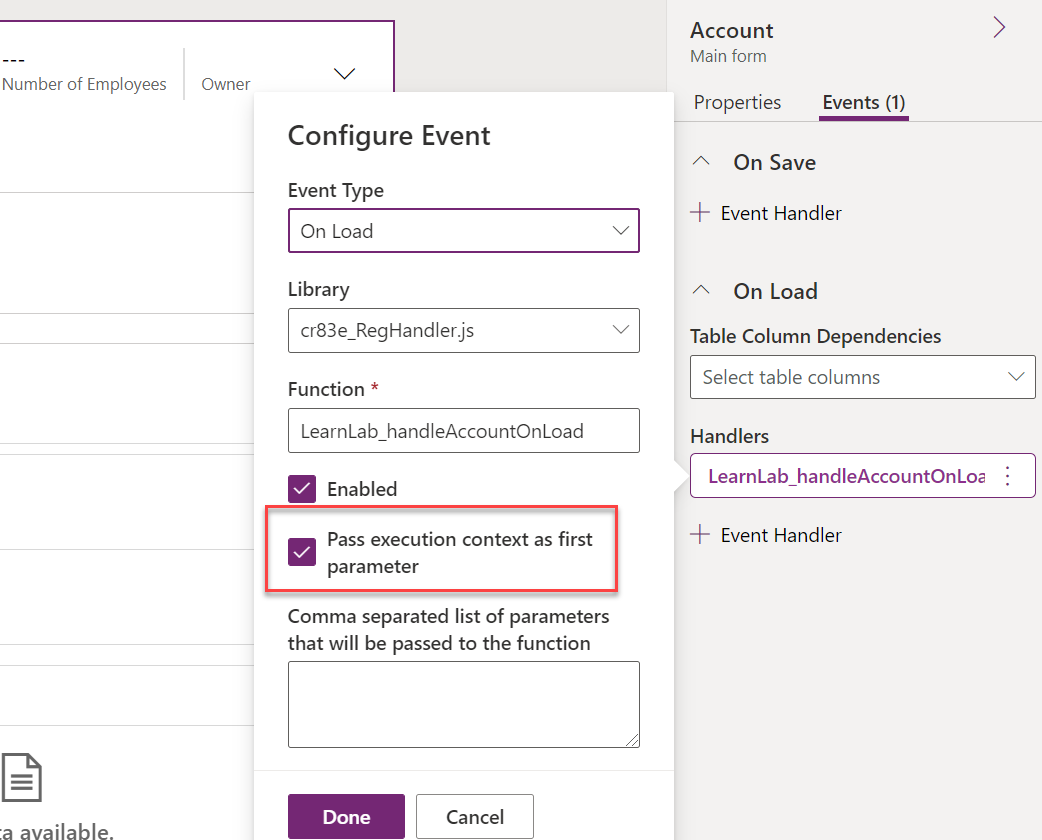
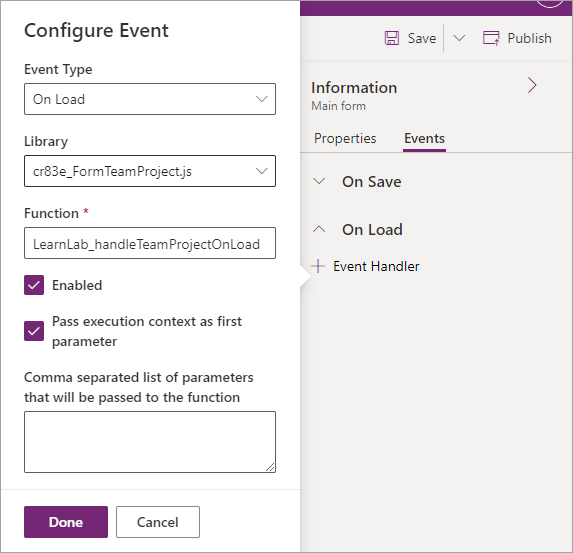
When you register an event handler, you can have the execution context passed as the first parameter. When you register the event handler using form properties, this is an option that you can enable. The image shows registering an OnLoad handler and enabling execution context.
Typically, it's a good idea to always have this option selected when you register an event handler using form properties. When you register an event handler using code, this option is automatically selected.
Your function definition that takes execution context as the first parameter would look like this:
The most common use of the execution context is to retrieve the form and grid contexts. Another useful method in this context is getEventSource. The event source returns a reference to the object that the event occurred. This object allows you to write generic handlers that interrogate the event source at run time to find out which control the event occurred on. This object can be helpful when writing one method you plan to register on events for multiple controls instead of registering a separate event handler for each control.
Form context
The Client API form context (formContext) references the form or an item on the form, such as a quick view control or a row in an editable grid, against which the current code runs. You can retrieve the formContext object from the execution context using the getFormContext function.
Before the form context, the item or form was available using the global Xrm.Page object. With the latest version, the Xrm.Page object is deprecated, and you should use the getFormContext method of the passed in the execution context object to return a reference to the appropriate form or an item on the form. So, instead of writing code like the following.
You would instead write the below code using formContext.
You can learn more about the deprecation of Xrm.Page.
The below diagram is a high-level overview of the properties and methods that are available within the form context:
Data object
The data object (formContext.data) is intended to be used for any table and process data manipulation within the form.
This table is a summary of each of the data object's containing objects and collections:
| Attributes | Collection of non-entity data on the form. Items in this collection are of the same data type as the attributes collection on entity, but it's important to note that they aren't attributes of the form table. |
| Entity | Provides methods to retrieve information that are specific to the row that is displayed on the page, the save method, and a collection of all the attributes that are included on the form. Attribute data is limited to attributes that are represented by fields on the form versus all fields that are available in the entity configuration. For more information, see formContext.data.entity. |
| Process | Provides objects and methods to interact with the business process flow data on a form. For more information, see formContext.data.process. |
UI object
The UI object (formContext.ui) provides methods to retrieve information about the user interface, and also collections for several sub components of the form or grid.
This table summarizes each of the UI object's containing objects and collections.
| Controls | Collection of all the controls on the page. See Collections for information about the collections, controls, and the control objects in the collection. |
| FormSelector | Use the formSelector.getCurrentItem method to retrieve information about the form that is currently in use. Use the formSelector.items collection to return information about all the forms that are available for the user. |
| Navigation | A collection of all the navigation items on the page. See formContext.ui.navigation item for information about the items in the collection. Navigation isn't available for Microsoft Dynamics 365 for tablets. For automating overall application navigation, we tend to use the Xrm.Navigation namespace. |
| Process | Provides objects and methods to interact with the business process flow control on a form, such as setting its visibility. For more information, see formContext.ui.process. |
| QuickForms | A collection of all the quick view controls on a form. For more information, see formContext.ui.quickForms. |
| Tabs | A collection of all the tabs on the page. See formContex.ui.tabs for information about the items in the collection. |
It's common to use the data object instead of the UI object if you need to get or set a table column value. The data object has only a single attribute representing the table column value. With the UI object, you can have multiple controls for the same table column on a form, each with a reference to the attribute. So, it's easier to work with the data object to manipulate the attribute value and the UI object if you want to work with the controls that represent that attribute on the form.
Using the context objects in your scripts makes them more resilient to change on the form and in the client API.
Next unit: Client scripting common tasks
Client scripting common tasks
The client API object model is extensive and rich. As you get familiar with the client scripting, you realize that you can use many API objects and methods to implement your logic. In this unit, we look at some of the common tasks you perform and the techniques to use to accomplish them.
Access Dataverse column data
A Dataverse column is in the object model as an attribute object. You can use the getAttribute() method of the formContext object to quickly locate either a specific attribute or all attributes present on the form. Each attribute object includes some common methods and other methods depending on the attribute data type.
Note
This sample code assumes that the attributes and controls used are present. Most of the methods return null if objects are not available and usual defensive checks should be used in practice.
Tip
Collections returned by Client API methods have some helpful methods that you can use to iterate through the elements. For more information, see Collections (Client API reference) in model-driven apps - Power Apps.
| Access by name | javascript var nameAttribute = formContext.getAttribute("name"); Assigns the attribute for the Account Name column to the nameAttribute variable. If attribute isn't present on the form, getAttribute method returns null value. |
| Access all attributes | javascript var allAttributes = formContext.getAttribute(); Assigns an array of all the attributes in the formContext.data.entity.attributes collection to the allAttributes variable. |
Use attributes
| Get the value of an attribute | javascript var nameValue = formContext.getAttribute("name").getValue(); Assigns the value of the Account Name column to the nameValue variable. |
| Set the value of an attribute | javascript formContext.getAttribute("name").setValue("new name"); Sets the value of the Account Name column to “new name”. |
| Get the currently selected option object in an OptionSet attribute (OptionSet attribute describes the Dataverse Choice column) | javascript var addressTypeOption = formContext.getAttribute("address1_addresstypecode").getSelectedOption(); Assigns the selected option in the Address Type column to the addressTypeOption variable. |
| Determine whether an attribute value has changed in the user interface since the form has been opened | javascript var isNameChanged = formContext.getAttribute("name").getIsDirty(); Assigns a Boolean value that indicates whether the Account Name column value has changed to the isNameChanged variable. |
| Change whether data is required in a column in order to save a record | javascript formContext.getAttribute("creditlimit").setRequiredLevel("required"); Makes the Credit Limit column required. javascript formContext.getAttribute("creditlimit").setRequiredLevel("none"); Makes the Credit Limit column optional. |
| Determine whether the data in an attribute is submitted when the record is saved | javascript var nameSubmitMode = formContext.getAttribute("name").getSubmitMode(); The nameSubmitMode variable value is either always, never, or dirty text to represent the submitMode for the Account Name column. |
| Control whether data in an attribute is saved when the record is saved | javascript formContext.getAttribute("name").setSubmitMode("always"); The example forces the Account Name column value to always be saved even when it hasn't changed. |
| When column level security has been applied to an attribute, determine whether a user has privileges to perform create, read, or update operations on the attribute. | javascript var canUpdateNameAttribute = formContext.getAttribute("name").getUserPrivilege().canUpdate; Assigns a Boolean value that represents the user’s privilege to update the Account Name column to the canUpdateNameAttribute variable. |
Access form controls
| Access all the controls for a specific attribute | javascript var nameControls = formContext.getAttribute("name").controls.get(); Assigns an array of all the controls for the name attribute to the nameControls variable. Most of the attributes are represented by one control but there may be more than one if a column has been added to the form more than once. |
| Access a control by name | javascript var nameControl = formContext.getControl("name"); The first control added to a form for a column has the same name as the column. Each of the other control names has an index number appended to the name. For example, three controls for the name column have the names: name, name1, and name2 respectively. |
| Access all controls | javascript var allControls = formContext.getControl(); Assigns an array of all the controls in the formContext.ui.controls collection to the allControls variable. |
Use form controls
Control objects like attribute objects have a common set of methods regardless of the type. They also have specialized methods based on the type of control.
| Determine if a control is visible | javascript var isNameVisible = formContext.getControl("name").getVisible(); Assigns a Boolean value to the isNameVisible variable that represents whether the Account Name column is visible. |
| Hide or show a control | javascript formContext.getControl("name").setVisible(false); Hides the Account Name column. |
| Get a reference to the attribute for the control | javascript var nameAttribute = formContext.getControl("name").getAttribute(); Assigns the attribute for the control for the Account Name column to the nameAttribute variable. |
| Disable or enable all controls for an attribute | javascript formContext.getAttribute("name").controls.forEach(function (control, index) { control.setDisabled(true); }); Remember that any attribute may have multiple controls. |
| Change the label for a control | javascript formContext.getControl("name").setLabel("Company Name"); Sets the label for the Account Name column to the text Company Name. |
| Get the parent of a control | javascript var parentSection = formContext.getControl("name").getParent(); Assigns the parent control of the Account Name column to parentSection variable. |
| Set focus on a control | javascript formContext.getControl("name").setFocus(); Set current input focus to the Account Name column. |
Use tabs and sections
Each form has collection of tabs. Each tab has a collection of sections. Each section has a collection of controls. You can programmatically access these elements and use their methods.
| Show or hide a tab | javascript formContext.ui.tabs.get("general").setVisible(false); Hides general tab. |
| Change the label for a tab | javascript formContext.ui.tabs.get("general").setLabel("Major"); Sets the label of the general tab to the text Major. |
| Show or hide a section | javascript formContext.getControl("industrycode").getParent().setVisible(false); Hides section containing the Industry Code column. |
Use entity data
The following table contains methods you can use to get information about the current record.
| Get the ID of the current record | javascript var recordId = formContext.data.entity.getId(); Assigns a current record unique identifier to the recordId variable. If the form is opened to create a new record, null value is returned. |
| Save the current record | javascript formContext.data.entity.save(); Use saveandclose or saveandnew to perform the equivalent actions using the Save & Close or Save & New. |
| Determine whether any data in the current record is changed. | javascript var isDirty = formContext.data.entity.getIsDirty(); Assigns a Boolean value that indicates whether any column value on the form has changed to the isDirty variable. |
Next unit: Exercise - Use client script to hide a form section
Exercise - Use client script to hide a form section
In this exercise, you use client script to implement the business requirement of hiding the Status section when a project start date isn't provided or in the future.
Important
Use a test environment with Microsoft Dataverse provisioned and the sample apps enabled. If you do not have one you can sign up for the community plan.
Task 1 - Prepare solution with the form
In this task, you create a solution, add an existing table to the solution, and prepare the main form of the table you added to the solution.
Navigate to Power Apps maker portal and make sure you are in the correct environment that has the sample apps enabled.
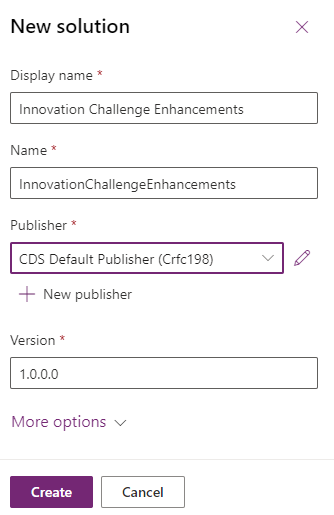
Select Solutions and then select + New solution.
Enter Innovation Challenge Enhancements for Display name, select CDS default publisher for Publisher, and select Create.
The Innovation Challenge Enhancements you created should open.
Select + Add existing and then select Table.
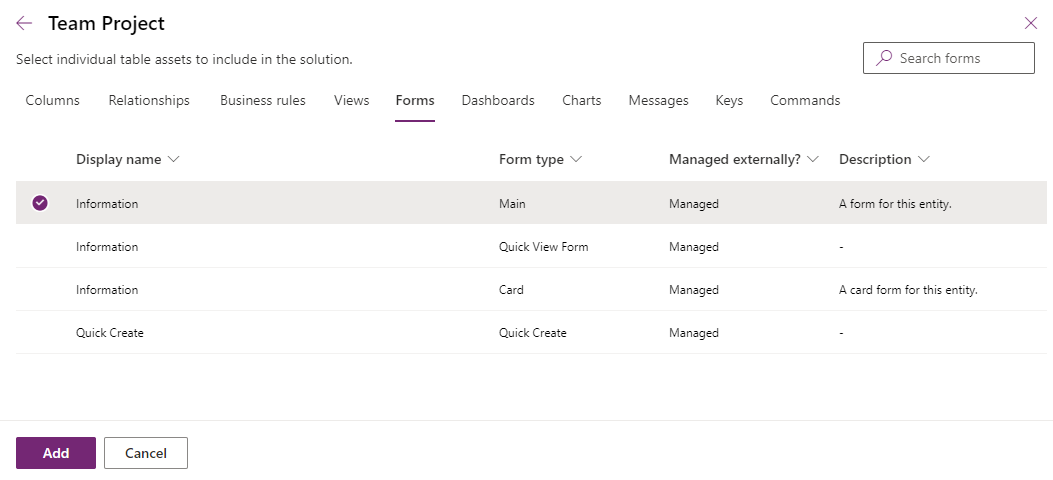
Enter team in the search textbox, select Team Project, and then select Next.
Note
If you are unable to locate Team Project table you may not have the sample apps in your environment. Select another environment or create a new one with the sample apps installed.
Select the Select objects button.
Select the Forms tab, select the Information form of Form type Main, and then select Add.
Select Add again.
Open the Team Project table you just added to the solution.
Select the Forms in the Data experiences card.
Open the Information form of Form type Main.
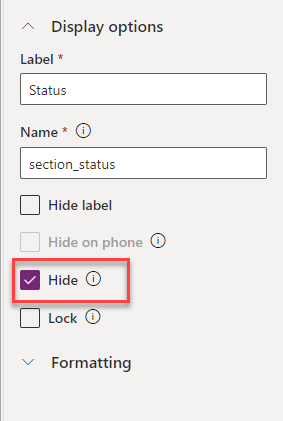
Select the Status section.
In the Properties pane, change the Name to section_status, and check the Hide checkbox. By default, a GUID is assigned as the section name. Change it to a more meaningful name to reference in your scripts. You also hide the section by default to reduce the jarring effect of showing and then hiding on load of the form.
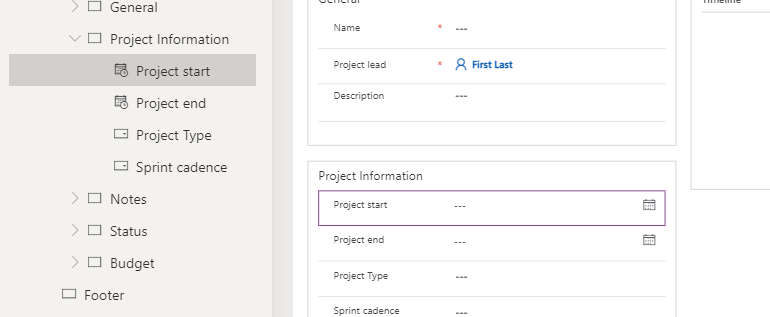
Go to the Tree view and select the General tab.
In the Properties pane, change the Name to tab_general.
Select the Project start column.
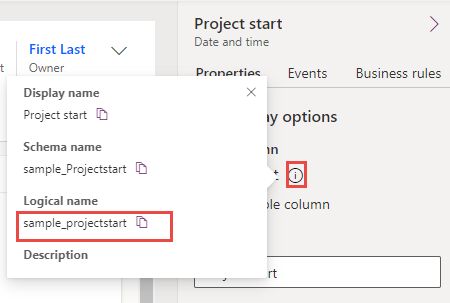
Go the Properties pane and select the (i) button next to the Table column name.
Copy the Logical name (sample_projectstart) and paste it into a notepad. You use this name in your script to reference the data column.
Select Save and publish to save your changes. Wait for the publishing to complete.
Select the Back button.
Select All.
Select Publish all customizations and wait for the publishing to complete.
Task 2 - Build the client script
In this task, you create a script that shows/hides the status section based on the project start date.
Hide the status section. If the project start date is empty or in the future, otherwise show the status section.
Start a new instance Visual Studio Code or use your favorite code editor. You can download and install Visual Studio Code.
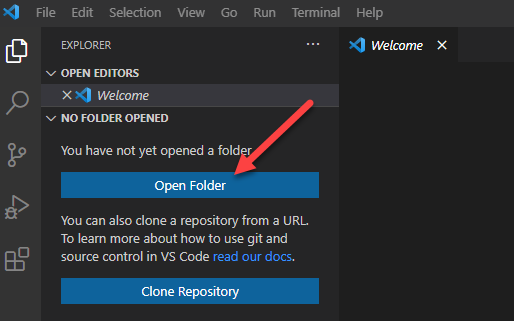
Select Open Folder.
Create a folder in your Documents folder and name it ClientScriptLab.
Select the ClientScriptLab folder you created and Select Folder.
Hover over the CLIENTSCRIPTLAB folder and select New File.
Name the file FormTeamProject.js.
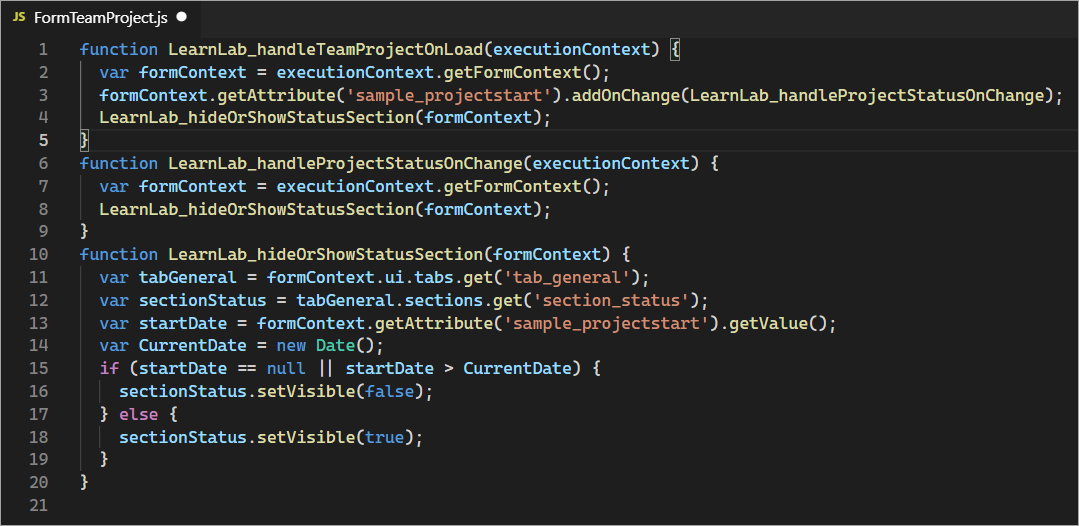
Add the below functions to FormTeamProject.js. Your functions should have either unique names or use a namespace to ensure uniqueness.
Add this script to the OnLoad function. Notice the project start column name here sample_projectstart. This is the logical name you saved earlier. This code registers an onChange event handler and calls a common function to show/hide the section. You need to handle on change in case a project start date input changes the hide/show requirement.
Add this script to the OnChange function. This code simply gets the formContext and then calls the common function to hide/show.
Add this script to the hideOrShowStatusSection function. Notice the tab name tab_general, the section name section_status, and column name sample_projectstart.
Your script should now look like this image.
Select File and Save.
Task 3 - Upload the script
In this task, you load the script you created into your environment.
Navigate to Power Apps maker portal and make sure you are in the correct environment.
Select Solutions and open the Innovation Challenge Enhancements solution.
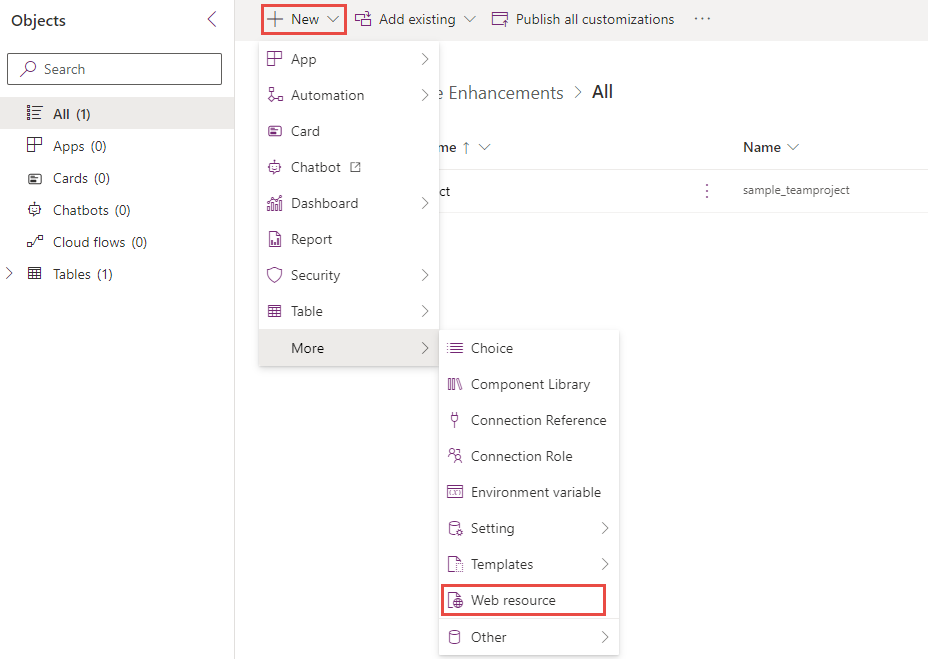
Select + New and then select More | Web resource.
Enter FormTeamProject.js for Name, enter FormTeamProject.js for Display name, select Java script (JS) for Type, and select Choose File.
Select the FormTeamProject.js file you created earlier and then select Open.
Select Save.
Your solution should now have the Team Project table and the FormTeamsProject.js web resource.
Don't navigate away from this page.
Task 4 - Edit form
In this task, you add JavaScript library to the Team Project main form and add an event handler for the On Load event.
Make sure you're still in the Innovation Challenge Enhancements solution.
Expand Tables and then expand the Team Project table.
Select Forms and open the Information form.
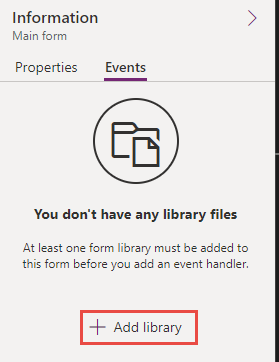
Go to the Properties pane, select the Events tab, and select + Add library.
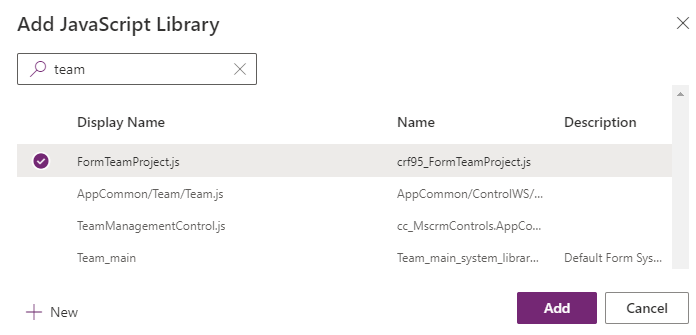
Enter team in the search textbox and press Enter. Select FormTeamProject.js, and select Add.
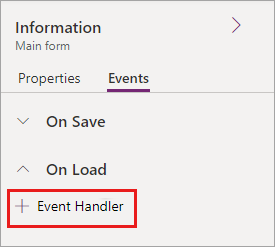
Expand the On Load section and select + Event Handler.
Enter LearnLab_handleTeamProjectOnLoad for Function, check the Pass execution context as first parameter checkbox, and select Done.
Select Save and publish and wait for your changes to be saved.
Select the Back button.
Select All.
Select Publish all customizations and wait for the publishing to complete.
Task 5 - Test
In this task, you test your script.
Navigate to Power Apps maker portal and make sure you are in the correct environment.
Select Apps and open the Innovation Challenge application.
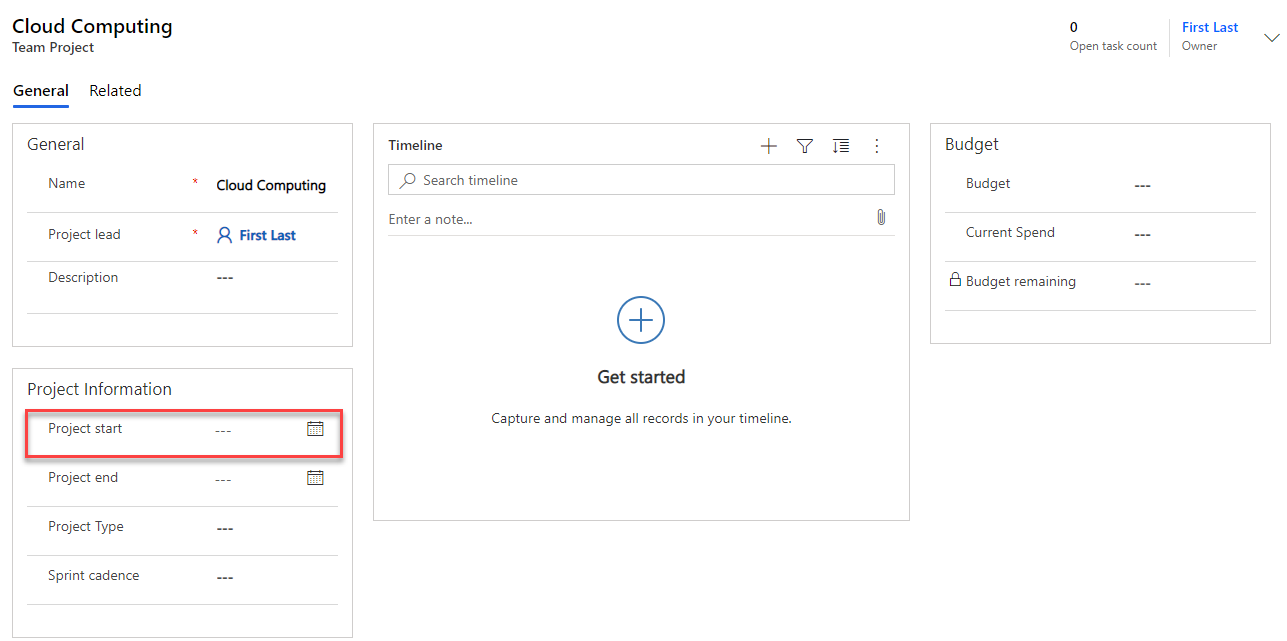
Select Team Projects and open the Cloud Computing team project.
The Status section should be hidden because the Project start column is empty.
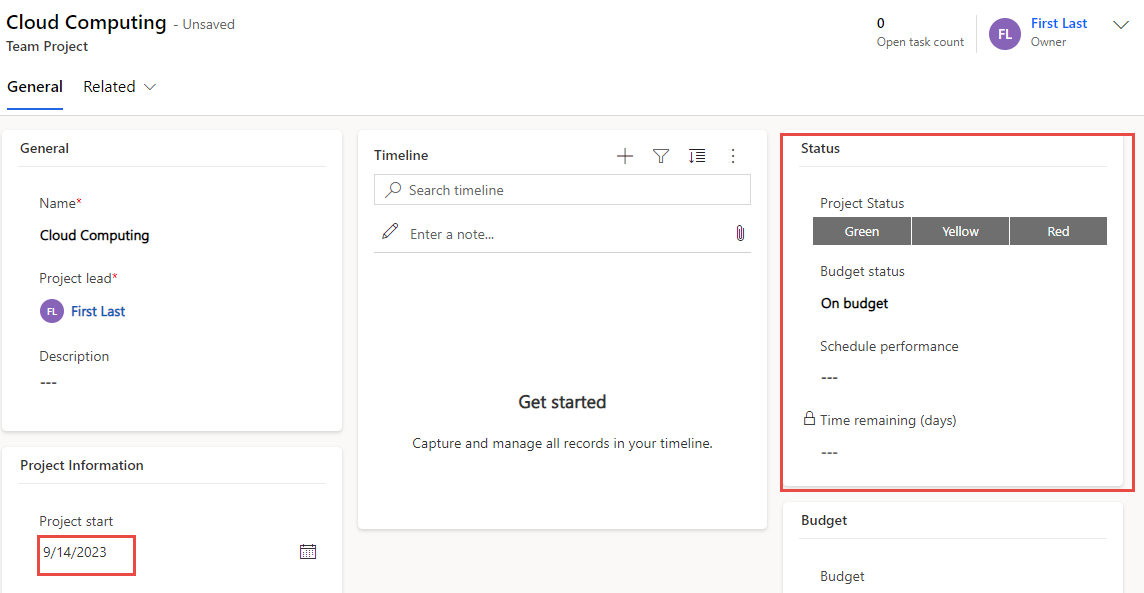
Press calendar icon next to the Project start and select today's date.
The Status section should become visible.
Change the Project start to a future date.
The Status section should now become hidden.
Change the Project start to a date in the past.
The Status section should become visible again.
You have now used JavaScript and Client API to implement business requirements that aren't possible to implement using declarative options like business rules.
Next unit: Check your knowledge
Check your knowledge
Answer the following questions to see what you've learned.
You need to retrieve the value of the firstname column of the contact record. What method would you use?
formContext.getAttributeValue("firstname")
formContext.getControl("fullname").getValue()
formContext.getAttribute("firstname").getValue()
getAttribute method of the form context returns the attribute object for the column firstname and getValue method returns the column's current value.
Your client script for the main form for the account table references column accountclassificationcode. How to ensure that the script doesn't break and works correctly when the other makers edit the form and potentially remove the column.
At the start of your script, add the following call require('accountclassificationcode').
Add the accountclassificationcode column to the script dependencies.
Web resources in Dataverse contain the list of dependent fields (columns). Adding a column to that list ensure that it can't be removed from the form and is always available for the script.
Mark accountclassificationcode column as read only.
Marking a column as read only ensures that the control is read-only when the form is opened in the app. It doesn't stop other makers from removing the column from the form and breaking the script.
You've been asked to hide a tab section on a model-driven app form when a record’s Status Reason column changes to a given value. Which events would you need to handle for this scenario?
Form OnLoad, Attribute OnChange
Handling Form OnLoad ensures that the tab section is shown or hidden when data row is loaded. Attaching a handler to the OnChange event of the Status Reason column shows or hides the section as the column value is changed.
Form OnLoad, Form OnSave
Attribute OnChange, Form OnSave














 Bengali (Bangladesh) ·
  English (United States) ·