
ARTICLE AD
Provide solutions to real-world scenarios.
100 XP
3 minutesIn the previous module for Power Automate, you learned how to build basic flows that save email attachments and send you reminders from your phone.
If you're a beginner with Power Automate, this module will expand your business flow skills. If you already have some experience, this module will tie concepts together and help fill in the gaps.
Be more productive, automatically, that's what Power Automate is all about.
Let's get started!
Exercise - Build an approval request
100 XP
8 minutesIn this unit, you'll learn how to build a business-friendly scenario that uses approvals.
In this scenario, anyone who has access to the Microsoft list can contribute tweets without knowing anything about Twitter. The social media team can then approve or reject those tweets allowing that team to remain in control of the account and the content that goes out to customers.
Prerequisites
Access to Power AutomateA Microsoft Office 365 account with access to SharePointA Twitter accountStep 1: Create a Microsoft Lists list for tweets
You'll use a template that starts an approval process whenever a new item is created in a specific list. If the item is approved, a tweet is posted to Twitter. For this unit, you'll change the process by adding steps that update a list with the approval response, indicate whether the item was approved, and add any comments that the approver added to the proposed tweet.
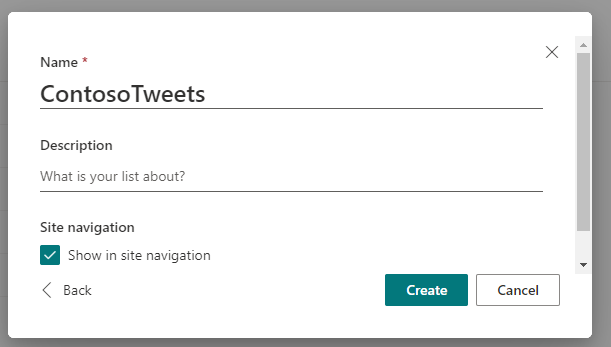
First, let's create the list.
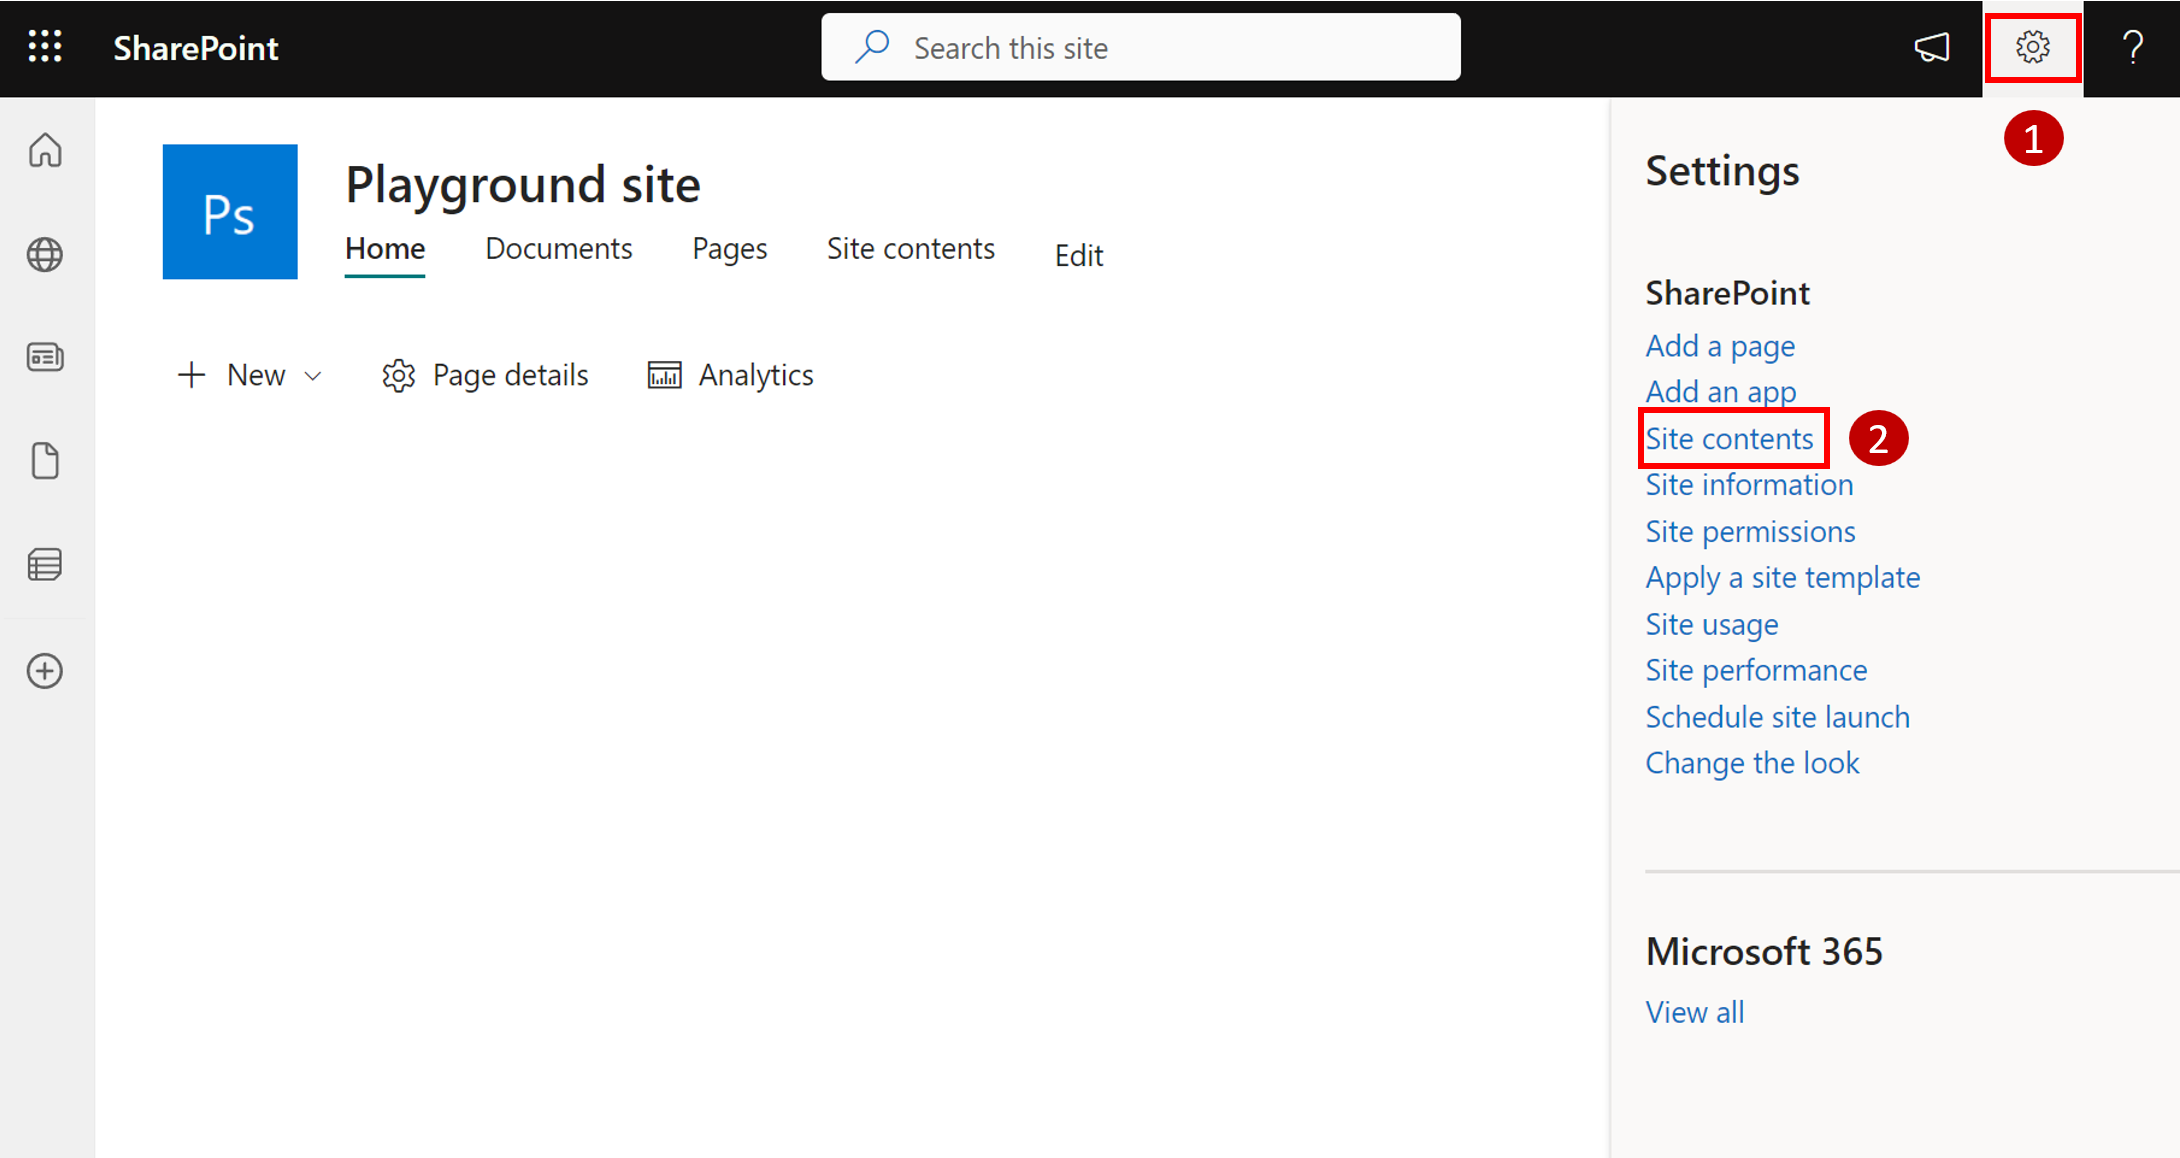
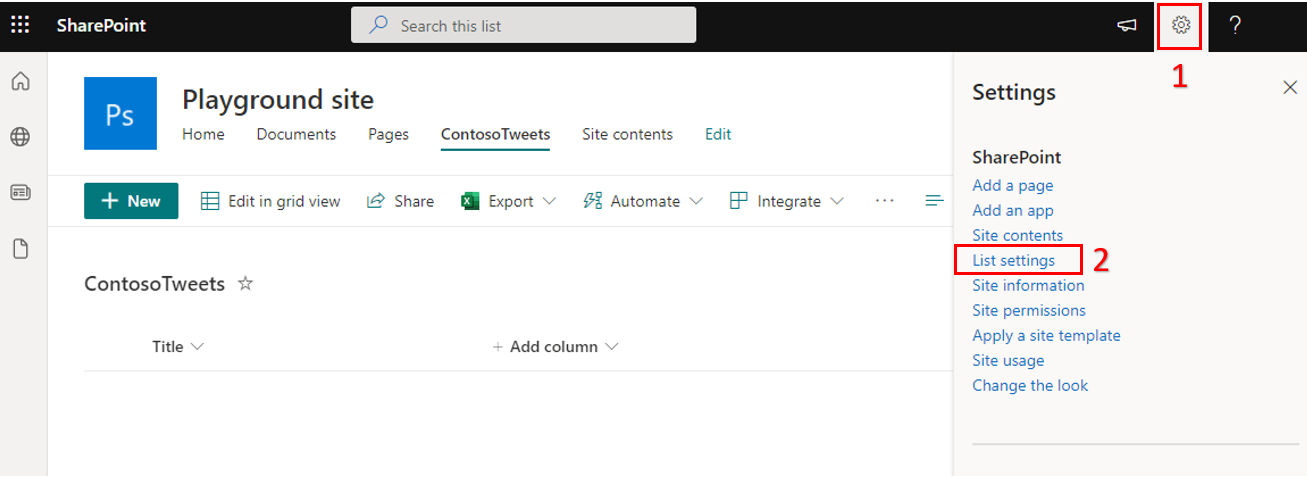
On your SharePoint site, select the gear settings icon on the top right and then select Site contents.
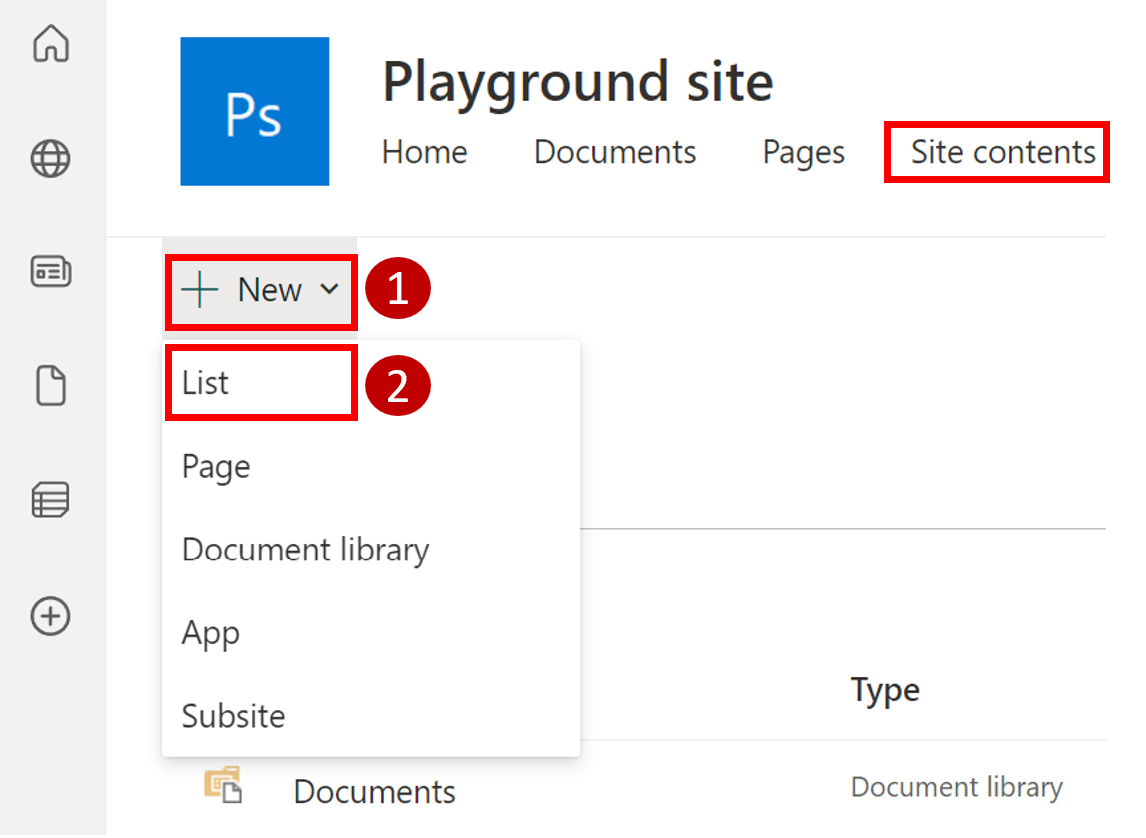
Select New and then select List.
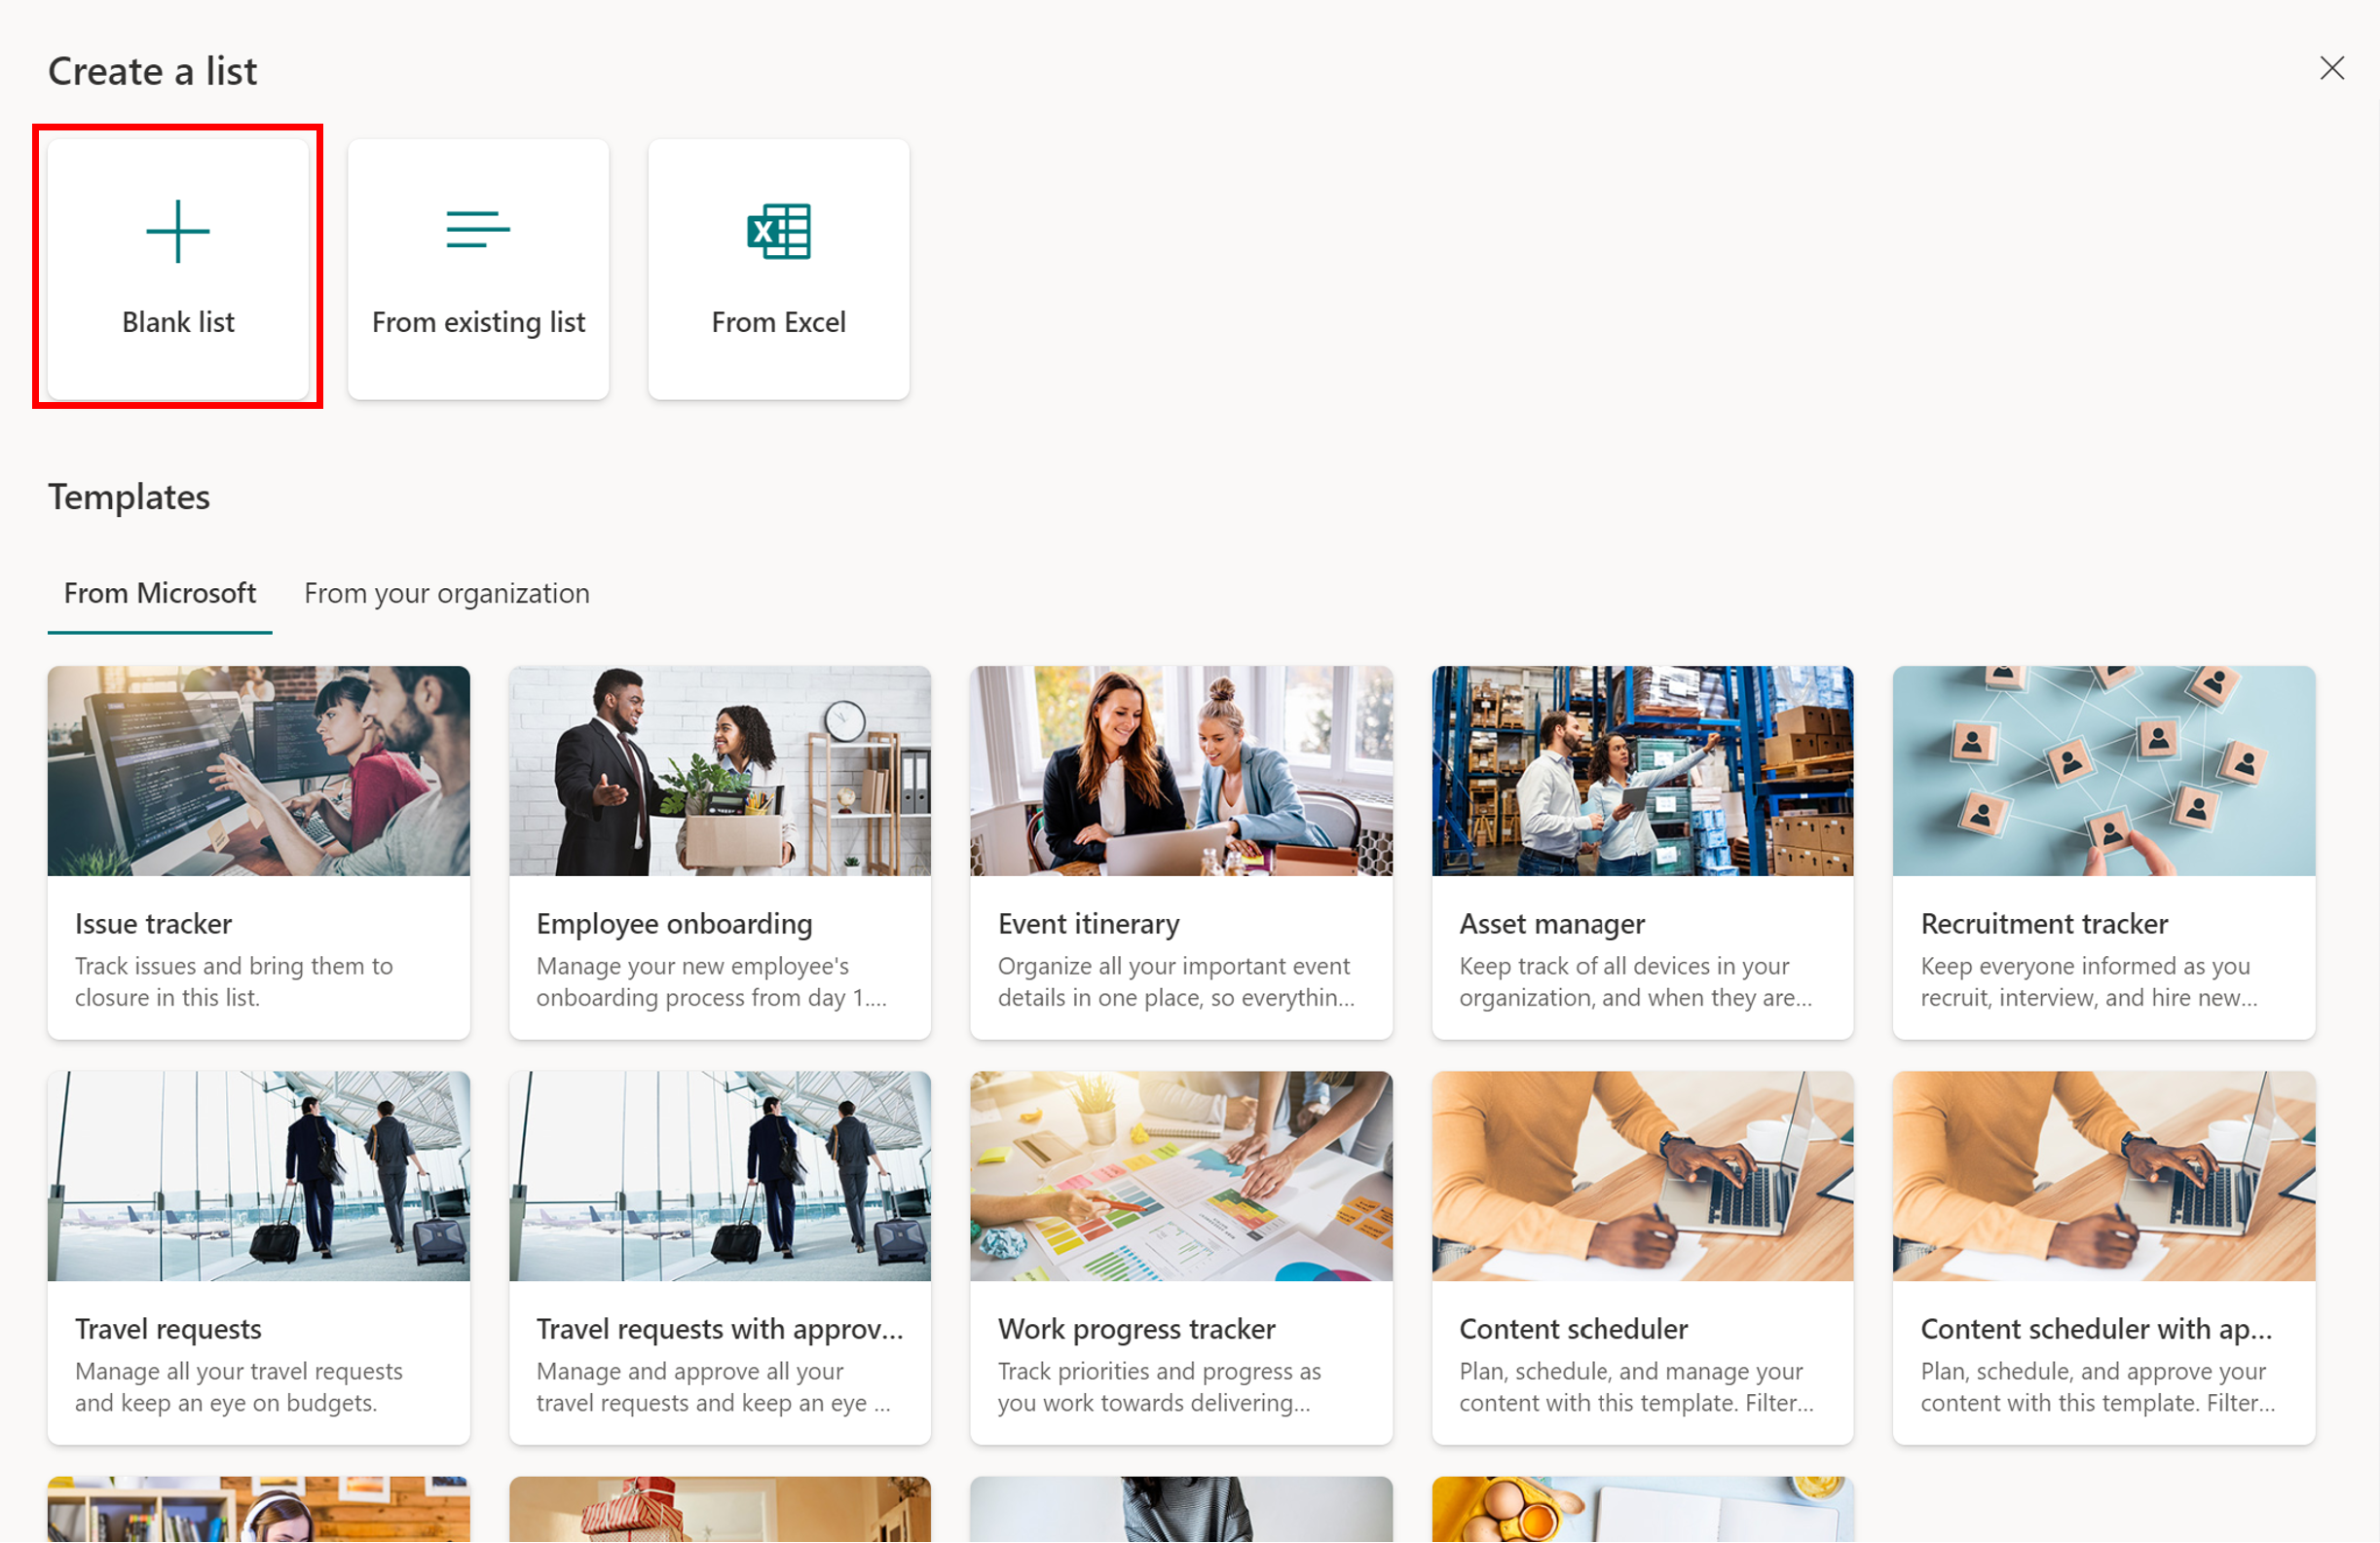
Select Blank list.
Name the list as ContosoTweets.
Select the gear settings icon on the top right and select List settings.
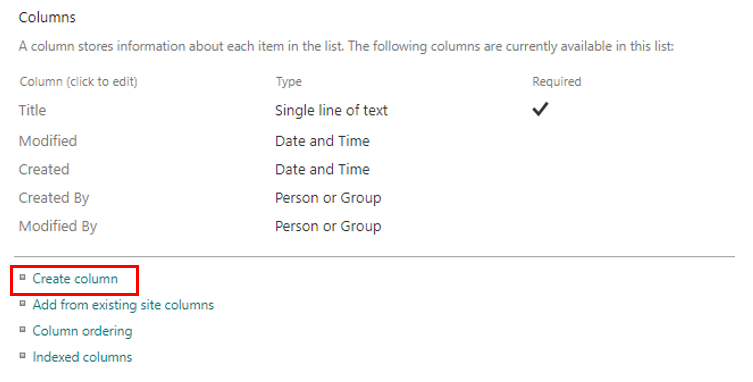
Open the list and select + Add column to add the following columns. Select Save after you create each column.
Add a Multiple lines of text column and name it TweetContent. This column will hold the content of the tweets that will require approval.
Add a Date and time column and name it TweetDate. Toggle the Include Time option to Yes.
Add a Yes/No column and name it ApprovalStatus. Set the Default value to No, which will ensure all items must be reviewed by the approver before the tweet can be approved.
Add a Single line of text column and name it ApproverComments. The approver can then add a comment about the approval status.
Copy the URL of the Microsoft list. You'll use it when you create the flow.
Step 2: Create an approval request flow
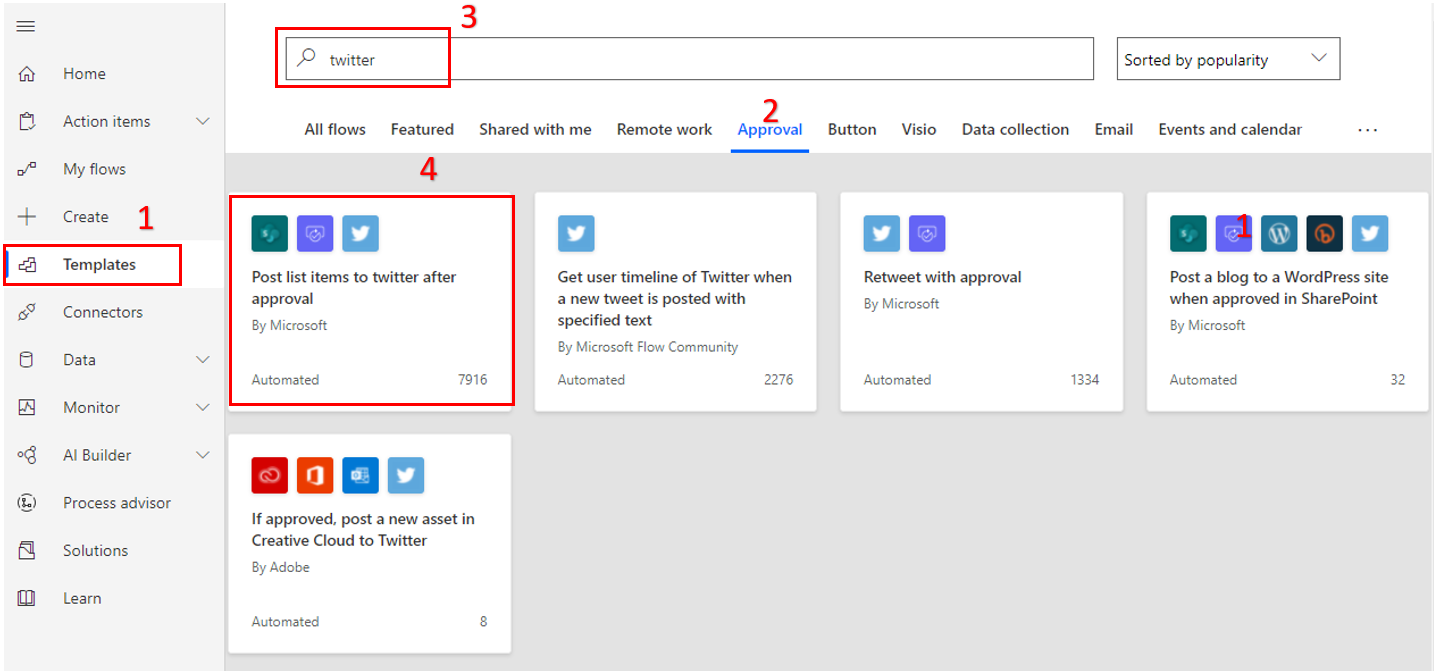
Sign in to Power Automate, and then select Templates.
Search Post list items to Twitter under Approval and select the appropriate template.
Make sure your account credentials for SharePoint, Approvals, and Twitter are entered and are correct. If any of these connections aren't entered, select the + icon next the connection and enter your credentials accordingly.
For Twitter authentication you'll receive a pop-up window similar to this one.
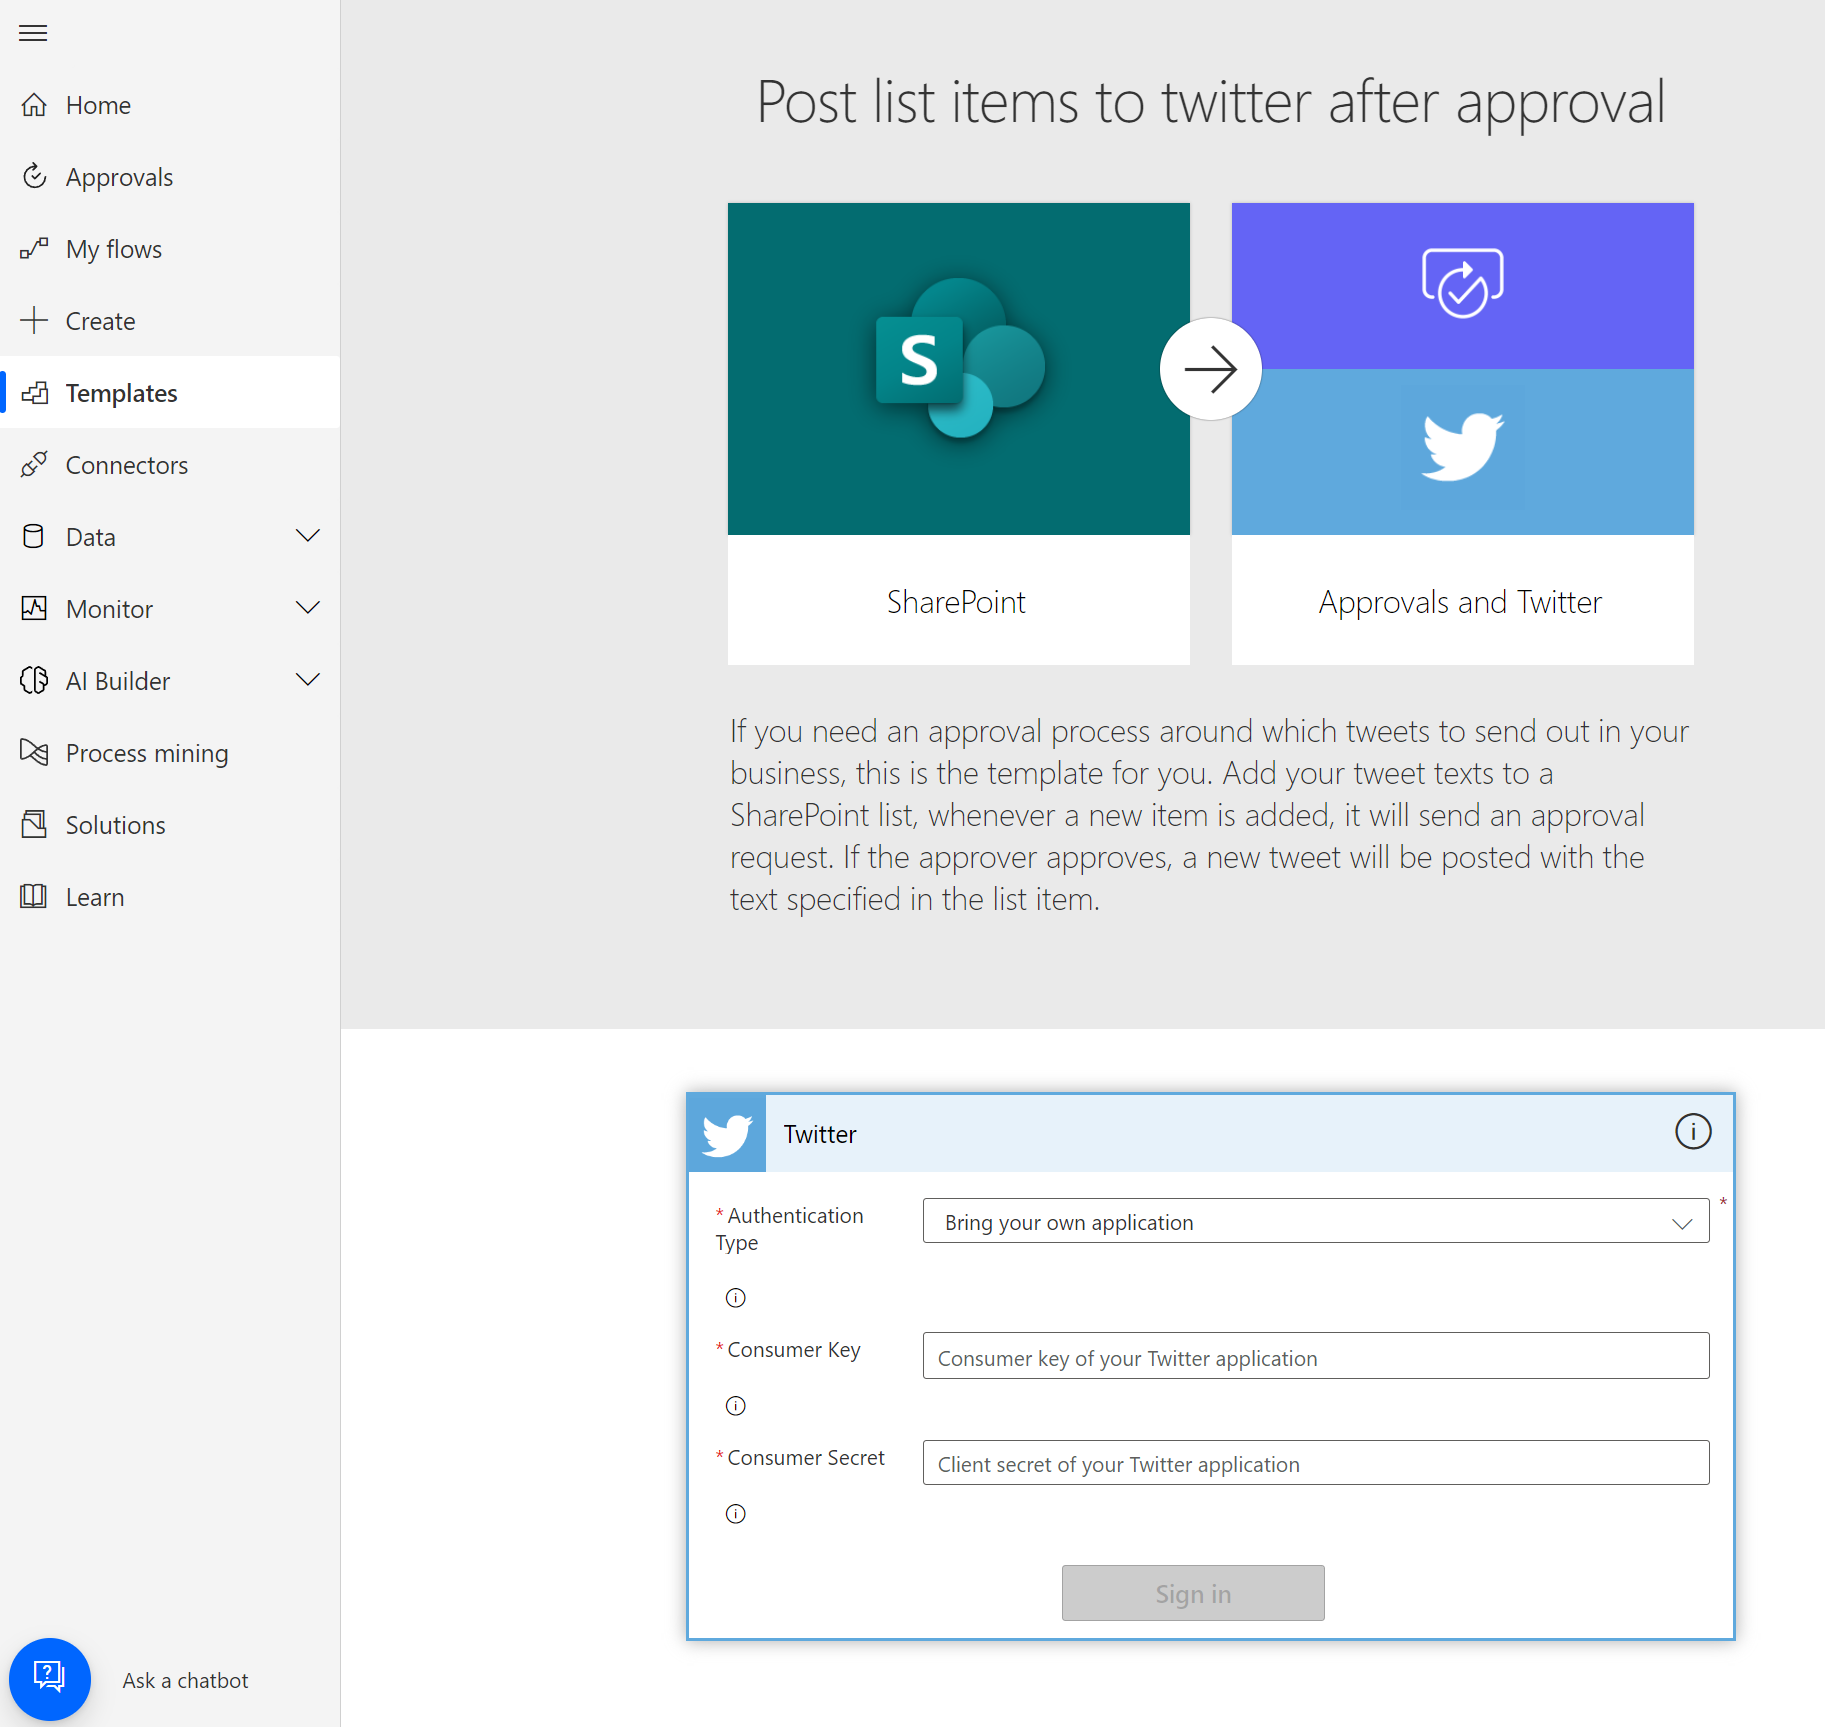
Once all of these connections are set up properly, select Continue to proceed.
In the When a new item is created trigger, enter the following values:
Site Address: Enter the URL of your team's SharePoint site.
List Name: Select ContosoTweets.
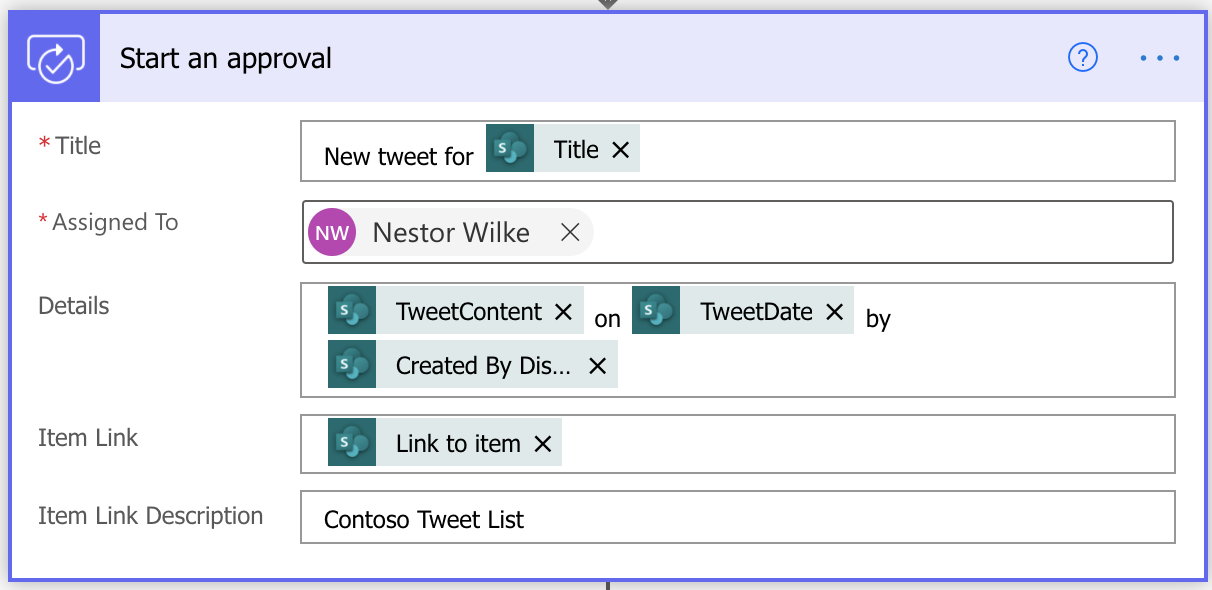
In the Start an approval action, set the Title field to *New tweet for *, and then select Title from the Dynamic content window.
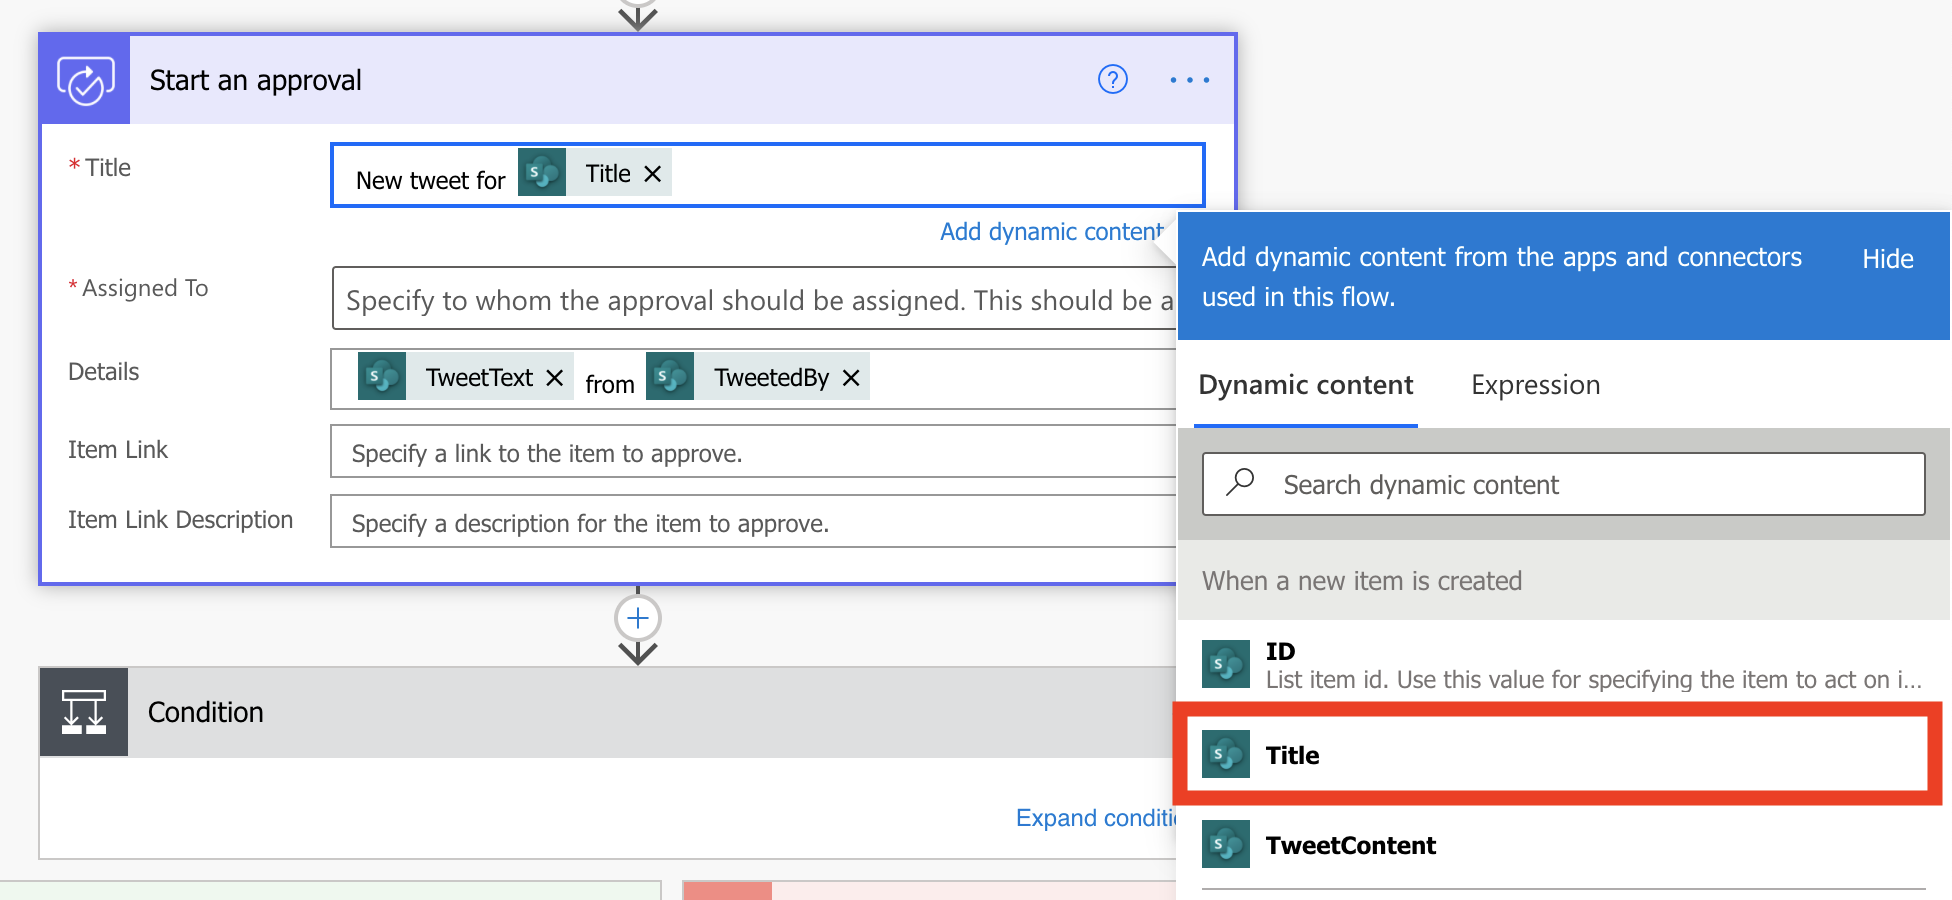
In the Assigned to field, enter and select either your name or the name of a test user.
In the Details field, remove the default items, add dynamic fields and text to get TweetContent on TweetDate by Created by DisplayName.
In the Item Link field, select Link to Item from the Dynamic content window.
In the Item Link Description field, enter Contoso Tweet List.
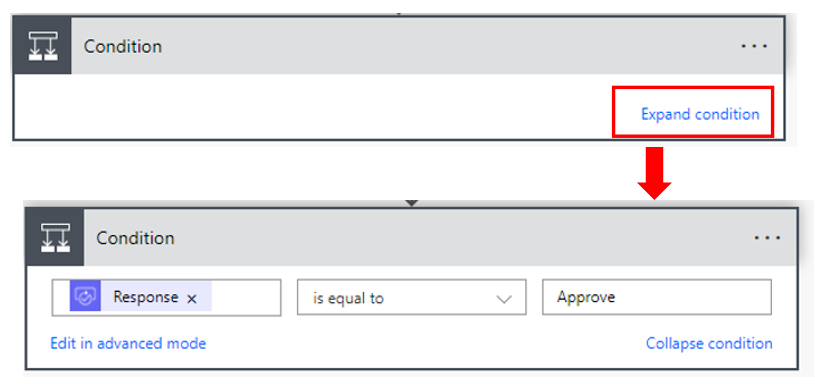
Select Expand condition and confirm the settings.
In the If yes section of the Condition, select Add an action.
Search for update item, and then select the SharePoint – Update item action.
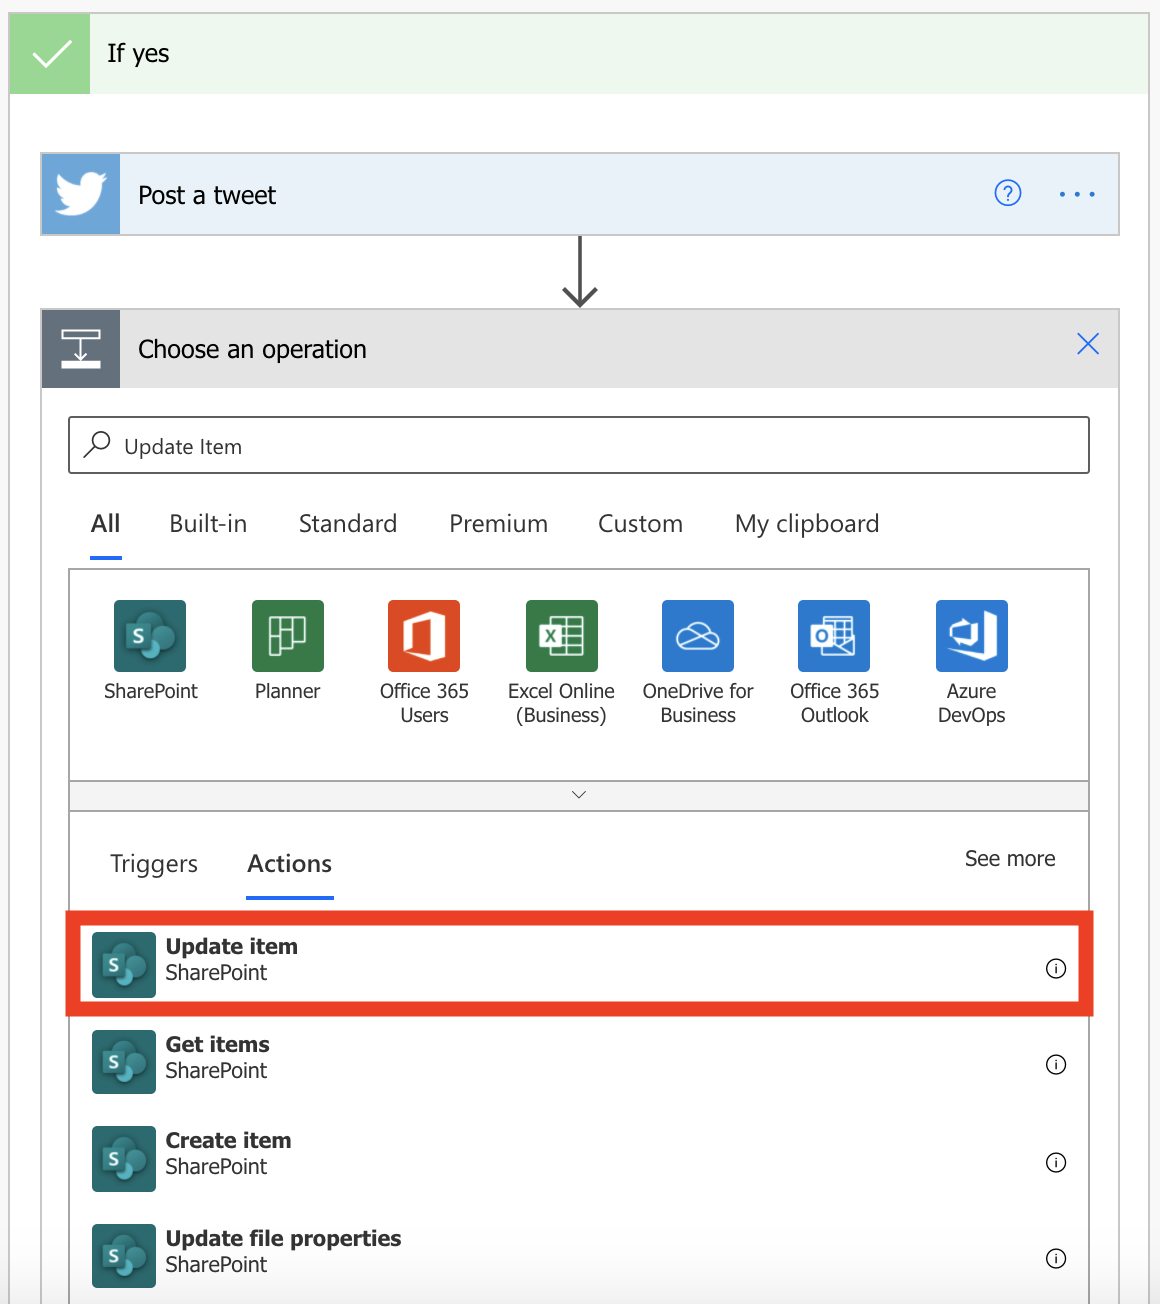
In the Site Address, enter the URL of the team's SharePoint site again.
In the List Name field, select ContosoTweets again.
In the Id field, add ID from the Dynamic content window. The Id field is used to match the actual tweet request in the list.
Select the Title field, and then search for and select Title under the When a new item is created action in the Dynamic content window.
Set the ApprovalStatus field to Yes.
In the ApproverComments field, under the Start an approval action, add Comments from the Dynamic content window.
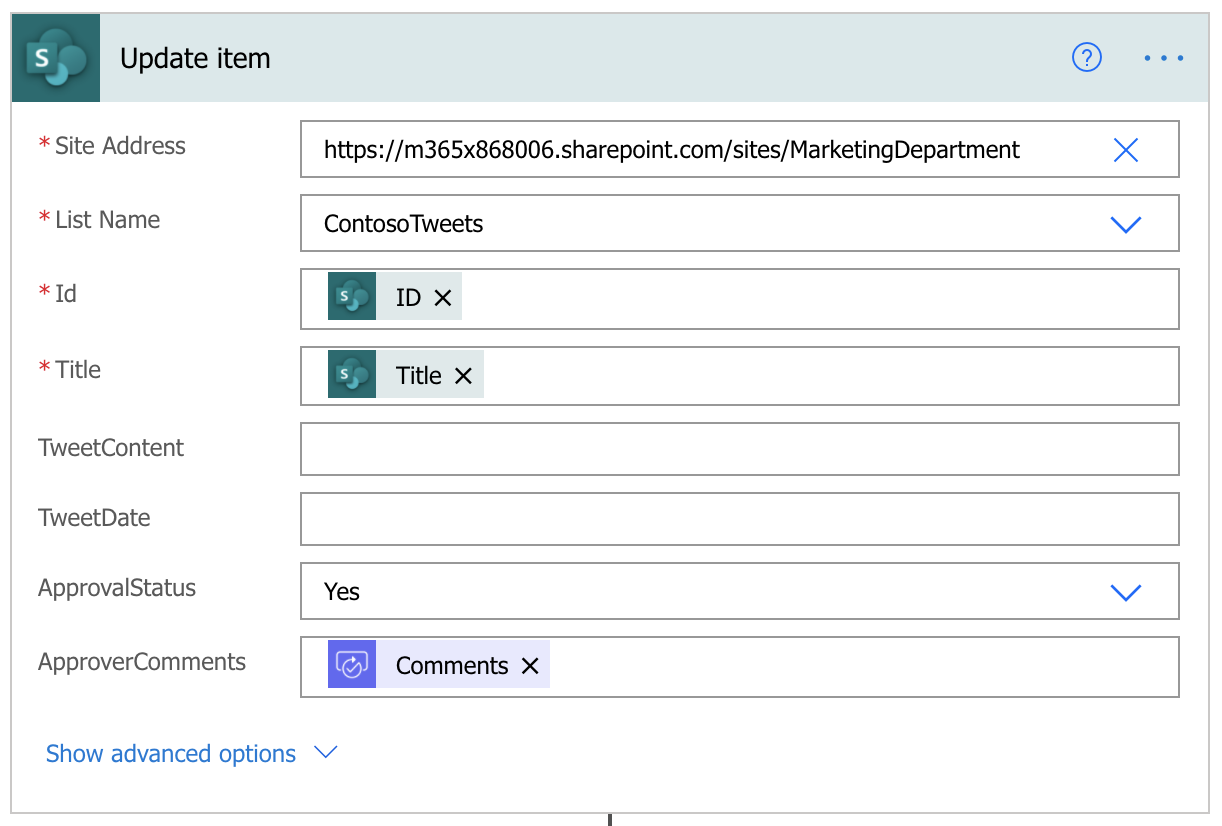
Select and drag Post a Tweet action below the Update Item action.
Expand the Post a tweet action by selecting the title bar.
Select the Tweet text field and remove Title and add TweetContent from the Dynamic content window. This step will create the actual tweet and then post it to Twitter when it's approved.
In the If no section of the Condition, select Add an action.
Repeat steps 12 through 18 to create a SharePoint – Update item action. Set the same values that you set for the If yes section of the Condition. The only difference is that you set the ApprovalStatus field to No this time.
Select Save.
Congratulations! You just created your first approval flow.
This unit showed just one way that Power Automate can empower your team to be more productive. Your team can contribute ideas, relevant news, or product guidance, but you maintain control over what's tweeted out to customers.
In the next unit, you'll see what it looks like when an approver receives a new request for a proposed tweet.
Exercise - Build a flow that processes an approval request
100 XP
5 minutesIn the previous unit, you learned how to build an approval process for tweets that are stored in a Microsoft Lists list. In this unit, you'll see what the experience looks like when an approver receives a new approval request.
Customize the SharePoint form via Power Apps
Before we test the Flow created in the previous unit, it's important to take the time to customize the SharePoint Form with Power Apps. If you're curious as to why, go to the ContosoTweets Microsoft Lists list and select + New to create an Item. The first thing you'll most likely notice is that users can create new SharePoint Items and Approve those Items themselves within the default SharePoint Form. For our example, this isn't significant, but in real-world scenarios, like you'll be creating for your companies and or organizations, restricting users from approving their own items as they're created is an important part of the Approval Process (when using SharePoint as a Datasource). There are many ways to customize your SharePoint Form to hide/show certain fields, these won't be covered in-depth in this unit, instead we'll open the list via Power Apps and remove the fields. By removing the fields from the SharePoint Form, the only way ApprovalStatus and ApprovalComments can be populated is through the Approval Flow process.
Navigate to the ContosoTweets list if you're not already there and select Integrate.
From the dropdown, select Power Apps and then select Customize forms.
Once Power Apps opens, in the Fields pane, select the ... next to the ApprovalStatus field and then select X Remove.
Repeat the previous step, for the ApproverComments field and the Attachments field. The only fields remaining on the form should be Title, TweetContent, and TweetDate.
In the upper left, select File and then select Save.
Once the Form has Saved, select Publish to SharePoint and then select Publish to SharePoint again.
Navigate back to the ContosoTweets list, refresh your browser and then select + New to create a New Item. If the SharePoint Form is still showing the old Form with the fields you removed, try refreshing the browser again and then select + New again. It can sometimes take a few minutes for the published changes to take effect, this is normal behavior when customizing a SharePoint Form with Power Apps.
Create a new item in our Microsoft Lists list
First, we need to add an item to our list. We can then process an approval request for that item.
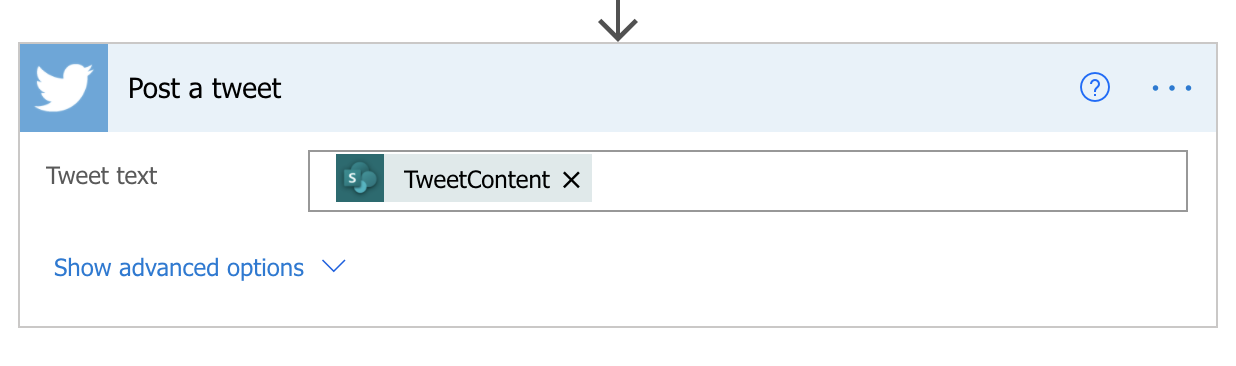
In SharePoint, open the ContosoTweets list that you set up in the previous unit, and then select + New to create a list item (tweet).
Enter the following values, and then select Save:
Title: PromotionsTweetContent: Check out the new product line of Contoso Electronics #OhSoContosoTweet Date: Today's date.
Review and approve the new item in Power Automate
In Power Automate, select My flows.
Select the Post list items to twitter after approval flow that you set up in the previous unit.
Under 28-day run history, select the flow that's running, or completed.
Select the When a new item is created trigger. Make sure that the information for the list item that you just created is shown.

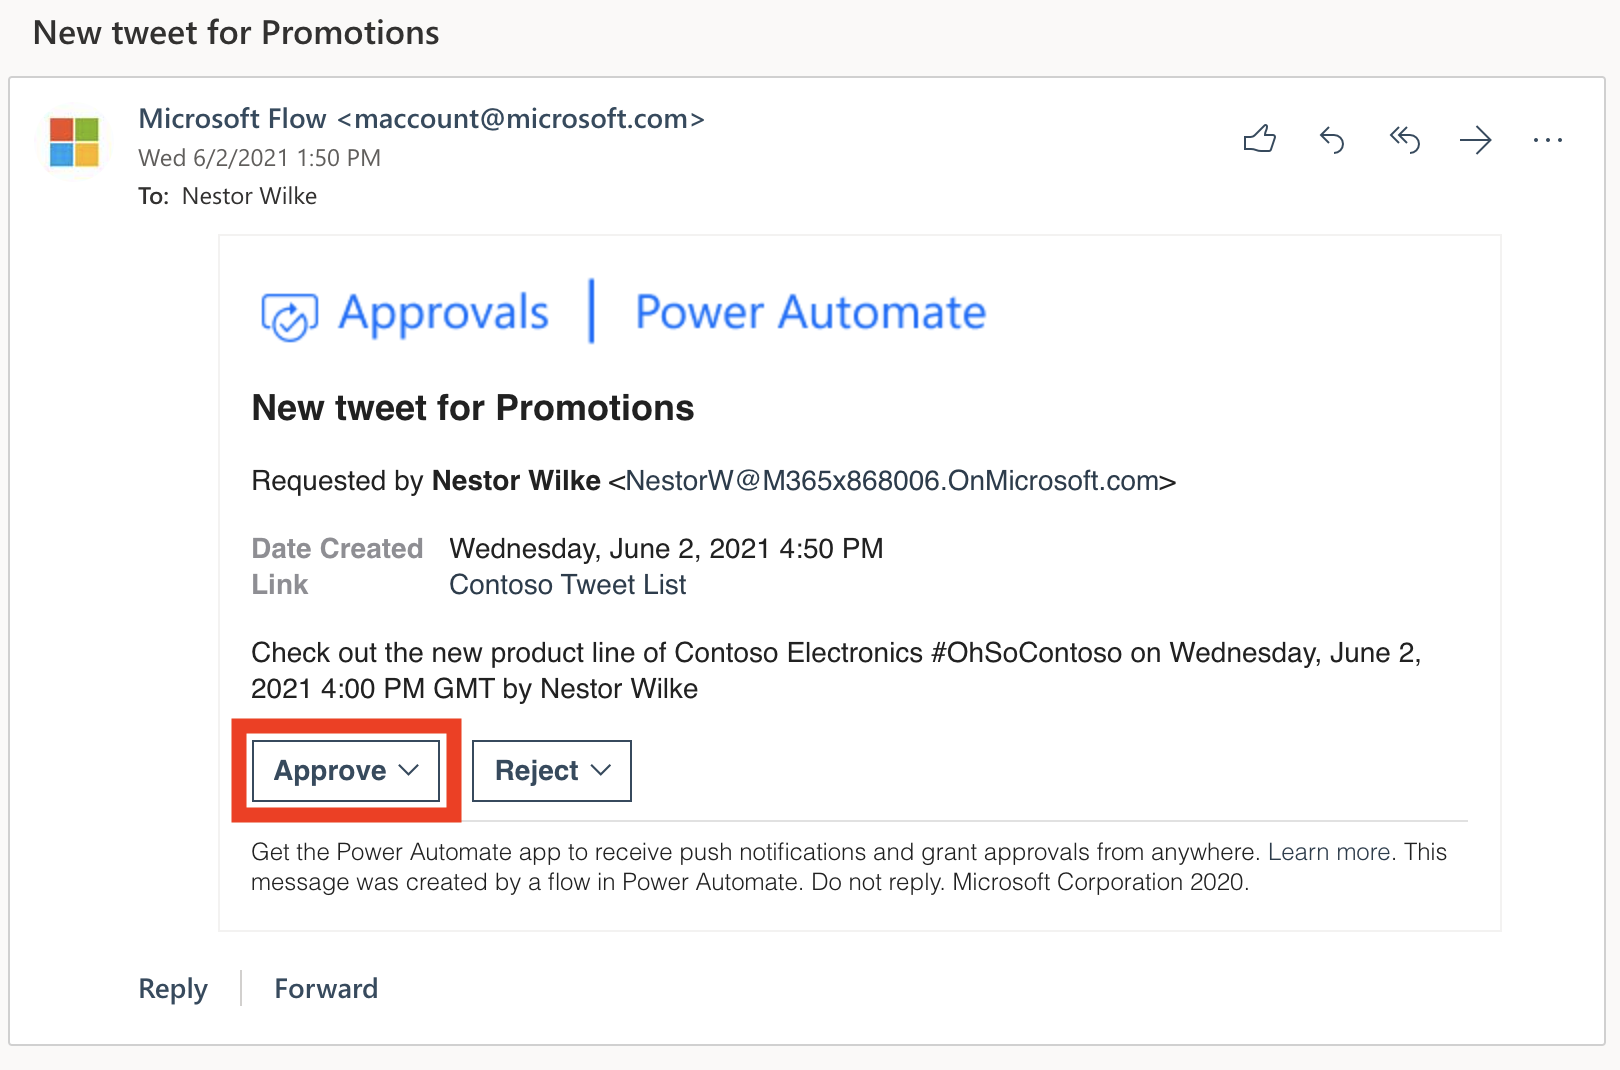
In Microsoft Outlook, open the automated approval mail in the inbox, and then select Approve. Add a comment and press Submit.
In Power Automate, select Approvals under Actions. You can see the approval you submitted in your history.
In SharePoint, refresh the ContosoTweets list. Make sure that the ApprovalStatus field is set to Yes, and that the comment that you just entered is shown.

In this unit, you saw the experience from the approver's point of view, from receiving an approval request email to processing the request in the Approval Center.
Exercise - Learn to build a flow that runs at recurring time intervals
100 XP
6 minutesYou can create a flow that performs one or more tasks (for example, sending a report by email) on a specific schedule:
Once a day, an hour, or a minuteOn a date that you specifyAfter the quantity of days, hours, or minutes that you specifyPrerequisites
Access to Power Automate.A basic understanding of Power Automate and experience with creating a flow is recommended.Create the flow
Launch Power Automate and sign in using your organizational account.
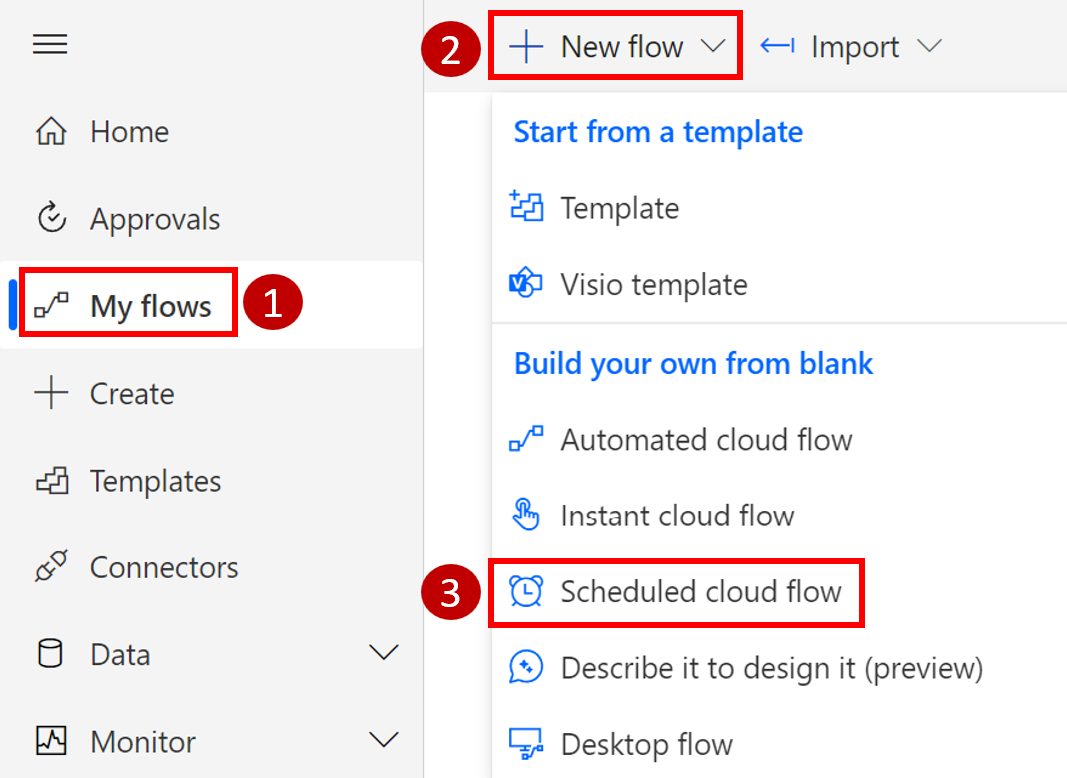
In the left pane, select My flows.
Select + New flow, and then select Scheduled cloud flow.
In the dialog box, specify the flow's name and how often the flow should run.
For example, if you want the flow to run every two weeks, enter 2 in the Interval field, and select Week in the Frequency field. You can also specify the day of the week your flow should run. The text at the bottom of the dialog box explains your inputs in plain language.
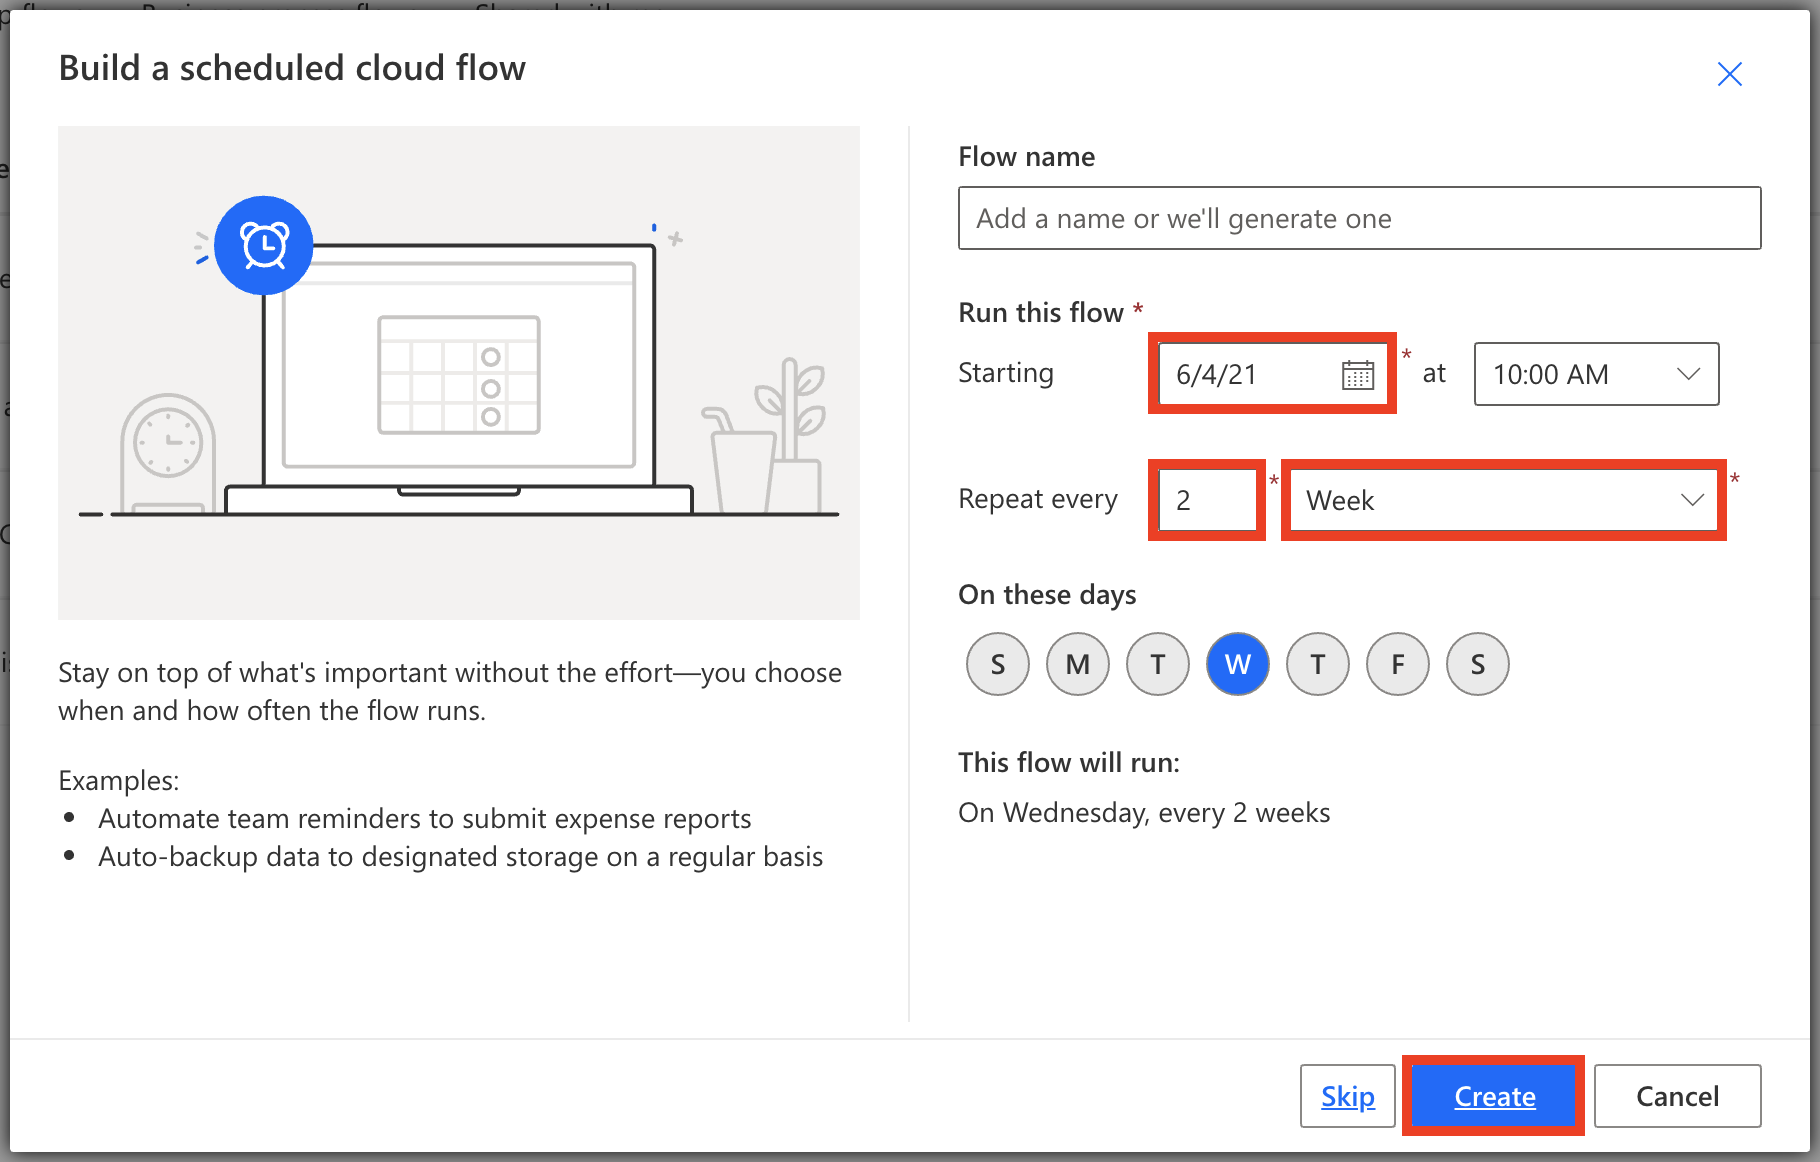
When you are satisfied with your inputs, select Create.
Specify advanced options
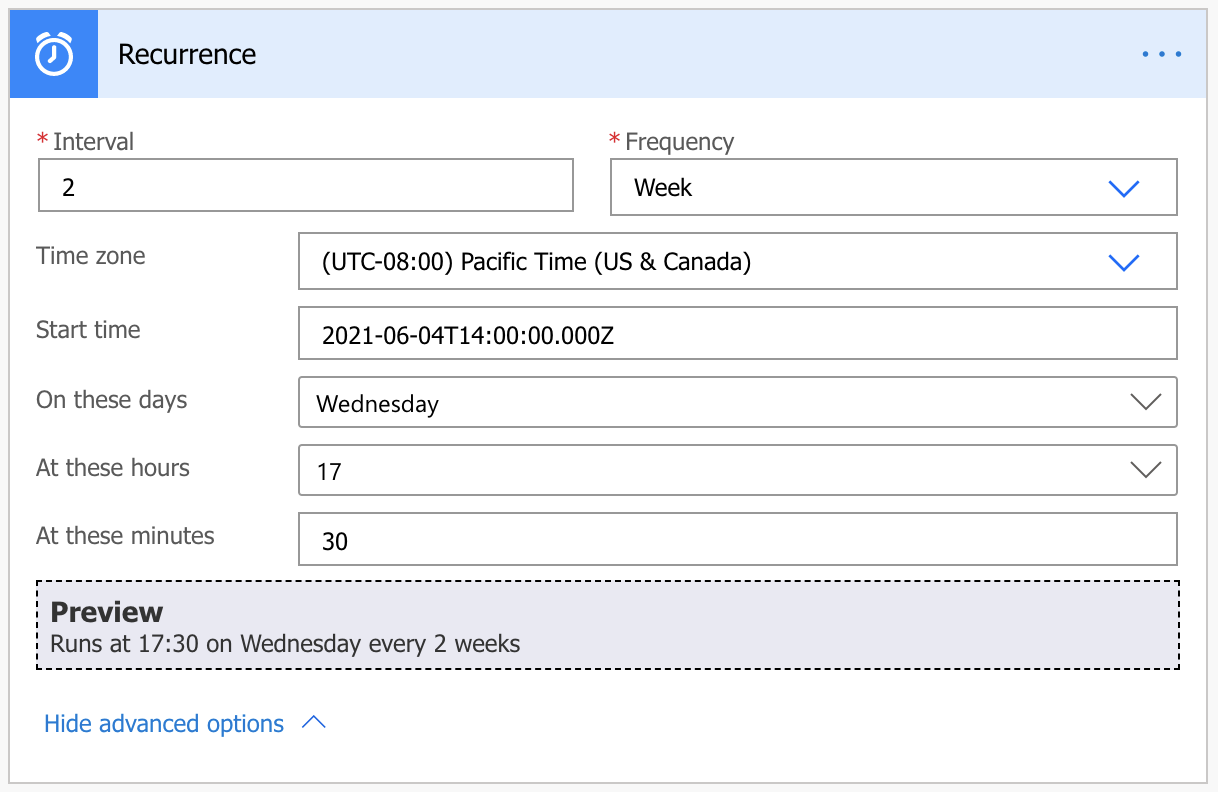
Once your flow is created, select the title of the Recurrence card to expand it.
Select Edit and then Show advanced options.
Note
The advanced options vary, depending on the value of the Interval and Frequency fields. If the dialog box that you see doesn't match the graphic that follows, make sure that the Interval and Frequency fields are set to the same values that are shown in the graphic.
Here you can specify a time zone to reflect the local time zone, Universal Coordinated Time (UTC), or another time zone.
If you selected Day in the Frequency field, you can specify the time of day when the flow should run.
If you selected Week, specify the day or days of the week when the flow should run, and the time or times of day when the flow should run.
Add the action or actions that the flow should take and then select Save.
For this example, I will add the Send an email (V2) action to remind me to submit any expense reports I have for this month.
Delay the flow
Next, you'll learn how to delay a flow.
On the top navigation bar, select My flows, and then select Automated cloud flow.
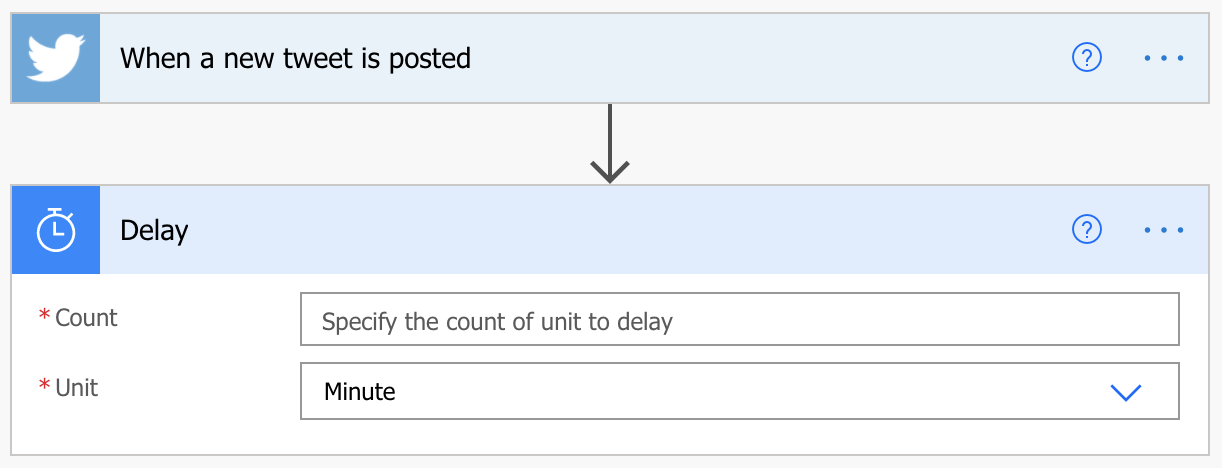
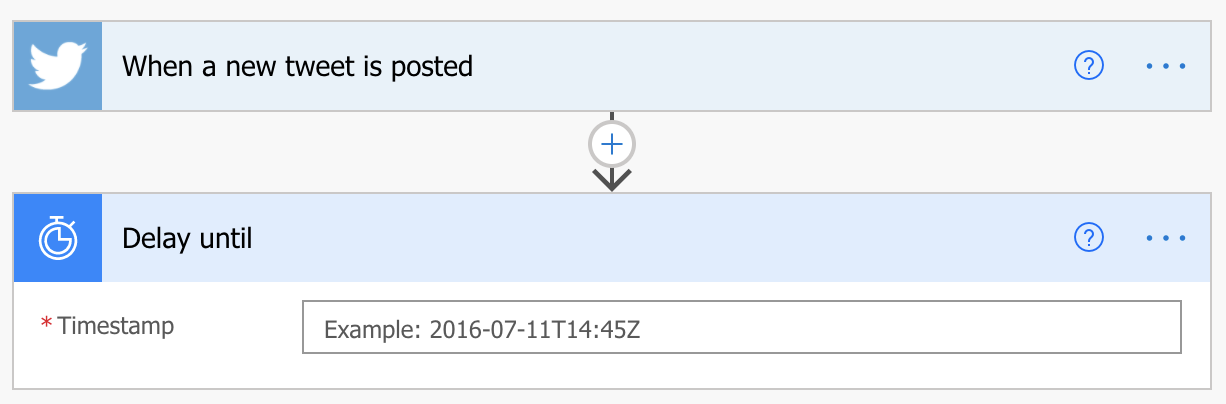
In the Search all triggers field, enter Twitter, and then select Twitter - When a new tweet is posted.
Select Create and once the flow is created select + New step.
In the list of actions, search Delay and select either Delay or Delay Until.
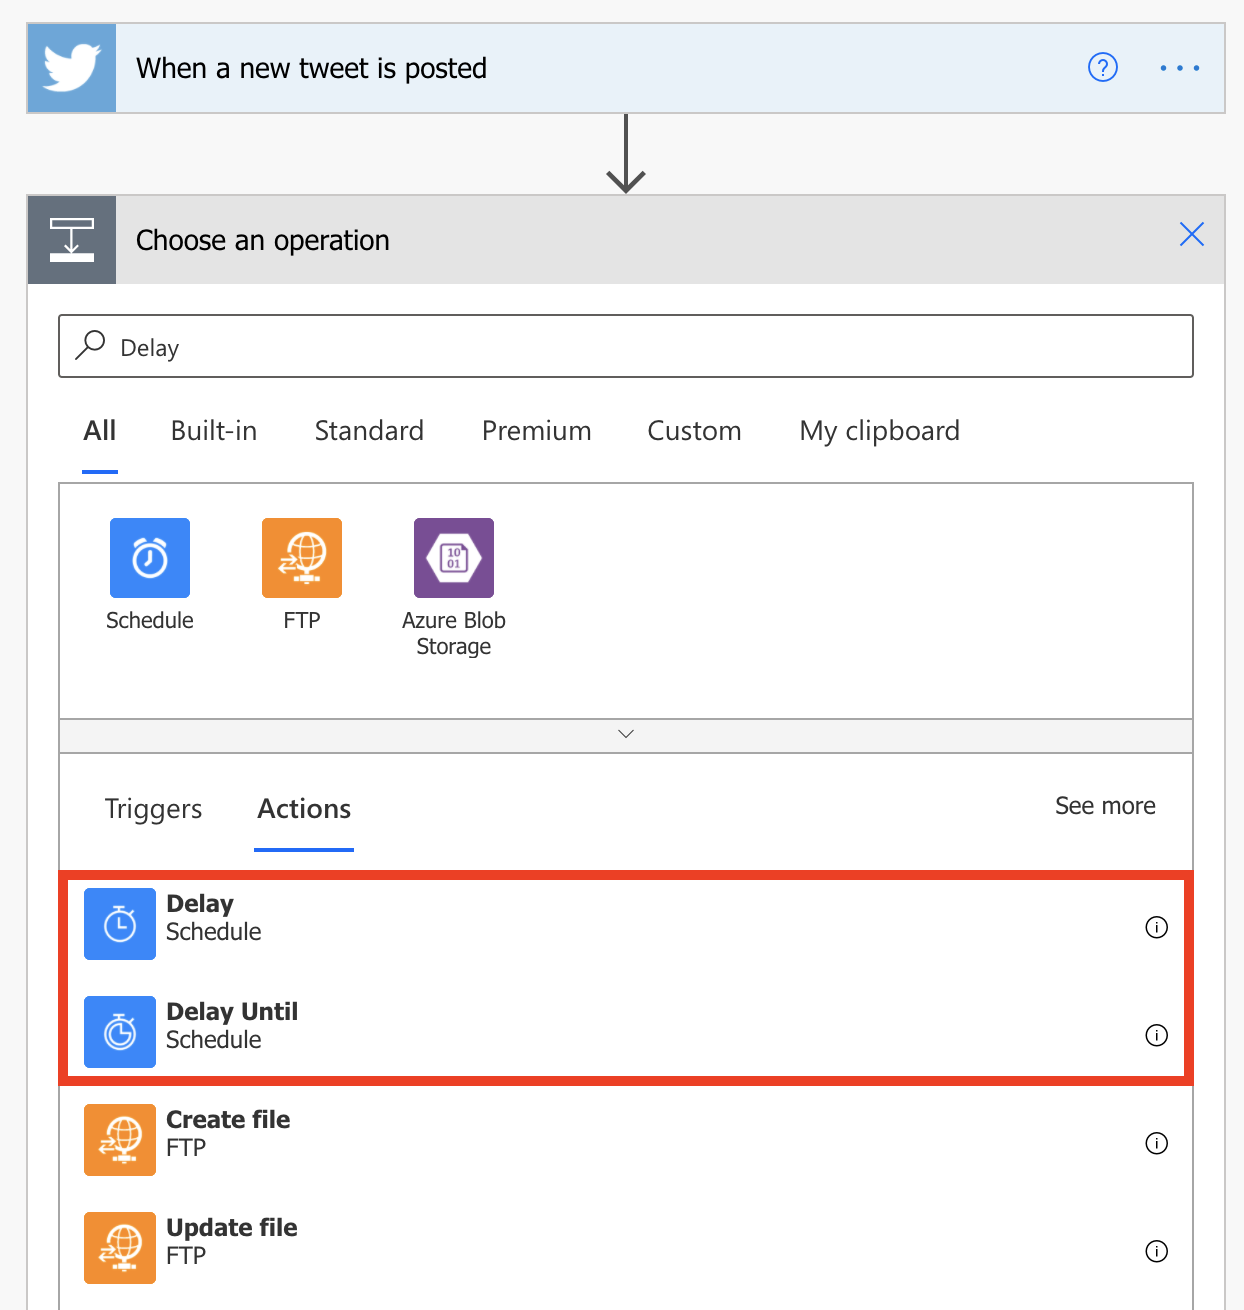
Follow one of these steps, depending on the action that you selected:
If you selected Delay, specify a count and a unit of time, like second, minute, or hour.
If you selected Delay until, specify a date in this format: YYYY-MM-DDTHH:MM:SSZ
Exercise - Create a business process flow
100 XP
12 minutesThis unit shows how to create a business process flow by using Microsoft Power Automate.
For more about how to create a mobile task flow, see Create a mobile task flow.
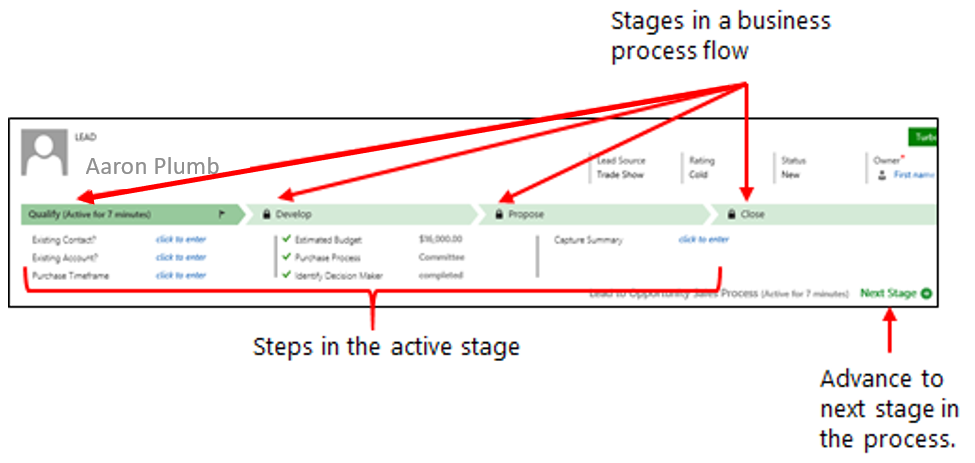
When a user starts a business process flow, the process bar at the top of the page shows the stages and steps of the process.
Prerequisites
To create business process flows, you need a Power Apps or Power Automate per user license.
Access to Power Automate.
An environment with a Microsoft Dataverse database. (Applicable only for work or school accounts).
Experience with creating a business process flow.
A table with which the business process flow will be associated. If the business process flow isn't related to an existing table, create a new table before you create the flow.
Tip
When you create a business process flow definition, you can define who has privileges to create, read, update, or delete instances of the business process flow. For example, for service-related processes, you might give customer service reps full access to change the business process flow instance. But you might give sales reps just read-only access to the instance, so that they can monitor post-sales activities for their customers. To set security for a business process flow definition that you create, select Enable Security Roles on the action bar.
Create a business process flow
Important
As of August 2022, you can no longer create or manage business process flows from Power Automate outside of the solution explorer. Business process flows and instances continue to be supported through the solution explorer, Power Apps, and Dataverse table views.
Launch Power Automate and sign in using your organizational account.
In the left pane, select Solutions.
You can either select an existing Solution or create a new one.
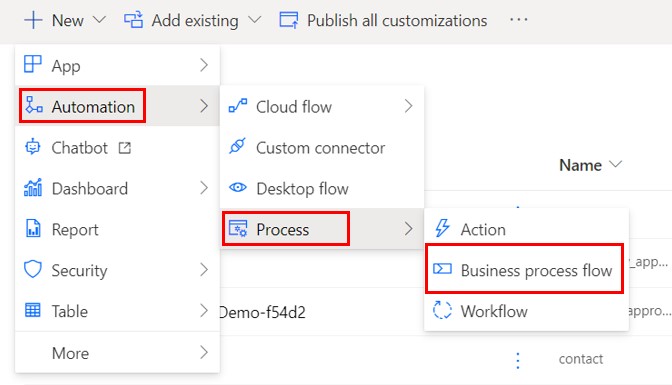
Inside the solution select + New, Automation, Process and then Business process flow.
In the Build a business process flow pane, fill in the required fields:
Display name: The display name of the process doesn't have to be unique, but it should be meaningful for people who must choose a process. You can change this name later.
Name: A unique name that's based on the display name. You can change the name when you create the process, but you can't change it after the process has been created. Power Automate can generate this for you.
Table: Select the Microsoft Dataverse Table on which to base the process.
The Table that you select affects the fields that are available for steps that can be added to the first stage of the process flow. If you can't find the table that you want, make sure that the Business process flows (fields will be created) option is set for the table in the table definition. You can't change the table after you save the process.
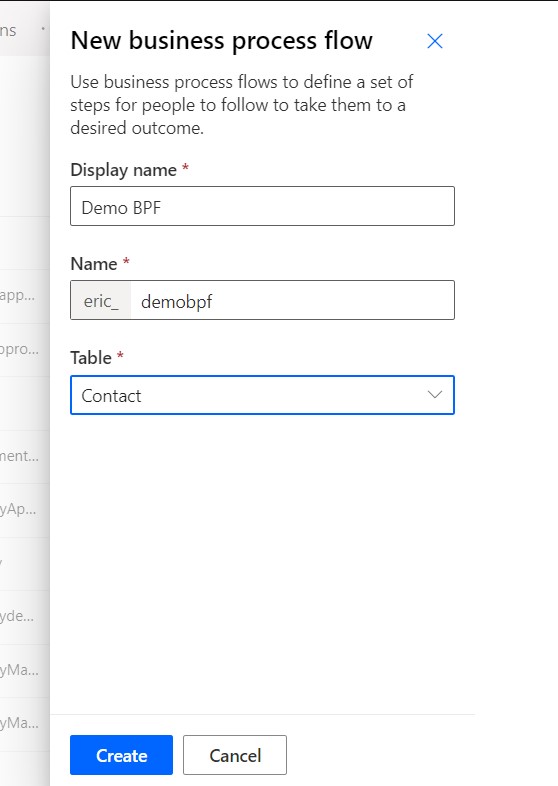
Select Create.
To access the newly created process, in the solution, select Processes, then your solution and then Edit.
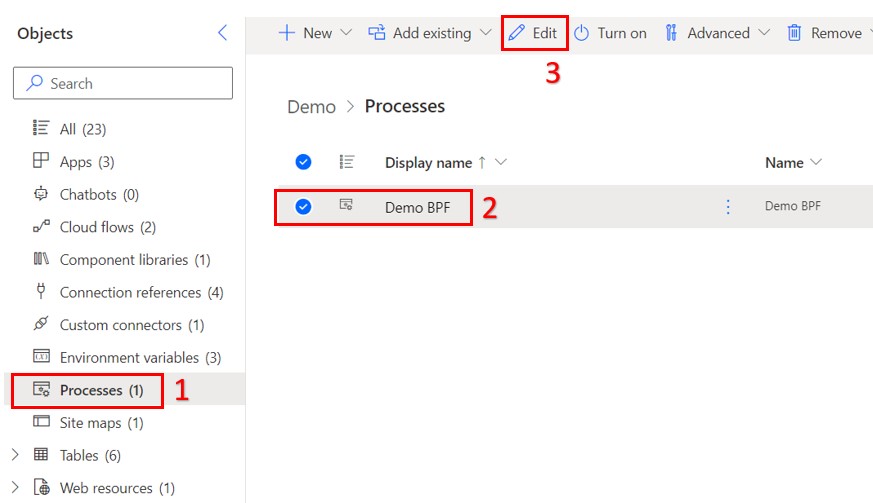
The business process flow designer is started. The designer page has three sections:
On the left, a single stage named Account New Stage has already been created for you.
Beneath this stage is the mini map, which lets you see the whole process or quickly go to a part of the process.
On the right are components that you can drag to the designer. You can also set properties to create a business process flow.
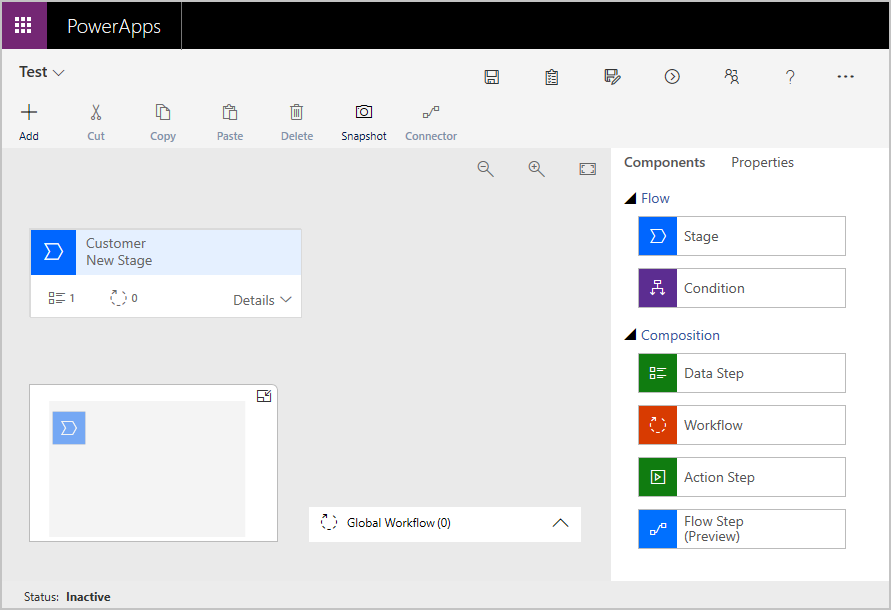
Add stages so that users can proceed from one business stage to another in the process:
Drag the Stage component from the Components tab to the plus sign (+) in the designer.
Select the stage, and then, on the Properties tab on the right, set the properties:
Enter a Step Name.
Optional: Select a category for the stage (for example, Qualify or Develop). This category appears as a chevron on the process bar.
![]()
When you've finished setting the properties, select Apply.
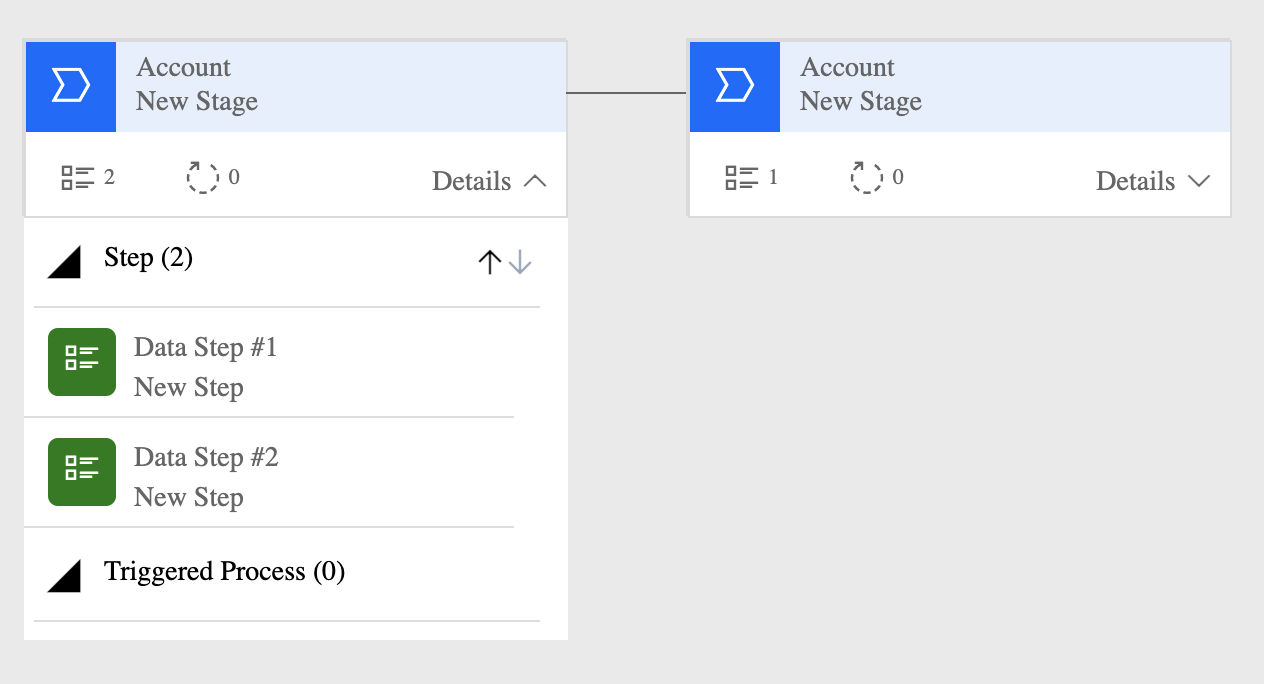
Add steps to each stage:
Tip
To see the steps in a stage, select Details in the lower-right corner of the stage.
Drag the Data Step component from the Components tab to the stage.
Select the step, and then, on the Properties tab, set the properties:
Enter a Step Name.
If users should be able to enter data to finish a step, select the appropriate field in the drop-down list.
If users must fill in the selected field to finish the step before they can proceed to the next stage of the process, select Required.
When you've finished, select Apply.
Add a Condition to the process:
Drag the Condition component from the Components tab to the plus sign (+) between two stages.
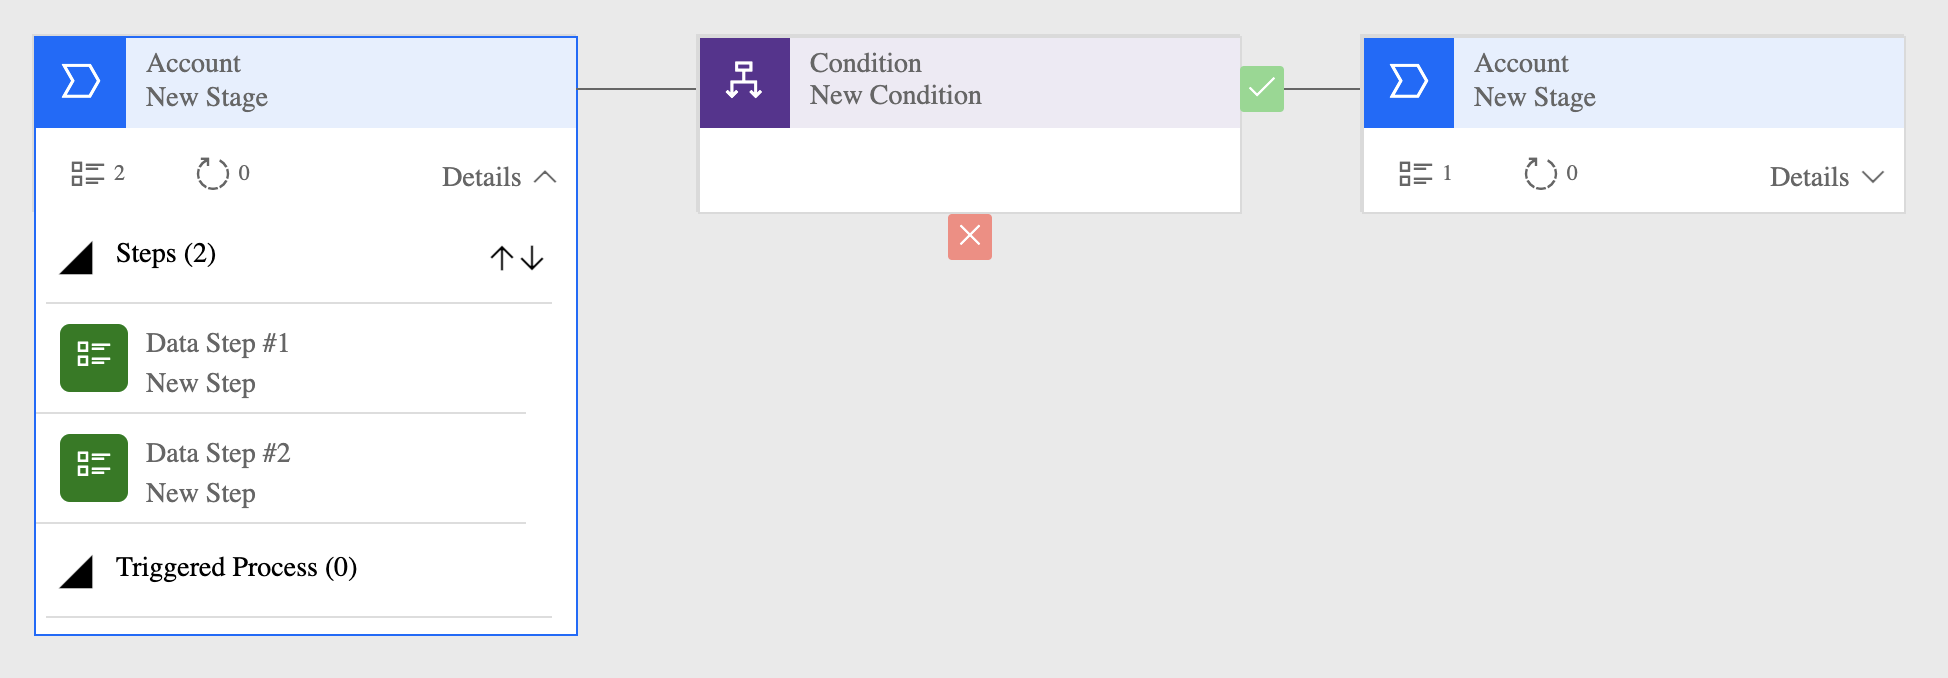
Select the condition, and then, on the Properties tab, set the properties. When you've finished, select Apply.
Add a workflow to the process:
Drag the Workflow component from the Components tab to either a specific stage or the Global Workflow item:
Drag the Workflow component to a specific stage if the workflow should be triggered when the process enters or exits that stage. The Workflow component must be based on the same primary table as the stage.
Drag the Workflow component to the Global Workflow item if the workflow should be triggered when the process is activated or archived (that is, when the status changes to Completed or Abandoned). The Workflow component must be based on the same primary table as the process.
Select the Workflow, and then, on the Properties tab, set the properties:
Enter a display name.
Select when the workflow should be triggered.
Search for an existing on-demand active workflow that matches the stage table or create a workflow by selecting New.
When you've finished, select Apply.
To validate the business process flow, select Validate on the action bar.
To save the process as a draft while you continue to work on it, select Save on the action bar.
Important
No one can use a process while it's a draft.
To activate the process and make it available to your team, select Activate on the action bar.
To define who has privileges to create, read, update, or delete the business process flow instance, select Edit Security Roles on the action bar. For example, for service-related processes, you might give customer service reps full access to change the business process flow instance. But you might give sales reps read-only access to the instance, so that they can monitor post-sales activities for their customers.
In the Security Roles pane, select the name of a role to open the details page for that role.
On the Business Process Flows tab, select options to assign the role appropriate privileges for the business process flow.
Note
By default, the System Administrator and System Customizer security roles have access to new business process flows.
Select Save.
Tip
Keep these tips in mind as you work on your business process flow in the designer:
To take a snapshot of everything in the business process flow designer, select Snapshot on the action bar. This option is useful if you want to share and get comments about the process from a team member.
Use the mini map to quickly go to different parts of the process. This option is useful when you have a complicated process that scrolls off the screen.
To add a description of the business process, select the arrow beside the process name in the upper-left corner of the page. You can enter up to 2,000 characters in the description field.
Edit a business process flow
You can edit the business process flow after it has been created.
On the Power Automate main page, select Solutions in the left pane. Select your solution.
In the solution, select Processes, select your process and then select Edit.
Keep the following points in mind when you edit the stages of a business process flow:
Business process flows can have up to 30 stages.
You can add or change the following properties of a stage:
Name: You can change the stage name after you create the stage.
Table: You can change the table for any stage except the first one.
Stage Category: A category lets you group stages by the type of action. It's useful for reports that will group records by the stage that they're in. The options for the stage category come from the Stage Category global choice set. You can add more choices to this global choice set and change the labels of existing choices. You can also delete choices, but we recommend that you keep the existing choices. If you delete a choice, you won't be able to add it back later. If you don't want a choice to be used, change the label to Don't use.
Relationship: Enter a relationship when the preceding stage in the process is based on a different table than the current stage. For the current stage, select Select relationships, and then specify the relationship that should be used when the flow moves between the two stages. We recommend that you specify relationships because they provide the following benefits:
Attribute maps are often defined for relationships. These attribute maps automatically carry over data between records. Therefore, they help minimize the amount of data entry that's required.
When you select Next Stage on the process bar for a record, any records that use the relationship are listed in the process flow. Therefore, the reuse of records in the process is promoted. In addition, you can use workflows to automate the creation of records. Users then just have to select the workflow instead of creating a record. Therefore, the process is streamlined.
Set Order Process Flow: If you have more than one business process flow for a table, you must specify which process is automatically assigned to new records. On the action bar, select Order Process Flow. For new records or records that don't already have a process flow associated with them, the first business process flow to which a user has access will be used.
Enable Security Roles: A user's access to a business process flow depends on the privileges that are defined for the business process flow in the security role that's assigned to the user. By default, only the System Administrator and System Customizer security roles can view a new business process flow.
Exercise - Create a business process flow that has conditions
100 XP
8 minutesImportant
The business process flow listed below has depreciated. We are in the process of modifying the content within this module. We recommend that you skip this exercise.
Business process flows guide you through the different stages of sales, marketing, or service processes, toward completion. For a simple process, a linear business process flow is a good option. But in more complex scenarios, you can use an enhanced business process flow that branches into different directions, depending on conditions within the flow.
Branches are automatically selected in real time, based on rules that are defined in the process definition.
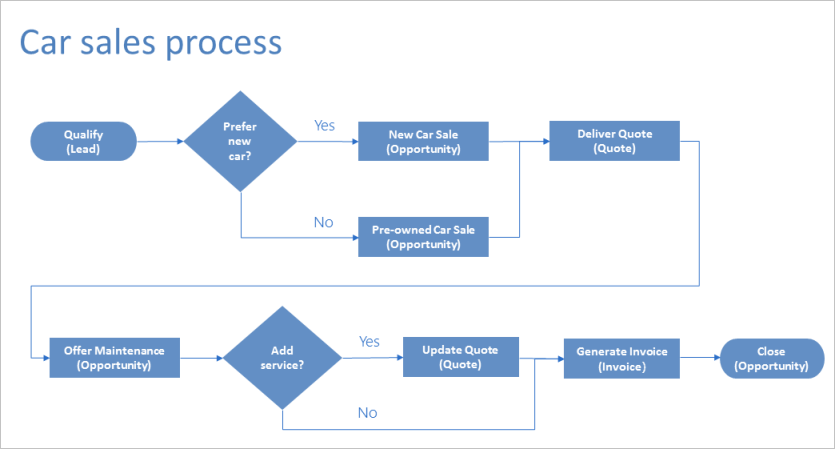
If you have Create permissions on business process flows, you can use If-Else logic to create business process flows that have multiple branches.The branching condition can be formed from multiple logical expressions that use a combination of AND or OR operators.For example, for the process of selling cars, you can set up a single business process flow that starts with a common qualification stage but then splits into separate branches, based on a rule:
One branch manages the case of a customer who prefers a new car or a pre-owned car.Another branch manages the case of a customer whose budget is above or below $20,000.A third branch might be for purchasing or declining a maintenance or service plan.The following diagram shows a business process flow that has branches.
Guidelines for business process flows that have branches
Keep the following points in mind when you design a business process flow that has branches:
A process can span a maximum of five unique entities.You can use a maximum of 30 stages per process and a maximum of 30 steps per stage.Each branch can be no more than five levels deep.Branching rules must be based on the steps in the stage that immediately precedes them.You can combine multiple conditions in a rule by using the AND operator or the OR operator, but not both.When you define a process flow, you can optionally select a table relationship. This table relationship must a one-to-many (1:N) relationship.More than one active process can run concurrently on the same data record.When branches are merged, either all the peer branches must be merged to a single stage, or each peer branch must end the process. A peer branch can't merge with other branches and end the process at the same time.Note
A table that's used in the process can be revisited multiple times (that is, there can be multiple closed table loops).A process can go back to the previous stage, regardless of the table type. For example, if the active stage is Deliver Quote on a quote record, process users can move the active stage back to the Propose stage on an opportunity record.Prerequisites
Access to Power Automate.An environment with a Microsoft Dataverse database and Dynamics 365 Apps enabled. (Applicable only for work or school accounts).Experience with creating a business process flow.Dynamics 365 customer engagement example: Car selling process flow that has two branches
Let's look at an example of a business process flow that has two branches. In this example, the business process flow is used for sales of new and pre-owned cars.
First, we'll create a process named Car Sales Process.
Launch Power Automate and sign in using your organizational account.
In the left pane, select Flows.
On the top bar, select + New and then select Business process flow.
In the Build a business process flow pane, fill in the required fields:
Flow name: Enter Car sales process.
Name: A unique name that's based on the display name that you entered. You can change the name when you create the process, but you can't change it after the process has been created.
Choose a table: Select the Lead table.
The table that you select affects the fields that are available for steps that can be added to the first stage of the process flow. If you can't find the Lead table, make sure that the Business process flows (fields will be created) option is set for that table in the table definition. You can't change the table after you save the process.
Select Create.
Once the new page spins up in PowerApps, add the first stage to the process, name the stage Qualify, and add two data steps to it: Purchase Time frame and Car Preference.
After the common Qualify stage, split the process into two separate branches by adding a Condition component:
Set up the condition with rules that meet your business requirements.To add the first branch, which will be run when the condition is satisfied, add a Stage component to the Yes path of the Condition component.To add the second branch, which will be run when condition isn't satisfied, add a Stage component to the No path of the Condition component.Tip
To create more complex branching, you can add another a Condition component to the No path of an existing Condition component.

If Car preference = New, the process branches out to the New Car Sales stage, as shown here.

Otherwise, the process goes to the Pre-Owned Car Sales stage in the second branch, as shown here.

After all the steps in either the New Car Sales stage or the Pre-Owned Car Sales stage are finished, the process returns to the main flow, at the Deliver Quote stage.

Prevent information disclosure example
There are a few things that you need to consider to prevent people from seeing specific information about a process flow.
This section uses the example of a business process flow that has branches for processing a loan request at a bank. In the following diagram, the custom entities that are used in the stages are shown in parentheses.
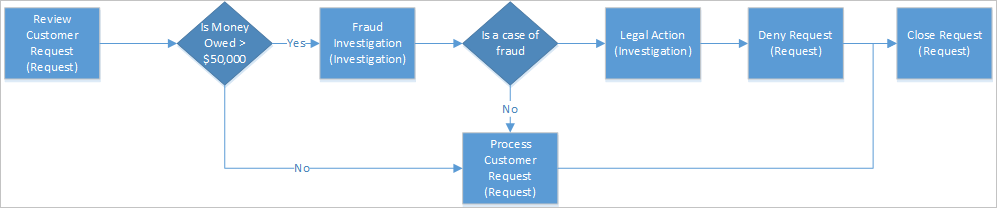
In this scenario, the bank loan officer needs access to the Request record, but she shouldn't have any visibility into the investigation of the request. At first glance, it looks as though we can easily meet this requirement by assigning the loan officer a security role that doesn't grant access to the Investigation table. But let's look at the example in more detail to see whether things will really be that easy.
Let's say that a customer submits a loan request for more than $60,000 to the bank. Here is a high-level view of the stages and branches:
In the first stage, the loan officer reviews the request.A branching rule checks whether the amount that's owed to the bank will exceed $50,000. If this branching rule is satisfied, the next stage in the process is to investigate whether the request is fraudulent.If it's determined that the request is fraudulent, the process moves on to taking legal action against the requestor.The loan officer shouldn't have visibility into the two investigative stages, because she doesn't have access to the Investigation table.But if the loan officer opens the Request record, she can see the entire end-to-end process. Not only will she be able to see the Fraud Investigation stage, but she'll also be able to identify the outcome of the investigation, because she can see the Legal Action stage in the process.The loan officer can preview the steps in the investigative stages by choosing the stage. Although she won't be able to see the data or the step completion status, she'll be able to identify the potential actions that were taken against the requestor during the Fraud Investigation and Legal Action stages.In this process flow, the loan officer will be able to see the Fraud Investigation and Legal Action stages, and this ability constitutes improper information disclosure.
Pay special attention to the information that might become disclosed because of branching. In our example, to prevent information disclosure, split the process into two separate processes: one for the request processing and one for the fraud investigation. The process for the loan officer will then look like this.
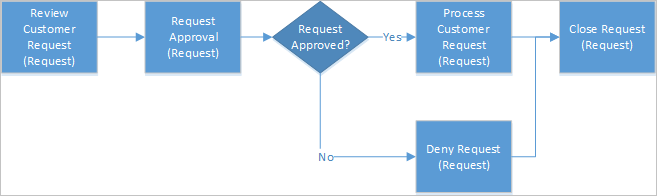
The process for the investigation will be self-contained and will include the following stages.
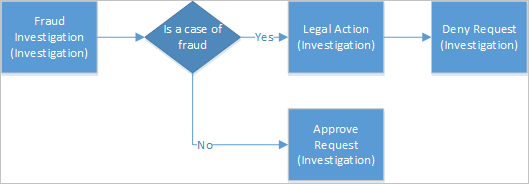
You'll have to provide a workflow to synchronize the Approve/Deny decision from the Investigation record to the Request record.
What is a common business process achieved in Power Automate?


 Bengali (Bangladesh) ·
  English (United States) ·