
ARTICLE AD
Introduction to Microsoft Dataverse
100 XP
5 minutesData is at the center of everything a business does today and powers the insights that can drive what it should do tomorrow. To thrive and grow, businesses need to capture, analyze, predict, present, and report data and do it all with a high level of agility.
A business may have many data sources across various devices, applications, systems, and software as a service (SaaS) providers. There may be connectors for some or all of these data sources to allow you to build apps and flows by using the Microsoft Power Platform, but these data stores need to be managed and require different tools, skills, and security models.
Microsoft Dataverse
Microsoft Dataverse is the cloud data platform for the Microsoft Power Platform that is easy to use, compliant, secure, scalable, and globally available. Using Microsoft Dataverse as the data store for your apps has many benefits:
Metadata: Properties you define on your data model are used by Power Apps, speeding up the building of apps.
Data access: You can control who can access which tables, rows, and columns.
Logic: Calculations and rules can be added to table columns.
Import and export: You can choose from multiple tools to manage your data, including Excel.
Audit: You can track who accesses and changes data.
Processes: Business processes can be added to ensure data quality and perform automation.
Managed data in the cloud: You don't need to perform backups or configure the database because this is performed for you by Microsoft.
Storage: You don't need to worry about how the data is stored because Microsoft takes care of this for you.
Skills: You don't need to be a DBA to manage Dataverse.
Secure: All data is encrypted at rest and in transit.
Integration: Dataverse is deeply integrated with Microsoft cloud services such as Microsoft 365 and Microsoft Azure.
Proven: Microsoft Dataverse is used by Dynamics 365 apps such as Dynamics 365 Sales and Dynamics 365 Customer Service.
Connectors: Microsoft Dataverse has connectors for Power Apps, Power Automate, and Power BI.
For more information, see Why choose Microsoft Dataverse?

Tables
Data within Dataverse is stored within a set of records called tables. A table is a logical structure of rows and columns that represent a set of data, similar to how a table stores data within a database.
Tables represent objects or things of the internet. These can be physical things such as pets, buildings, and products, or abstract concepts such as projects, skills, and benefits.
Microsoft Dataverse is designed to let you quickly and easily create a data model for your application, based on the tables and the table metadata that you include in your app.
Dataverse includes a base set of standard tables that support common business scenarios. You can also create custom tables specific to your organization and populate them with data that you import from lists in Microsoft SharePoint, from Microsoft Excel, or by using PowerQuery. App makers can then use Power Apps to build rich applications by using this data.

For most organizations, it's a good idea to use the standard tables and columns as they were intended. But to meet your business needs, you can extend the functionality of standard tables by creating one or more custom tables to store information that's unique to your organization.
Table characteristics
100 XP
10 minutesIn Microsoft Dataverse, you create and edit tables by using the Power Apps maker portal. You don't need to use T-SQL, instead you maintain a table and its properties with the user interface in the maker portal.
Before you can start creating a table in Dataverse, you need to understand the capabilities and options of Dataverse tables.
Table properties
Tables are the key building blocks of Microsoft Dataverse. In Dataverse, a table is more than just a database table with columns and relationships. A Dataverse table contains other components to support your apps and flows. Tables in Dataverse have the following properties:
Name: For example Pets and Skills
Rows: Fido and Max are instances of pets
Columns: Such as pet type, age, and breed
Relationships: Describe the links to other tables, such as this pet has these skills.
Alternate keys: Alternate column, or columns, to uniquely identify a row in the table
Forms: Forms used by model-driven apps to view and edit a table row
Views: Define the rows and columns for displaying table rows
Charts: Visualizations of table rows
Business rules: Logic that can be applied to columns in a table row
Metadata: Properties of the table that affect the capabilities of the table and how the table can be used by apps and flows

We explore these table properties in the remainder of this module.
Row keys
Database tables have a primary key. A primary key uniquely identifies a single row in the table. In Dataverse, the primary key is a Globally Unique Identifier (GUID), a 32-character string such as 123e4567-e89b-12d3-a456-426655440000. The GUID for the primary key is generated automatically when a row is created in a Dataverse table.
Because GUIDs aren't user friendly, in Dataverse there's also a column called the primary column. This is a text string that is used to represent the row in apps and flows. When creating a Dataverse table, this column is defaulted to Name.
Note
When you integrate other systems with Dataverse, the GUID is not often known to the external system. This is where you can use an alternate key.
Create a table in Dataverse
To create a Dataverse table, select on Tables in left-hand navigation of the Power Apps maker portal, and then select + New table.

There are two tabs in the name table pane. The first tab, Properties, contains the following table options:
Display name: The name of the table, for example, Pet
Plural name: The plural name for the table, for example, Pets
Description: For internal use to describe the purpose of the table
Enable attachments: Checkbox to enable files to be attached to table rows
The second tab, Primary column, contains the following options for the primary column of the table:
Display name: Name of the column, for example, Pet name; by default, the Display name is set to Name. You can change the Display name.
Description: This is for internal use to describe the purpose of the column.
Schema name: This is the internal name of the column created in the database. By default, the schema name is automatically created for you based on the Display name. You can change the Schema name before creating the table. The schema name can't contain spaces and includes the customization prefix for the Dataverse solution publisher.
Column requirement: By default, the primary column is Business required
Maximum character count: The primary column is always of type Single Line of Text and defaults to 100 characters. You can change the length of the primary column.

Advanced options
At the bottom of the Properties tab, you can expand Advanced options. This exposes further options for the table.

The most important of these options are:
Schema name: This is the internal name of the table created in the database. By default, the schema name is automatically created for you based on the Display name. You can change the Schema name before creating the table. The schema name can't contain spaces and includes the customization prefix for the Dataverse solution publisher.
Type: Standard, Activity, or Virtual. These options are discussed later. Almost all tables you create will be the default option, Standard.
Record ownership: User or Team or Organizational: These options are discussed later. Almost all tables you create will be the default option, User or Team.
Important
You cannot change the following after the table is created:
Schema nameTable typeTable ownershipYou can enable many other options for the table. These options either create table columns or relationships, or affect the user interface when the table is used within an app.

For more information, see Create and edit tables using Power Apps.
Note
Best practice is to create tables from within a Dataverse solution. The table will inherit the publisher prefix from the solution.
Table types
Before creating tables in Dataverse, you should understand the different types of custom tables that you can create:
Standard: A table where you can store data and add to the navigation in model-driven apps. Most tables you create will be standard tables.
Activity: Activity tables store interactions such as phone calls, tasks, and appointments. Dataverse has a set of activity tables. These tables share the same set of columns and share security privileges. Many of the table options, including the primary column, are fixed and can't be changed. Activity tables appear in the timeline on model-driven app forms.
Virtual: Virtual tables connect to data from an external data source such as Microsoft Azure SQL Database or a SharePoint List.
Note
After a table is created, the table type can't be changed.
Table ownership
When you create a custom table, the options for ownership are User or team owned, or Organization-owned. After a table is created, you can’t change the ownership.
User or team owned: Actions that can be performed on these rows can be controlled at the user level.
Organization-owned: Access to the data is controlled at the organization level.
Note
After a table is created, the table ownership can't be changed.
When to use standard tables, and when to create new tables
Dataverse comes with many standard tables that support core business application capabilities. Each table also contains many metadata columns that represent common data that the system needs to store for that table. We recommend that you become familiar with the catalog of standard tables, and use them where possible, because any applications written with standard tables work as you expect in your environment without extra effort.
For minor changes, you might not have to create a custom table:
To change the display name of a column, you can edit the table. You don't have to create a new table.
You can't delete standard tables, but you can hide them. To hide a standard table, change the security role privileges for your organization to remove the Read privilege for that table. This removes the table from most parts of the application.
If standard tables don't work for your business needs, and if they can't be edited to meet those needs, consider creating a new table, column, or table relationship.
Exercise - Create a Microsoft Dataverse table
In this unit, you create a table and then customize key components. You learn how to:
Create a custom table.
Add custom columns to your table.
Customize a view.
Customize a form.
The tutorial follows the Contoso company, which is a pet grooming business that grooms dogs and cats. Contoso needs an app for client and pet tracking that can be used by employees on various devices.
Create a custom table
Follow these steps to create a new custom table.
Sign in to the Power Apps maker portal.
In the left navigation pane, select Tables, select + New table, and then select + New table again.

In the Properties table of the New table pane, enter the following:
Display name: Pet
Description: Track pets for pet grooming

Select the Primary Column tab and enter the following:
Display name: Pet Name
At the bottom of the pane, select Save.
Add and customize columns
When the table is finished creating, your display shows the table properties and your blank table in the section called Pet columns and data. Note here that Pet Name is the only column on display and next to that is +18 more and next to that is + to add a new column. There's also an Edit button in the upper-right corner of this section that will also allow you to edit, but in this case we do the editing within this window.
Within the Pet columns and data, select the + button to create a new column, and observe a pop-up New column pane on the right side of the screen.
In the New column pane, enter the following values:
Display name: SpeciesData type: Choice
Create the choice values:
Select + New choice and you see the New choice pane appears.In the Display name field, enter Species.Under Choices you see two entry fields titled Label and Value. Enter Dog and 1 respectively.Select + New choice under the Dog entry and make Cat the new entry for Label and 2 for Value.Select Save.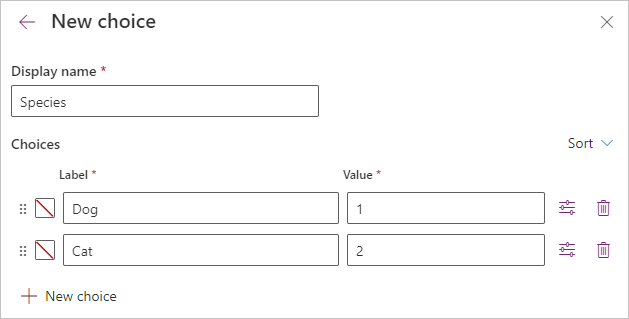
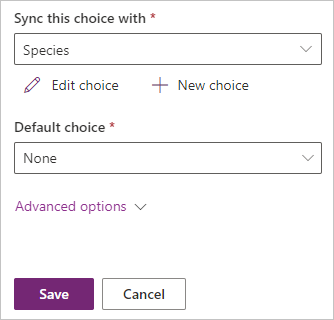
To make the Species choices that you just created the designated choices for this column, select the drop-down list under Sync this choice with, select Species, and then select Save.
Let's add another column in the columns and data pane; again select the + button to add a new column.

In the New column pane, enter the following values, and then select Save:
Display name: BreedData type: Single line of text (this is the default)Add one more column by selecting the + button again in the columns and data pane.
In the New column pane, enter the following values, and then select Save:
Display name: Appointment dateData type: Date and TimeCustomize a view
Navigate to Views by selecting Views under Data experiences.

The list of views for the Pet table is displayed.

Select Active Pets to open the view designer.
In the view designer, select + View Column to the right of the Created On column, and select the following columns. (As you add each one, your view resets. Continue selecting + View Column to add all of the columns):
Appointment dateBreedSpecies (you need to scroll down or search for this column)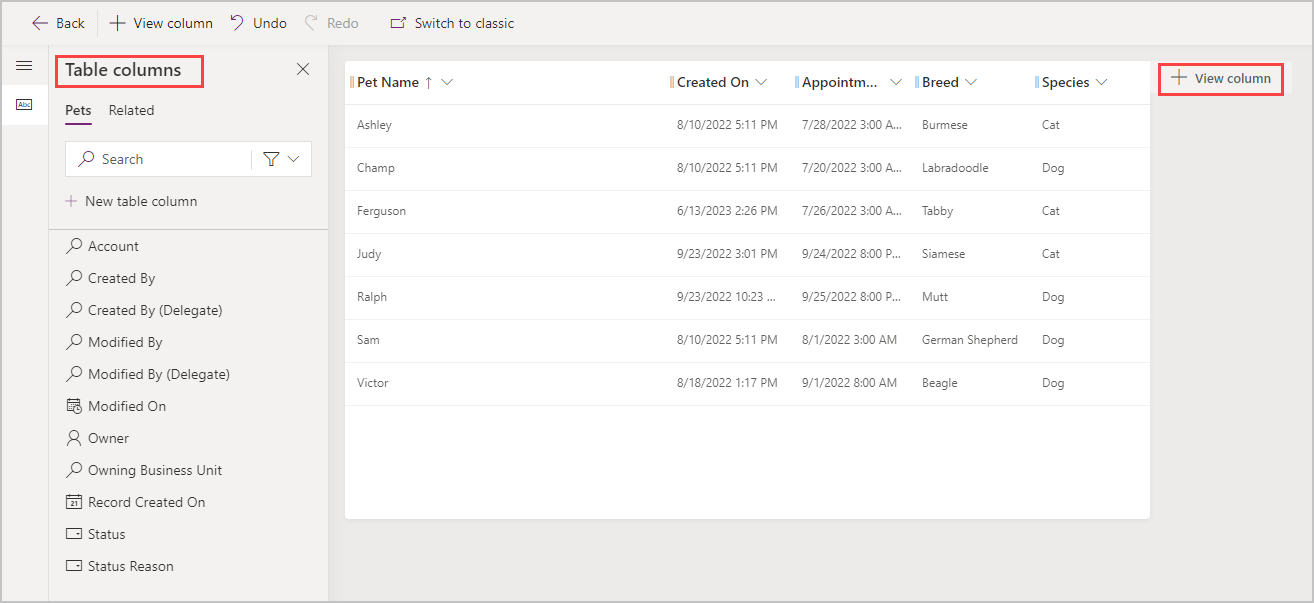
Select the Created On column, select Remove.
To arrange the columns, drag them in the order you want them (or you can select the column to move, and then select Move Left or Move Right) until your view looks like this.

On the view designer toolbar, select Save.
Select Publish and then Navigate back to Tables by pressing the Back button at the top left of the screen.
Customize the main form
Navigate to Forms by selecting the drop-down caret to the right of Tables>Pet>Views and then selecting Forms.
The list of forms for the Pet table is displayed.

Select Information next to the Main form type to open the form editor.
In the form editor, select Table columns from the menu on the far-left side of the window, and drag the Species, Breed, and Appointment date columns from under the Table columns pane to the General section of the form canvas, so that the form looks like the following.

Select Save and publish.
Close the form designer and navigate back to the list of forms by selecting the Back button at the upper-left of the screen.
Navigate to the Pet table by selecting Pet in Tables>Pet>Forms.
At this point, it's possible to add data directly to your table. Under Pet columns and data, you can begin entering as many rows as you want.

It's also possible to import data into your table. We'll show you how to do that in the next exercise.
Exercise - Import data into your Microsoft Dataverse database
You can import data into your Microsoft Dataverse database in bulk from various sources including Excel, Access, SharePoint, SQL and many others.
Note
The Dataverse Pet table referred to in this unit was created in the previous exercise. To have some other data to import, the steps immediately below will walk you through how to create a quick SharePoint list so that you can practice importing into your Pet table.
Create sample import data
Before we walk through how to import data into your Dataverse table, let's create a SharePoint list to use as a table. In a separate browser tab, go to office.com and sign into your work or school account.
In the upper left corner of the window, select the app launcher waffle box then > All apps > SharePoint. Then you can navigate to the SharePoint site that you want to create your list in.

Select New > List in the command bar of the SharePoint site.

Select Blank list from the Create a list popup.

Add a name for your list "SharePoint Pets", and select Create.

On your newly created list that appears, let's create columns that match your Pets data table created in the last exercise. Select Add column and add the following columns next to your Title field as the following data types:
| PetSpecies | Single line of text |
| Breed | Single line of text |
| AppointmentDate | Date and time |
Next, we want to add data so that we have some to import. Add data to your table so that it looks similar to this:

Return to your SharePoint site's Home page and copy the URL from the browser. Now we're ready to import some data into our Dataverse table. Keep this browser tab open.
Import data into your Dataverse table
In a separate browser tab, go to the Power Apps maker portal, and in the left navigation pane, select Tables.
Select the Pet table, and then select Import and Import data from the menu at the top of the screen.

On the Choose data source window note that there are more than 40 options to choose from. In this example, we're going to select SharePoint Online list where we have data to import into our Pet table.

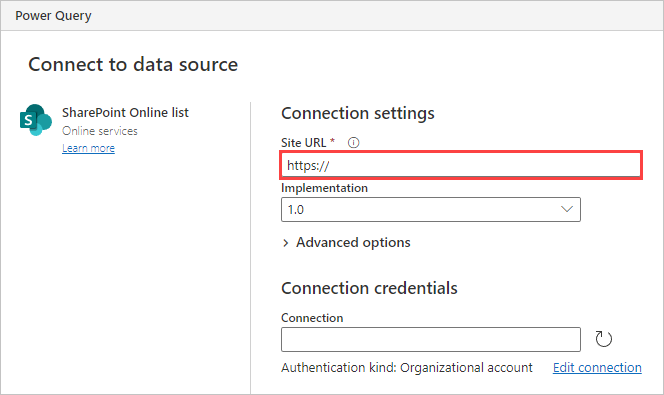
As the window changes to Connect to data source, we enter the SharePoint page URL copied previously in the Site URL entry field. (After entering the URL, it may be necessary to select Organizational account for Authentication kind and Sign in with your connection credentials.) Then we select Next at the lower-right of the window.
In the Choose data window that appears, we can now select one or more lists or document libraries that we want to import. Selecting from the list on the left shows all available columns of data available in the data source. Look for the list you just created called SharePoint Pets and select it. Selecting Next takes you to the Queries screen where you can shape the data before importing.

Using the query edit window, you can remove any of the columns that you don't wish to import, by using the Remove columns button at the top of the window. It's possible to select multiple columns at once by selecting columns while holding the Shift or Ctrl key and then selecting Remove columns. If you make a mistake, the Applied steps on the right side of the window keeps track of the changes, and you can cancel that step to undo the last action.

With the remaining columns of ID, Title, PetSpecies, Breed and AppointmentDate we'll select the Next button to move to the next step.
At the Map tables window now appearing, we want to select Load to existing table.
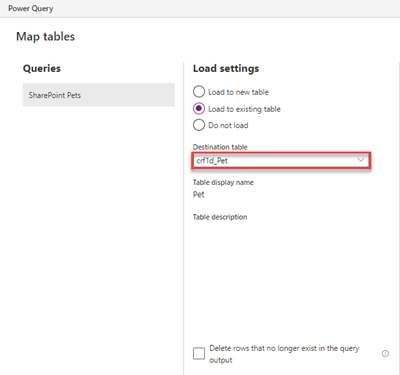
We can select the Destination table from the drop-down. Keep in mind that the Pet table we created will have a prefix in front of it with an underscore. In this case, it's crf1d_Pet, but your table will have a different prefix.
Notice how the Column mapping has the destination columns from our Pet table.
Next, we select the source columns that we want to import into our destination columns. That's why it's helpful to have similar names to make mapping easier. Each dropdown has a list of all available columns, so it's fairly easy to match if your names are close. Once all of your source columns are matched with the destination columns, select Next in the bottom right of the window.
The Refresh settings provides you with the ability to set up a refresh schedule if you want your data to regularly update. In this case, we leave it set to Refresh manually and select Publish at the bottom right of the window.

If you receive any warnings, pay attention to the messages, and go back to your query edit screen to shape your data.
If you published and received no warnings, and the table screen refreshes, you should be able to see that the data was imported into your list.

Though this example used SharePoint as a source for importing data, the steps are similar with any data source you want to import into your list.
Table relationships
When working with Microsoft Dataverse, you need to try to keep information about different sets of data in separate tables. This is known as data normalization. Table relationships define the different ways table rows can be associated with rows from other tables.
We learned earlier in this module that a Database table has a primary key to unique reference rows in the table. In Dataverse, a relationship between two tables references, or looks up, the primary key.
Relationship types
When you look at the Power Apps maker portal, you might think there are three types of table relationships, but actually there are only two, as described below:
One-to-many relationships: In a one-to-many (1:N) table relationship, many related table rows are associated with a single primary table row in a parent/child relationship.
Many-to-many relationships: In a many-to-many (N:N) table relationship, many table rows are associated with many other table rows.
One-to-many relationships actually exist between tables and refer to each table as either a Primary/Current table or Related table. The related table, sometimes called the child table, has a lookup column that allows storing a reference to a row from the primary table, sometimes called the parent table.
Many-to-one relationships
The N:1 (many-to-one) relationship type exists in the user interface because the designer allows you to view and create relationships from either of the tables involved in a relationship. If you have a one-to-many relationship between Table A and Table B, you can see a one-to-many relationship under Table A in the Power Apps maker portal, and a many-to-one relationship under Table B. A many-to-one relationship is just a one-to-many relationship viewed from the related table.
Lookup columns
You can also create a table relationship by creating a column with data type lookup. Creating a lookup column creates a many-to-one relationship.

There's no functionality difference for a relationship whether it's created using one-to-many, many-to-one, or a lookup column.
One-to-many relationship behaviors and mappings
Besides defining how rows can be related to other rows, 1:N table relationships also provide data to address the following questions:
When I delete a row, should any rows that are related to that row also be deleted?
When I assign a row to a new owner, do I also have to assign all related rows to the new owner?
How can I streamline the data entry process when I create a new related row in the context of an existing row?
How should people who view a row be able to view the related rows?
Many-to-many relationships
One-to-many relationships have a hierarchy between the rows in the table relationship. Rows that are related through Many-to-many table relationships are considered peers.
Note
Many-to-many relationships are not supported by relational databases and Dataverse creates a hidden Intersect table to link the table rows. This intersect table does not have a form and you cannot edit its properties or add columns to the table.
You can create a many-to-many relationship and you choose the related tables.
For more information, see Create many-to-many table relationships overview.
Exercise - Create table relationships
In this unit, you create a table and then add relationships between tables. You learn how to:
Create a relationship by using a lookup column.Add a One-to-Many table relationship.Add a Many-to-Many table relationship.Note
The Dataverse Pet table referred to in this unit was created in the previous exercise. You will need to create other tables to add relationships to.
Create a custom table and add a column
Sign in to the Power Apps maker portal.
In the left navigation pane, select Tables, select + New table, and then select + New table again.
In the Properties table of the New table pane, enter the following:
Display name: Trick
Description: Pet Tricks
Select the Primary Column tab and enter the following:
Display name: Trick NameAt the bottom of the pane, select Save.
On the Trick table, select + New and select Column.
In the New column pane, enter the following values:
Display name: Level
Data type: Choice
Create the choice values:
Select + New choice to display the New choice pane.
In the Display name field, enter Level.
Under Choices are two entry fields titled Label and Value. Enter Beginner and 1 respectively.
Select + New choice under the Beginner entry and make Proficient the new entry for Label and 2 for Value.
Select + New choice under the Proficient entry and make Expert the new entry for Label and 3 for Value.
Select Save.
Select the drop-down list under Sync this choice with, select Level, and then select Save.
Create a relationship by using a lookup column
On the Trick table, select + New and select Column.
In the New column pane, enter the following values:
Display name: Pet
Data type: Lookup
Related table: Pet
Select Save.
Add a one-to-many relationship
Select on Tables in left-hand navigation of the Power Apps maker portal, and then select the Account table.
On the Schema pane, select Relationships to display the existing relationships on the screen.

At the top left of the screen select the + New relationship, and then select One-to-many in the dropdown.
In the One-to-many pane on the right, in the Related (Many) list, select Pet.
Select Done.
Notice that when you add a many-to-one relationship, an Account column of the Lookup data type is automatically added to the list of columns on the Pet table.

Create a one-to-many relationship
To create a Dataverse table, select Tables in left-hand navigation of the Power Apps maker portal, and then select the table you want to use in the relationship.
Navigate to Relationships by selecting Relationships under Schema.

Select + new relationship and then select One-to-many.

The new relationship pane is displayed.

The Current table is the table you selected. You select the Related table from the drop-down list. The other fields on the pane are automatically populated.
For more information, see Create and edit One-to-many or Many-to-one table relationships using Power Apps portal.
Dataverse logic and security
Microsoft Dataverse is more than a data store, it contains features to apply business logic to data and securing access to data.
Tables within Dataverse can use rich server-side logic and validation to ensure data quality. You can also reduce repetitive code in each app that creates and uses data within a table.
Business rules: Business rules validate data across multiple columns in a table, and provide warning and error messages, regardless of the app that's used to create the data.
Business process flows: Business process flows guide users to ensure they enter data consistently and follow the same steps every time. Business process flows are currently supported only for model-driven apps.
Real-time workflows: Workflows automate business processes without requiring user interaction.
Business logic with code: Business logic supports advanced developer scenarios that extend the application directly through code.
Business Rules
Business rules can be used for many common scenarios when creating and update table rows:
Set the value for a table column.
Perform calculations on table columns.
Validate data.
Enforce data requirements.
Prompt users to enter data into a table column.
Business rules are used to replace the need for code such as JavaScript in model-driven app forms and are an important low-code feature of Dataverse.
Business rules provide a simple drag-and-drop declarative interface to implement and maintain rules. The business rule designer allows you to specify the conditions that define when the rule is applied, and actions performed by the rule.
The following screenshot shows a business rule on the Pet table to force the Appointment Date to be displayed and a date to be selected.

Business rules are created and managed in the Power Apps maker portal. Business rules are defined for a Dataverse table and are applied based on the setting of the Scope on the rule:
Individual form: The rule applies only to the specified model-driven app form.
All forms: The rule applies to all model-driven app forms.
Entity: The rule applies to all model-driven app forms and when the row is created or updated on the Dataverse table. This is the default setting.
Actions
By combining conditions and actions, you can do any of the following with business rules:
Set column values.
Clear column values.
Set column requirement levels.
Show or hide columns.
Enable or disable columns.
Validate data and show error messages.
Create business recommendations based on business intelligence.
For more information, see Create a business rule for a table.
Differences between canvas and model-driven apps
The business rules defined for a table apply to both canvas apps and model-driven apps if the table is used in the app.
Model-driven apps can use all actions available on business rules, however not all business rule actions are available for canvas apps. The following actions aren't available on canvas apps:
Show or hide columns.
Enable or disable columns.
Create business recommendations based on business intelligence.
Dataverse security
Dataverse has a comprehensive security model that controls access to environments, tables, table rows, and other Dataverse features such as importing and exporting of data.
Data in Dataverse is securely stored so that users can view it only if you grant them access. Access to data in Dataverse is controlled using role-based access control (RBAC). Dataverse security roles are collections of privileges and access levels. Instead of assigning each privilege to a user, you assign one or more Dataverse security roles to users. This simplifies management of user access.
Note
A user must be assigned at least one security role to be able access Dataverse and run their apps.
You can assign several built-in security roles:
System Administrator: Has full permission to customize or administer the environment.
Environment Maker: Can create new resources associated with an environment, including apps, flows, and connections.
Basic user: Can run an app within the environment and perform common tasks for rows on the out-of-the-box tables such as Account and Contact.
You'll typically create custom security roles for your app to provide the minimum set of privileges required by the app.
Security roles are managed from the Power Platform admin center. Select your environment and select Settings, expand Users + permissions and select Security roles.

Within the security role you can specify the access levels for each privilege for every table. In the following screenshot, the Create, Read, Write, Delete, Append, Append To, Assign, and Delete privileges for the Pet table have been selected.

To change a privilege you select the circle for the privilege.
For more information, see Security concepts in Microsoft Dataverse.
Exercise - Create a custom table and import data
Scenario
The current sales process for your company is manual and updates are only provided each Friday. You want to simplify this process, minimize the opportunity for mistakes, and improve visibility. So you decide you want to create a new app to track sales leads and automatically calculate the forecasted revenue. You want Dataverse to store the list of potential customers.
Use Microsoft Dataverse to store data
In this exercise, you use a custom Dataverse table to store the list of potential customers for your app.
You learn how to:
Create a custom table.
Add custom columns to your table.
Create a calculated column.
Configure a business rule.
Import data from a Microsoft Excel workbook.
Create a custom table
Go to the Power Apps maker portal and sign in (if necessary).
On the menu, select Tables.
Select + New table and select +New table again.
Under Properties, enter the Display name: Prospect.
Select the Primary column tab and change the Display name to Prospect Name.
Select Save.
After a few moments, the Tables > Prospect screen will appear.

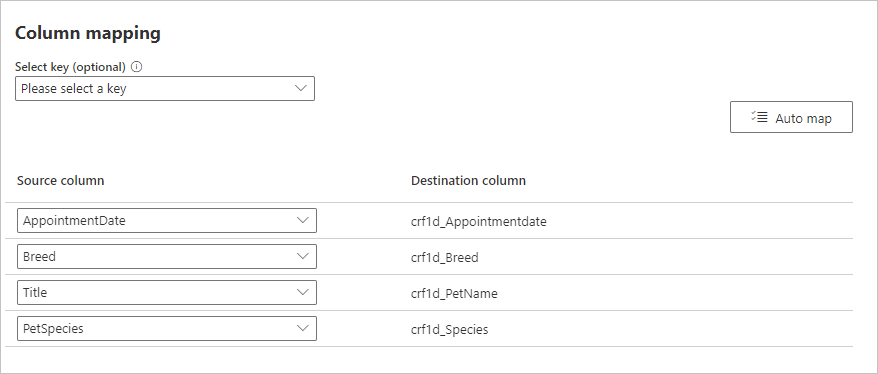
Select + to add a new column in the Prospect columns and data section.
In the New column pane, enter the following information:
Display name: StageData type: Select Choice (and select Choice from the pop-up)Required: Select Business required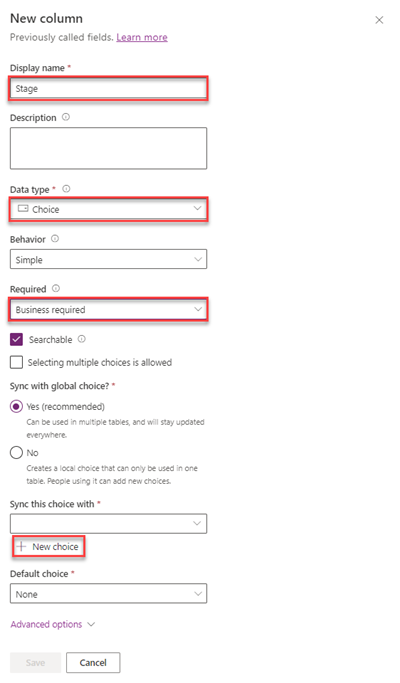
Under Sync this choice with, select + New choice. The New choice pane appears. Enter the following information and select Save.
Display name: Prospect Stage
Add the following choices under Label, selecting New choice between entries until your table looks like the following screenshot. When completed, select Save:
Lead (under Value enter 1)Opportunity (under Value enter 2)Won (under Value enter 3)Lost (under Value enter 4)
Once you've saved your New choice, select the drop-down list under Sync this choice with and find/select Prospect Stage.
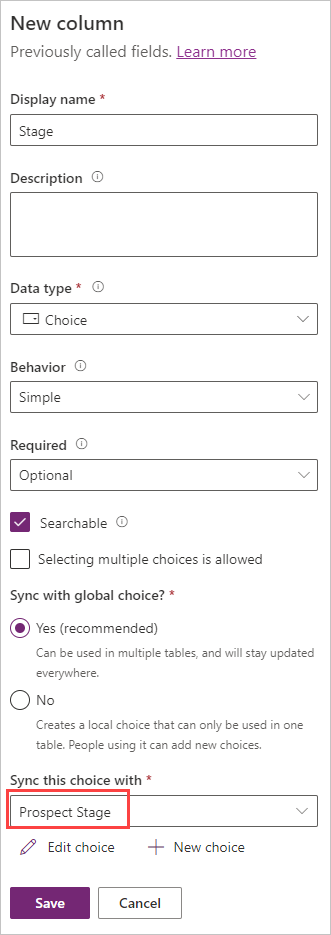
Under Default choice select Lead
Select Save.
Select + in the Prospect columns and data pane to add a new column.
Enter the following information in the New column pane and then select Save.
Display name: Contract AmountData type: CurrencySelect + again to add a new column with the following information and then select Save.
Display name: ProbabilityData type: Whole Number (Select Number and then Whole number from the popup)Next, we're going to add a column with a behavior. This one is a little more complex. Add a column with the following information. You'll notice something different after you select Save. (If your popup is blocked, ensure that you enable popups.)
Display name: Forecasted RevenueData type: CurrencyBehavior: CalculatedA calculated field pop-up window appears with the Set Forecasted Revenue where you can edit the behavior of the Forecasted Revenue column. Add an Action by selecting the + Add action button.
Enter the following formula next to the equals sign, but don't copy and paste. Note: your column names won't be exactly the same as the example below since the crXXX_ will be specific numbers and letters that define your environment. The formula entry autosuggests options as you start to type the column names. Check the screenshot below to see what your formula should look like in the Action pane.
crXXX_contractamount * (crXXX_probability / 100)
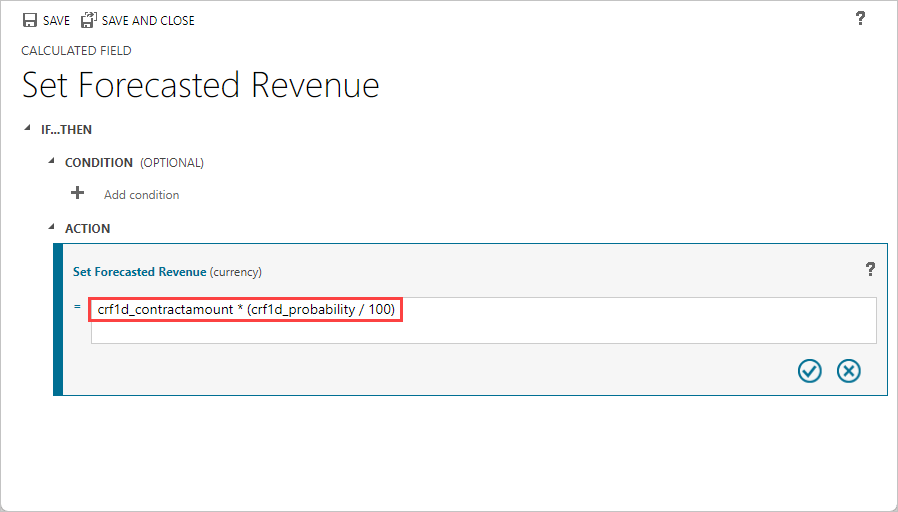
If it looks good, select the circled checkmark to save your changes. (You may need to scroll right to see the circled checkmark.)
Select SAVE AND CLOSE at the top of the window and the window disappears to reveal your Prospect Tables screen again.
Add a business rule
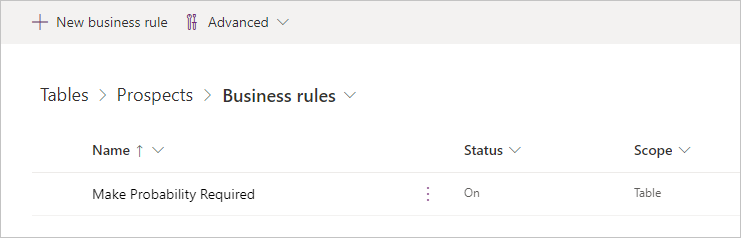
In the table designer, find the Customizations pane on the far right and select Business rules.
Select + New business rule at the top of the screen; a new browser tab will open.

Select the Condition New Condition inside of your design pane. The condition Properties pane shows on the right hand side of the screen.
In the Properties pane under Rules, look at your Field, ensure that Contract Amount is selected.
For the Operator, change the value from Equals to Contains data.
Select Apply.
Now select the Components tab.
Click and hold Set Business Required and drag to the plus symbol to the right of the purple checkbox in the design pane.

With Set Business Required New Action selected/highlighted, look at the Properties pane and under Field, select Probability.
For the Status, choose Business Required.
Select Apply.

In the top left of the screen, select the chevron drop-down just to the right of Prospect New business rule and in the Business rule name, type Make Probability Required.
Select Save in top-right corner of screen.
Select Activate to (also top-right of screen) activate the rule.
A popup window appears for Process Activate Confirmation. Select Activate in the popup to confirm activation.
Close the browser tab.
Select Done.
Notice your new business rule has been added to the Business rules screen. Select Prospect to return to your table editing screen.
Import data from an Excel file
You use the spreadsheet named "Prospects.csv" for this exercise. Open this link and Download the file.
Extract the Prospects.csv from the zip file.
Open the Prospects.csv file in Excel. Notice the Stage column is empty. You need to enter these values manually. Enter the values in the Stage column as below:
Contoso Flooring: WonFabrikam Inc: WonAdventure Works: LeadVanArsdel: LostAdatum: LeadRelecloud: OpportunitySave your file locally as an Excel Workbook (.xlsx). Then close the spreadsheet.
Return to your Prospect table in the Power Apps maker portal.
Select the Import button at the top of the screen and select Import data from Excel.
Note
If you receive an error when selecting the Import data from Excel option, then your Power Apps license does not allow for importing Excel data.
In the Import data pane that pops up, select Upload under the File entry field, locate the Prospects Excel workbook, and select Open.
Wait a few moments as the file uploads. Next, you see an error notification under the column Mapping Status saying "Mapping errors exist".
Select Map columns. (You need to scroll to the right to see Map columns.)
Map the following Prospect columns to the associated Source values:
Contract Amount: ContractAmountProspect Name: NameProbability: ProbabilityStage Value: StageSelect Save Changes at the top right of the screen. If successful, you see a success notification under Mapping status saying "Mapping was successful".
Select Import at the top right of the screen. You have to wait while your data is being imported. If successful, you see a notification saying "Import completed successfully." Close the window by selecting x at the top right of the window.
The imported data doesn't appear right away, so go ahead and refresh your browser screen.
Ensure that the data has been successfully imported. Your columns and data should look similar to this:

Congratulations! You've created a custom table with a business rule and imported from an Excel data source. Now you have an automated way to store your potential customers.
Dataverse auditing
Microsoft Dataverse supports an auditing capability where table and column data changes within an environment can be recorded over time for use in analysis and reporting purposes. Auditing is supported on all custom and most customizable tables and columns. Auditing isn't supported on table or column definition changes, retrieve operations, export operations, or during authentication.
Key concepts
The following bullets identify some key auditing concepts:
You can enable or disable auditing at the environment, table, and column levels. If auditing isn't enabled at the environment level, auditing of tables and columns, even if it's enabled, doesn't occur. By default, auditing is enabled on all auditable table columns but is disabled at the table and environment level.
The ability to retrieve and display the audit history is restricted to users who have certain security privileges: View Audit History, and View Audit Summary. There are also privileges specific to partitions: View Audit Partitions, and Delete Audit Partitions. See the specific message request documentation for information about the required privileges for each message.
Audited data changes are stored in records of the audit table.
Configure tables and columns for auditing
Auditing can be configured at three levels: environment, table, and column. The environment level is the highest level, followed by the table level, and finally the column level. For column auditing to take place, auditing must be enabled at the column, table, and environment levels. For table auditing to take place, auditing must be enabled at the table and environment levels.
There's a slight difference in how auditing is enabled or disabled for an environment compared to a table or column.
You enable or disable auditing at the environment level under Settings in the Microsoft Power Platform admin center.
For tables, you enable auditing under Advanced options for the table in the Power Apps maker portal by checking the Audit changes to its data box.
For columns, you enable auditing under Advanced options for the column in the Power Apps maker portal by checking the Enable auditing box.
A user must be assigned the System Administrator or System Customizer security role to enable or disable auditing.
For more information, see Manage Dataverse auditing.
Dual-write vs. virtual tables
Microsoft Dataverse allows for many different connections to external data sources. Dual-write and virtual tables allow Dataverse to access this data and write back to the original data source.
Dual-write
Dual-write is an out-of-the-box infrastructure that provides near-real-time interaction between Dataverse and Dynamics 365 finance and operations apps or Business Central apps. When data about customers, products, people, and operations flows beyond application boundaries, all departments in an organization are empowered.
Dual-write provides tightly coupled, bi-directional integration between Dynamics 365 finance and operations apps and Dataverse. Any data change in finance and operations apps causes writes to Dataverse, and any data change in Dataverse causes writes to finance and operations apps. This automated data flow provides an integrated user experience across the apps.
Find more information on configuring Dual-write.
Virtual tables
Virtual tables (also known as virtual entities) enable the integration of data residing in external systems by seamlessly representing that data as tables in Microsoft Dataverse, without replication of data and often without custom coding.
Virtual tables replace previous client-side and server-side approaches to integrating external data, which required customized code and suffered from numerous limitations, including imperfect integration, data duplication, or extensive commitment of development resources. In addition, for administrators and system customizers, the use of virtual tables greatly simplifies administration and configuration.
Find more information on configuring virtual tables.
When to use Dual-write vs. virtual tables?
Both Dual-write and virtual tables offer useful data integration functionality. It's important to understand when you need to use each tool.
Dual-write should be used when you're working with Dynamics 365 apps and need near real-time integration. Dual-write will duplicate the data in both directions (to and from Dataverse).
Virtual tables should be used when you're connecting to data sources outside of Dynamics 365. These data sources may have built-in connectors, or you may have to use a custom connector.
Check your knowledge
Answer the following questions to see what you've learned.
When you create a Table, what are the two types of relationships you can create?
One-to-many and One-to-one
One-to-many and Many-to-many
The two types of relationships you can create are One-to-many and Many-to-many.
One-to-one and Many-to-one
How many apps can use the same Table?
1
20
100
Unlimited
The same table can be used by an unlimited number of apps.
How can you create a Many-to-one relationship between two tables?
Create a customer column
Create a choice column
Create a lookup column
Creating a lookup column creates a many-to-one relationship.
Create a relationship role.


 Bengali (Bangladesh) ·
  English (United States) ·