
ARTICLE AD
Microsoft Dataverse Azure Solutions overview
100 XP
10 minutesBecause Microsoft Dataverse is built as part of the robust Microsoft Power Platform, it provides numerous capabilities to facilitate integration with Microsoft Azure solutions. This lesson covers some of the standard integration practices regarding Azure solutions and how they pertain to Dataverse.
Comparing Azure's integration solutions
Azure comes with a variety of other solutions, which can also be integrated with Dataverse. The following sections provide a summary of each solution. However, this module will limit further education in future lessons to the solutions that have pre-configured utilities within Dataverse that help streamline your integrations, such as Microsoft Azure Service Bus, Microsoft Azure Event Hubs, and Microsoft Azure Logic Apps.
Logic Apps
Azure Logic Apps provides a robust visual interface in which you can orchestrate complex integrations across your various environments. It has many of the same capabilities as Microsoft Power Automate workflows, so if you are familiar with preparing workflows in that context, you should be able to recognize their similarities. Both provide the ability to use pre-built and custom-built connectors, which you can use to connect to whichever system is needed. Most importantly, Logic Apps comes with a Microsoft Dataverse connector that will allow you to trigger actions based on various Dataverse events (such as a record being created or updated).
Azure Service Bus
Azure Service Bus is Microsoft's cloud messaging as a service (MaaS) platform. Messages are sent to and received from queues for point-to-point communications. Service Bus also provides a publish-subscribe mechanism that uses its Topics feature, which will not be covered in this module.
Azure API Management
Because API needs are handled by Dataverse Web API, and because Dataverse provides a role-based security model that can handle most integration scenarios, you might not need to consider Microsoft Azure API Management often. However, if you ever need to write a custom and/or proprietary API to sit on top of the Dataverse Web API, you could use Azure's API Management services.
Event Grid
Microsoft Azure Event Grid is an event-driven, publish-subscribe framework that allows you to handle various events. While Dataverse does not provide out-of-the-box capabilities to integrate with an Event Grid instance as it does with Service Bus or Event Hubs, it is a viable item to consider when you are in need of event-driven integrations.
Event Hubs
Azure Event Hubs is Microsoft's version of Apache Kafka and provides a real-time data ingestion service that supports millions of events per second. This service is good for large streams of data that need to be ingested in real time (which might occur when you are trying to capture items like application telemetry within a business application) but are not common in most business application integration scenarios. Technically, Event Hubs is not seen as an integration solution in Azure (it's seen as an analytics solution given that its predominant applications are with "big data"). Dataverse provides a utility to publish events to an Event Hub. In the context of Dataverse, while provided as an endpoint, Azure Service Bus traditionally becomes the preferred method for integration of actual business data because it comes with far less overhead.
Choosing the right Azure integration solution
If you're struggling to figure out which Azure integration solution best suits your needs, consider the information in the following table.
| Create workflows and orchestrate business processes to connect hundreds of services in the cloud and on-premises. | Logic Apps |
| Connect on-premises and cloud-based applications and services to implement messaging workflows | Service Bus |
| Publish your APIs for internal and external developers to use when connecting to backend systems that are hosted anywhere. | API Management |
| Connect supported Azure and third-party services by using a fully managed event-routing service with a publish-subscribe model that simplifies event-based app development. | Event Grid |
| Continuously ingest data in real time from up to hundreds of thousands of sources and stream a million events per second. | Event Hubs |
For in-depth guidance on Azure's broader Integration Services framework, refer to the Azure Integration Services whitepaper, which is found here.
Another article to reference is one found on the Azure website: Choose between Azure messaging services - Event Grid, Event Hubs, and Service Bus.
xpose Microsoft Dataverse data to Azure Service Bus
100 XP
30 minutesMicrosoft Dataverse provides a variety of pre-built mechanisms for externalizing its data for integration purposes. This lesson covers how to accomplish exposing Dataverse data to Azure Service Bus by using Dataverse's Service Endpoint Registration feature, which is found in its Plug-in Registration Tool.
Set up your Azure Service Bus environment
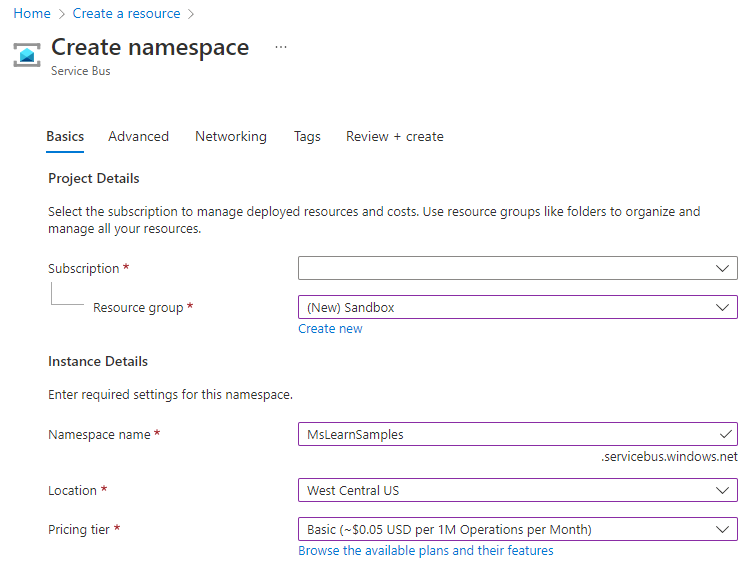
Create your Azure Service Bus namespace and message queue with the following steps.
Sign in to the Azure portal.
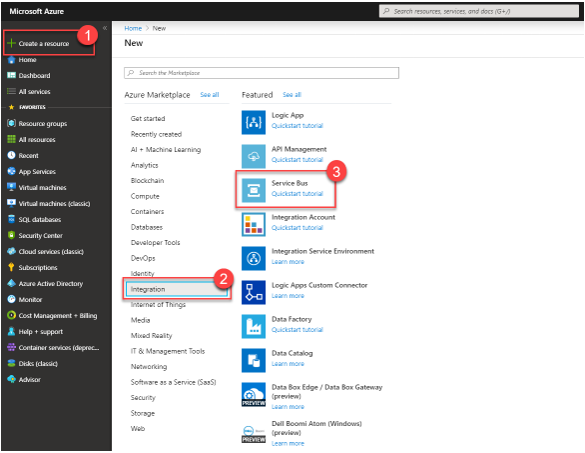
In the left navigation pane of the portal, select + Create a resource, select Integration, and then select Service Bus.
Enter the appropriate details for your namespace and then select Create.
Select Create.
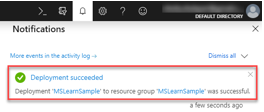
It might take a few minutes for your resource to provision. When it's finished, you should see something similar to the following image in the Notifications area of your Azure portal:
After your resource has been created, go to your newly created namespace to create a new queue.
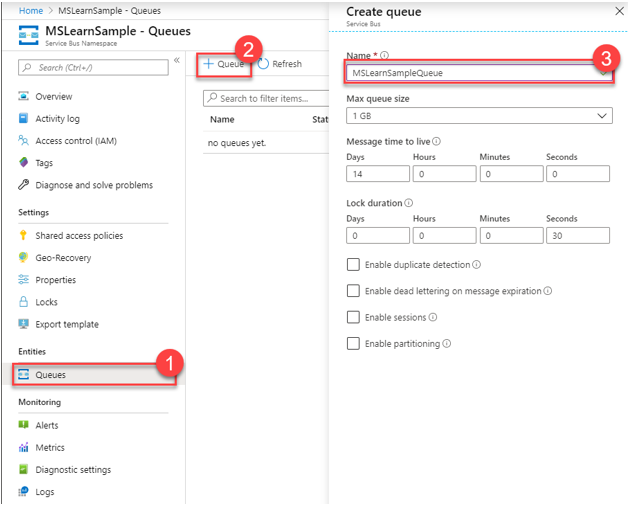
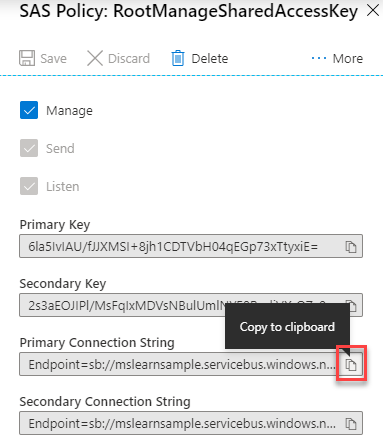
Note a few items that are found in your namespace so that Dataverse has the correct credentials to connect to your new queue. For this procedure, use the existing Shared access policy that was auto created as part of your namespace. If you want further access limitations, you can create a Shared access policy for your individual queue as well.
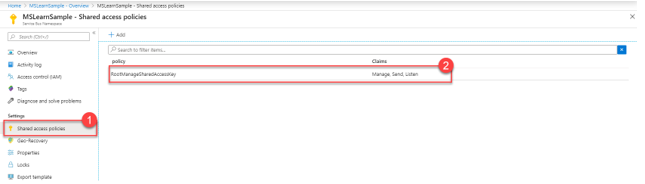
From within your Shared access policy, copy your Primary Connection String and store it for future use because you'll need this string as part of your Service Bus Endpoint configuration in Dataverse:
Register Service Bus Endpoint in Dataverse
Now that you have set up a message queue in Azure, you can provide Dataverse with the required configuration information to access it.
Note
You will be using Dataverse's Plug-in Registration Tool to configure the publishing of your Dataverse data to your Service Bus. This tool is provided as part of Microsoft's Dataverse developer tooling, which is found at NuGet. For more information on how to install the Plug-in Registration Tool through NuGet, see Download tools from NuGet.
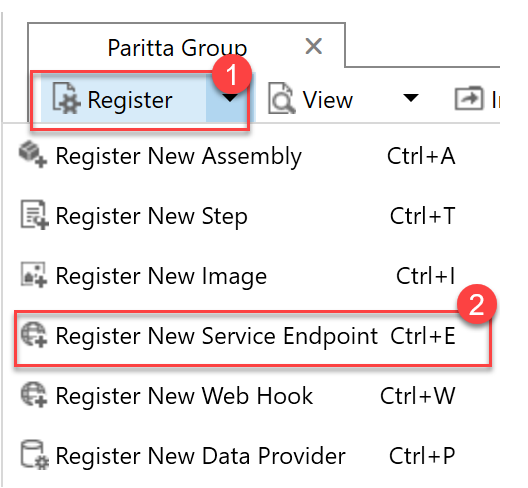
Open the Plug-in Registration Tool and connect to your Dataverse environment.
When connected to the environment, register your Service Bus Endpoint by selecting Register and then selecting Register New Service Endpoint.
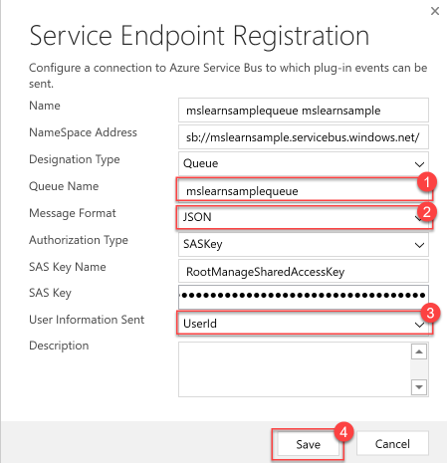
Copy and paste the Primary Connection String value that you referenced earlier when setting up your Service Bus instance, and then select Next.
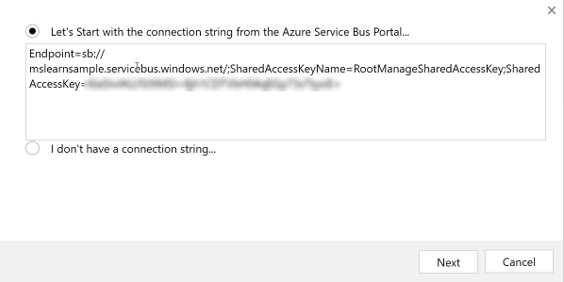
All the fields from your connection string should prepopulate on the form. For this example, you'll be writing a one-way queue publisher, so you can leave the Designation Type as Queue. Dataverse supports many other designation types to support various messaging protocols.
Enter your queue name into the Queue Name field and specify Message Format as JSON. Dataverse supports the .NETBinary, JSON, and XML message formats. You are using JSON for this message because it's become an industry standard messaging format because of its portability and lightweight nature. Lastly, to have your user information sent to your queue, you can select UserId in the User Information Sent drop-down list.
Register a Service Bus integration step
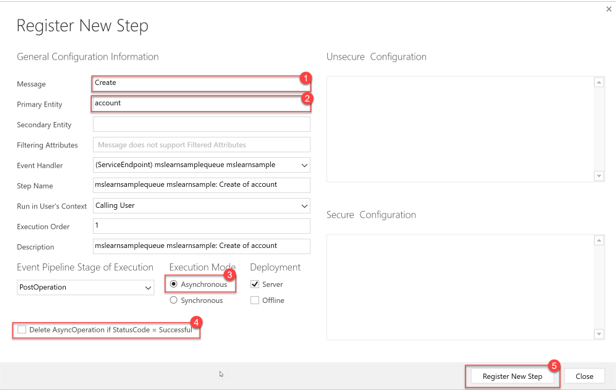
In this scenario, you'll register an integration step that publishes a message to a Service Bus queue every time an account is created. By registering a step, you can define the entity and message combination, and you can define what conditions will cause the message that is being processed by Dataverse to be sent on the Service Bus to the Azure queue.
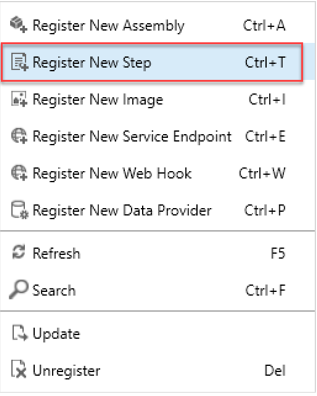
Register a new step for your Service Endpoint by right-clicking and selecting Register New Step.
Enter the following details to register a new integration step that will be started on creation of an account record. Make sure that you clear the Delete AsyncOperation if StatusCode = Successful flag. Clearing this flag is only for testing purposes so you can verify that the created System Job records show that the Service Bus integration step has successfully started on creation of an account record. In a real-world production scenario, we recommend that you leave this value selected.
Test your Service Bus integration
Test your Service Bus integration with the following steps:
To test your Service Bus integration, go to your Dataverse environment and create an account.
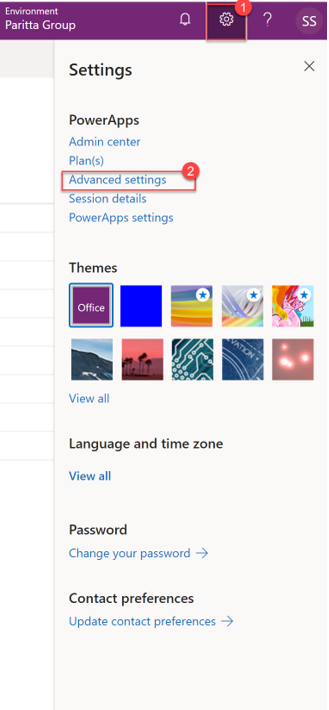
To see if the integration ran, go to Settings > Advanced Settings and select the System Jobs view.
 Advanced settings area." data-linktype="relative-path" style="box-sizing: inherit; outline-color: inherit; border: 0px; vertical-align: baseline; display: inline-block;">
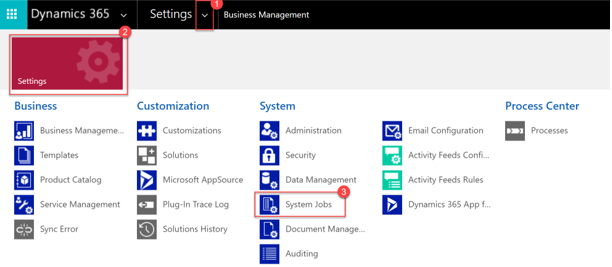
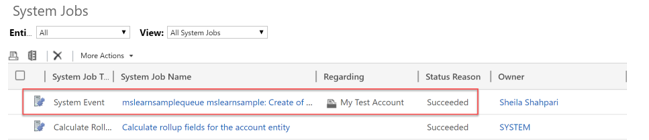
Go to the System Jobs view by going to Settings > System Jobs.
 Settings > System Jobs." data-linktype="relative-path" style="box-sizing: inherit; outline-color: inherit; border: 0px; vertical-align: baseline; display: inline-block;">
Verify that your integration step ran successfully by viewing it in the System Jobs view. If it ran successfully, the Status Reason should be Succeeded. You'll also use this view to troubleshoot integration runs in the event that an error occurs. In the case of failure, open the System Job record to view the error information.
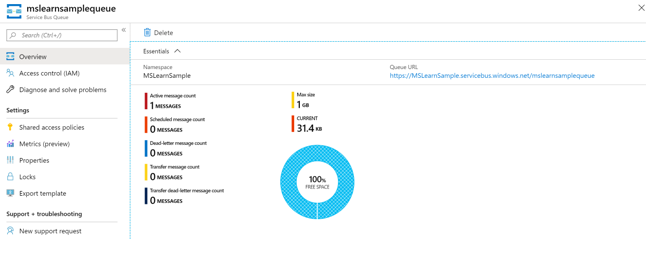
Because the integration step ran successfully, you can now verify that the account creation message has arrived in your Service Bus queue by going to the queue in the Azure portal.
Write a Service Bus Event Listener that consumes Microsoft Dataverse messages
100 XP
10 minutesTypes of supported Service Bus contracts
Microsoft Dataverse supports a variety of methods to consume Azure Messaging Service Bus queue messages: queue, one-way, two ways, or REST. If using two-way and REST, you are able to return a string of information back to Dataverse.
Queue
Queue listeners are not required for this type of queue. You can consume queued messages in a "destructive" or "non-destructive" read. A destructive read will read the message from the queue and remove it, whereas a non-destructive read will not remove the message from the queue. This method is useful for "send-and-forget" scenarios where it is not critical that the message is received at a given point of time.
Topic
Topic listeners are similar to queue listeners, except that one or more listeners can subscribe to receive messages for a given topic. This type is useful if you require multiple consumers for a given message.
One-way
One-way contracts require that an active event listener be available to consume a message that is posted to the Service Bus queue. If no active listener is available, the post will fail. If the post fails, Dataverse will retry posting the message in exponentially larger and larger time spans until the asynchronous system job is eventually canceled. In this case, the System Job status of this event will be set to Failed.
Two-way
Two-way contracts are similar to one-way contracts, except that they also provide the ability to return a string value from the listener. If you've registered a custom Azure-aware plug-in to post your message, you can then consume this returned data within your plug-in. A common application of this scenario might be if you want to retrieve the ID of a record that was created in an external system as part of your listener's process to maintain it in your Dataverse environment.
REST
REST contracts are similar to two-way contracts except that it is exposed on a REST endpoint.
Write a queue listener
In the previous exercise, you registered a Service Endpoint that publishes messages to a Service Bus Endpoint whenever account data is updated in your Dataverse environment. This exercise now describes how to consume those messages.
Create a C# Console Application in Visual Studio that targets .NET 4.6.2 or higher.
Add the following NuGet packages:
Azure.Messaging.ServiceBus
Microsoft.CrmSdk.CoreAssemblies
In the application's Main method, paste the following code. Replace the Endpoint URL with your Azure Service Bus Namespace's Endpoint URL and the queue name if it differs:
C#Copy
string connectionString =@"[ENDPOINT URL]"; string queueName = "mslearnsamplequeue"; QueueClient queueClient = QueueClient.CreateFromConnectionString(connectionString, queueName, ReceiveMode.PeekLock);To consume your message, use the "OnMessage" method, which provides the ability to process a Service Bus queue message in an event-driven message pump.
C#Copy
{ //get RemoteExecutionContext based on Message Format RemoteExecutionContext context = null; if (message.ContentType == "application/msbin1") //.NETBinary Message Format { context = message.GetBody(); } else if (message.ContentType == "application/json") //JSON Message Format { context = message.GetBody( new DataContractJsonSerializer(typeof(RemoteExecutionContext))); } else if (message.ContentType == "application/xml") //XML Message Format { context = message.GetBody( new DataContractSerializer(typeof(RemoteExecutionContext))); } try { var target = context.InputParameters["Target"] as Entity; foreach (var field in target.Attributes) { Console.WriteLine($"Name: {field.Key} Value: { field.Value}"); } } catch (Exception ex) { Console.WriteLine(ex.ToString()); } }); " style="box-sizing: inherit; outline-color: inherit; font-family: SFMono-Regular, Consolas, "Liberation Mono", Menlo, Courier, monospace; font-size: 1em; direction: ltr; border-width: 0px; border-style: initial; line-height: 1.3571; display: block; position: relative;">queueClient.OnMessage(message => { //get RemoteExecutionContext based on Message Format RemoteExecutionContext context = null; if (message.ContentType == "application/msbin1") //.NETBinary Message Format { context = message.GetBody<RemoteExecutionContext>(); } else if (message.ContentType == "application/json") //JSON Message Format { context = message.GetBody<RemoteExecutionContext>( new DataContractJsonSerializer(typeof(RemoteExecutionContext))); } else if (message.ContentType == "application/xml") //XML Message Format { context = message.GetBody<RemoteExecutionContext>( new DataContractSerializer(typeof(RemoteExecutionContext))); } try { var target = context.InputParameters["Target"] as Entity; foreach (var field in target.Attributes) { Console.WriteLine($"Name: {field.Key} Value: { field.Value}"); } } catch (Exception ex) { Console.WriteLine(ex.ToString()); } });Lastly we are going to add a Console.ReadLine() to our main method to allow for multiple messages to be processed. Note this is not a scalable method for handling event-processing however is sufficient enough for our exercise’s purposes. You’d want to have a more scalable solution that you host in an Azure Durable function or other service of your preference.
C#Copy
Console.ReadLine();Hit F5 to run your application. If there are already messages in your queue from your previous exercise, they should get processed and their message contents should be displayed on the console screen. If not, you can invoke an update by making an update to an Account in your Dataverse environment.
Publish Microsoft Dataverse events with webhooks
Another method for publishing events from Microsoft Dataverse to an external service is to register webhooks. A webhook is an HTTP-based mechanism for publishing events to any Web API-based service of your choosing. This method allows you to write your own custom code that is hosted on external services as a point-to-point.
Webhooks vs. Azure Service Bus
When considering integration mechanisms, you have a few available options. It's important that you consider various elements when choosing a given method.
Consider using Azure Service Bus when:
High scale asynchronous processing/queueing is a requirement.
Multiple subscribers might be needed to consume a given Dataverse event.
You want to govern your integration architecture in a centralized location.
Consider using webhooks when:
Synchronous processing against an external system is required as part of your process (Dataverse only supports asynchronous processing against Service Bus Endpoints).
The external operation that you are performing needs to occur immediately.
You want the entire transaction to fail unless the webhook payload is successfully processed by the external service.
A third-party Web API endpoint already exists that you want to use for integration purposes.
SAS authentication isn't preferred and/or feasible (webhooks support authentication through authentication headers and query string parameter keys).
Webhook authentication options
The following table describes the three authentication options that you can use to consume a webhook message from a given endpoint.
| HttpHeader | Includes one or more key value pairs in the header of the HTTP request. Example: Key1: Value1, Key2: Value2 |
| WebhookKey | Includes a query string by using code as the key and a value that is required by the endpoint. When registering the webhook by using the Plug-in Registration Tool, only enter the value. Example: ?code=00000000-0000-0000-0000-000000000001 |
| HttpQueryString | Includes one or more key value pairs as query string parameters. Example: ?Key1=Value1&Key2=Value2 |
Webhook HTTP headers
The following table shows the HTTP headers that are passed to your service as part of a webhook call. You can use these headers as part of your processing method if you are writing a new webhook processor.
| x-request-id | A unique identifier for the request |
| x-ms-dynamics-organization | The name of the tenant who sent the request |
| x-ms-dynamics-entity-name | The logical name of the entity that passed in the execution context data |
| x-ms-dynamics-request-name | The name of the event that the webhook step was registered for |
| x-ms-correlation-request-id | Unique identifier for tracking any type of extension. This property is used by the platform for infinite loop prevention. In most cases, this property can be ignored. This value can be used when you are working with technical support because it can be used to query telemetry to understand what occurred during the entire operation. |
| x-ms-dynamics-msg-size-exceeded | Sent only when the HTTP payload size exceeds the 256KB |
Register a Webhook endpoint
Webhook endpoint registration is performed similarly to Service Endpoint registration, by using the Plug-in Registration Tool.
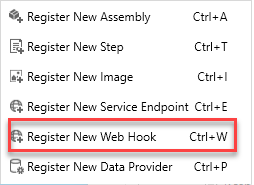
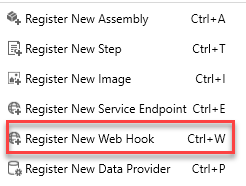
Within the Plug-in Registration Tool, you can register a new webhook by selecting Register New Web Hook under the Register menu option.
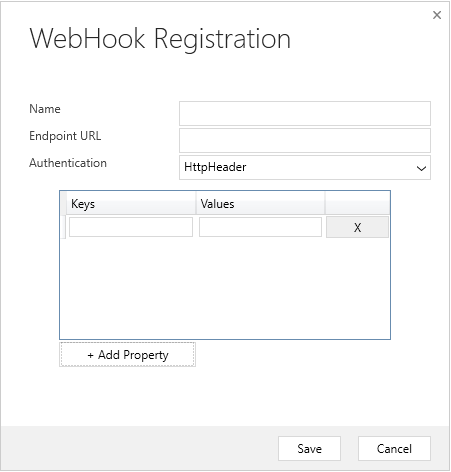
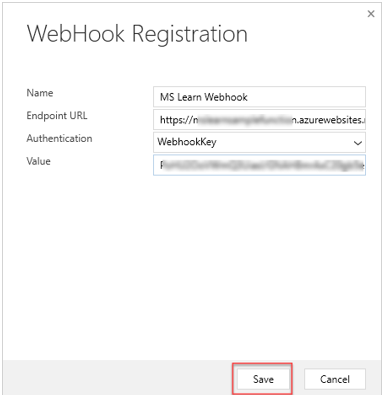
The following WebHook Registration dialog box will appear, where you can configure the URL of your endpoint, along with any authentication options.
Register with HTTPHeader Authentication
If HttpHeader authentication is selected, the screen will prompt you to add Keys and Values that will be passed as part of your HTTP request. Commonly, the keys and values might include an OAuth bearer token or other various authentication formats.
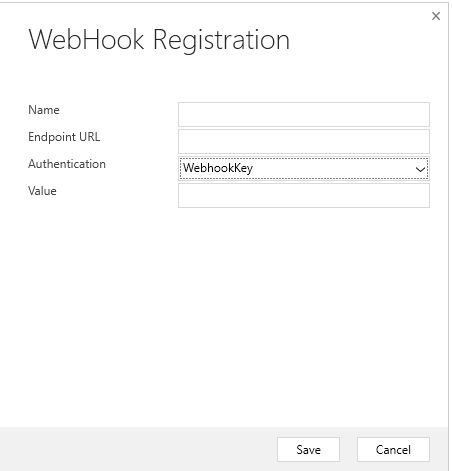
Register with WebhookKey Authentication
If WebhookKey is specified as the Authentication method, a query string is passed to the URL with the given key in the format ?code=[web hook key]. This method is handy when you are calling Azure Functions because it uses this code parameter by default to perform its authentication.
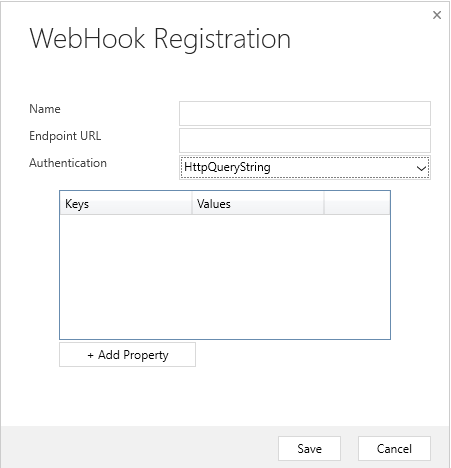
Register with HTTPQueryString Authentication
You can pass Query String parameters by specifying HttpQueryString as the Authentication option. As with the HTTPHeader option, it presents the option to pass a set of key/value pairs to your Web API. You could also pass additional parameters, and even manually pass the "code" parameter that is expected through Azure Functions in this manner.
Write an Azure Function that processes Microsoft Dataverse events
The previous exercise reviewed how to register webhooks that expose Microsoft Dataverse data to an external Web API. In this exercise, you will build an example Web API by using Azure Functions to illustrate how to consume a published webhook event.
Azure Functions vs. plug-ins
Microsoft Azure Functions provides a great mechanism for doing small units of work, similar to what you would use plug-ins for in Dataverse. In many scenarios it might make sense to offload this logic into a separate component, such as an Azure Function, to reduce load on the Dataverse's application host. You have the availability to run functions in a synchronous capacity because Dataverse webhooks provide the Remote Execution Context of the given request.
However, Azure Functions does not explicitly run within the Dataverse's implementation pipeline, so if you need to update data in the most high-performing manner, such as autoformatting a string value before it posts to Dataverse, we still recommend that you use a plug-in to perform this type of operation.
Write an Azure Function that processes Dataverse events
To start writing an Azure Function that processes Dataverse events, you will use Visual Studio 2019's Azure development template to create and publish your Function. Visual Studio provides a number of tools that are available to help make Azure development simple. Therefore, you are required to have Azure Development Tools installed in your Visual Studio 2019 instance. If you don't have the feature installed, you can add it through the Visual Studio Installer.
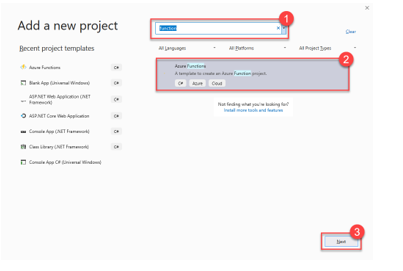
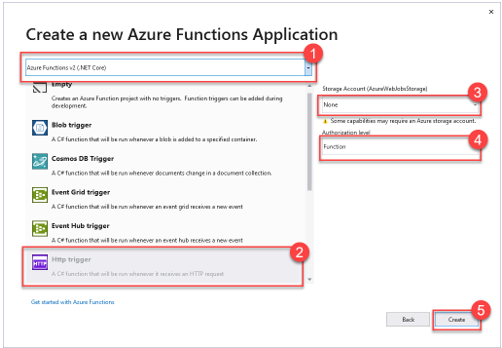
Create your Azure Function project
Create a new Azure Function project by using the Azure Functions template. You can find this template by creating a new project and then entering "function" in the search bar.
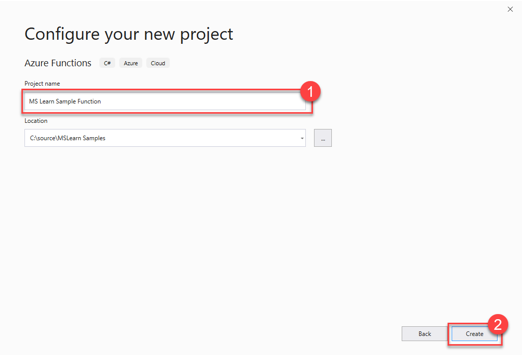
Give your Function project a descriptive name and then select Create.
Specify the Azure Functions v2 (.NET Core) type and ensure that Http trigger template is selected. You can set Storage Account to None because you won't be using storage for this exercise; however, you might need it in other scenarios. Set the Authorization level to Function and then select Create.
Your sample project should be created now, with the following template code found in the Function's .cs file:
You will be replacing this code later, but first, you will publish your Function to ensure that everything works correctly.
Publish your Azure Function to Azure
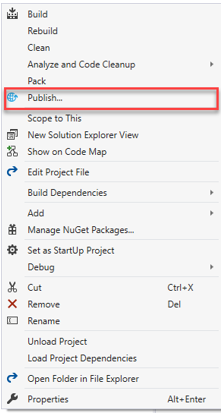
Right-click your project and select Publish... from the context menu to test the publishing of your Function to Azure App Service.
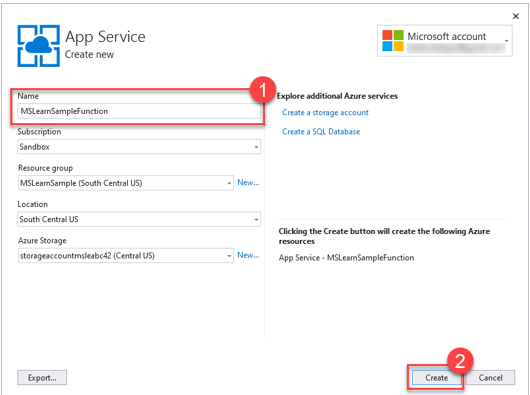
Create a new publish target if you haven't already. If you'd like to select an existing App Service plan, you can skip this step and select the Select Existing option instead.
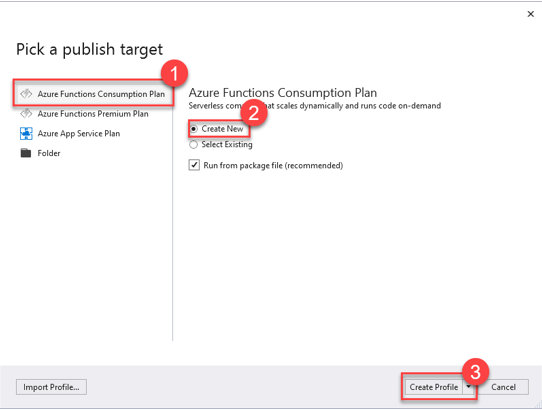
If you are creating a new publish target, name your new App Service, verify that its Subscription, Resource group, Location, and Azure Storage fields are correct, and then select Create.
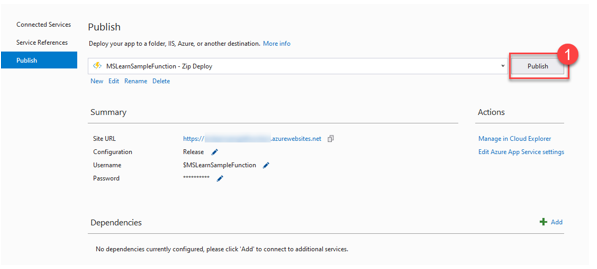
After your Publish profile is created, select Publish to deploy your Function to Azure. The Function is published by default in release mode. If you'd like to debug this function (more on this later), you'll want to publish the Function in Debug mode.
Another method to create Azure Functions
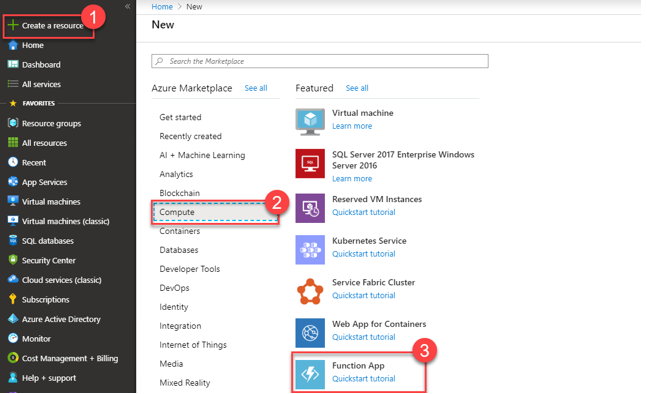
If you want to manually create your Azure Function without the help of Visual Studio 2019, you can do so from the Azure portal:
Sign in to your Azure environment and create a Function App by selecting Create a resource.
 Compute > Function App." data-linktype="relative-path" style="box-sizing: inherit; outline-color: inherit; border: 0px; vertical-align: baseline; display: inline-block;">
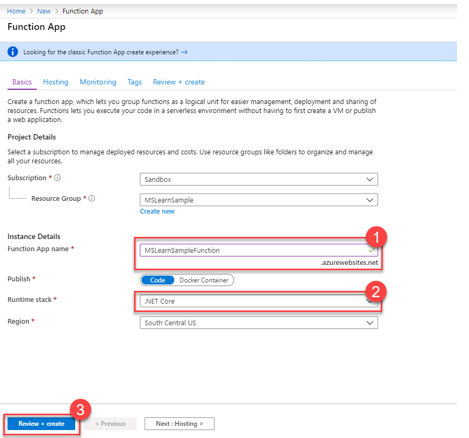
To create an Azure Function App, specify its name and runtime stack, and then verify that the Subscription, Resource group, and Region fields are correct.
Note
This lesson doesn't cover the details of building a new Azure Function assembly.
Update your Function's logic to interact with Dataverse data
If needed, change your Function's FunctionName and corresponding class name to something more meaningful (that is, MSLearnFunction).
Add the following using statements to your Function:
Replace the code inside the Run function with the code below:
Build your Function and publish it to Azure by right-clicking the project and then selecting Publish....
Verify that your Function has been published by going to the Azure portal. You can either manually select it from within the resource group that you specified when you created the Function, or you can search for it by name in the Azure portal, as shown in the following image.

Register a Dataverse webhook that calls your Azure Function
In this exercise, you'll use the Plug-in Registration Tool to register a webhook that calls your new Azure Function.
Open the Plug-in Registration Tool and sign in to your Dataverse environment.
Register a new webhook by selecting Register New Web Hook under the Register menu option.
Get your Function's URL from the Azure portal by selecting Get function URL.
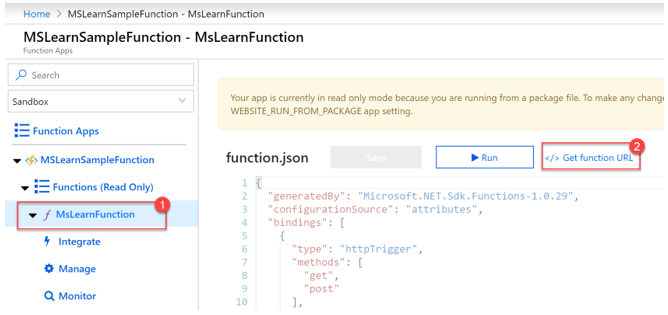 Get function URL" data-linktype="relative-path" style="box-sizing: inherit; outline-color: inherit; border: 0px; vertical-align: baseline; display: inline-block;">
Paste the copied value into a text editor, which should look like the following image.
Cut and paste the code query string value from the copied URL and place into the Value section of the WebHook Registration string (make sure to remove the code= portion).
Register a new step that will post a message on creation of a new account. Register a new step by right-clicking your new webhook assembly and then selecting Register New Step.
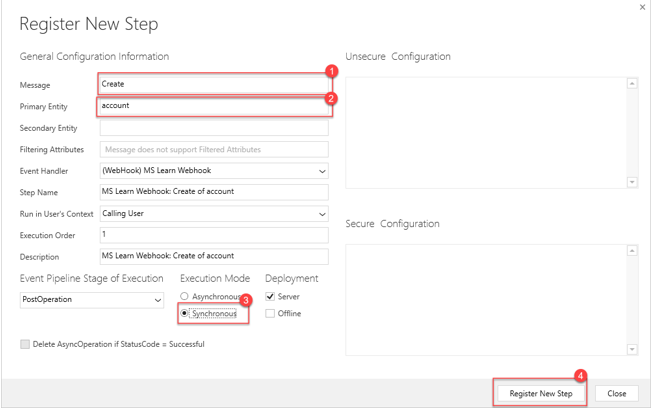
Configure the step as illustrated in the following figure. Because you will be building this webhook to run synchronously, ensure that the flag is set when you are registering the new step.
Test your webhook integration
To test your webhook integration, go to your Dataverse environment and create an account.
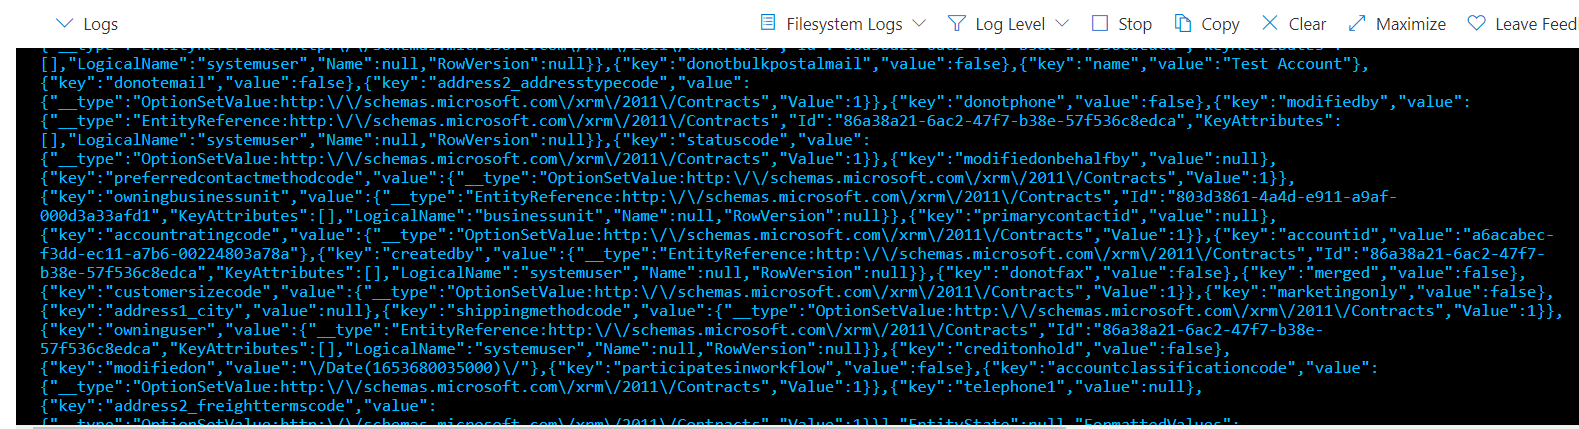
Go to your Function in the Azure portal and view the logs.
Check your knowledge
Answer the following questions to see what you've learned.
1.
What is Microsoft's cloud-based messaging solution called?
Event Grid
Logic Apps
Service Bus
Microsoft's cloud-based messaging solution is Service Bus.
2.
Dataverse can be configured to publish events directly to which Azure service?
Event Grid
Service Bus
Dataverse can be configured to publish directly to Azure Service Bus.
Logic Apps
3.
What mechanism might you use to publish Microsoft Dataverse data directly to an Azure Function?
Webhooks
Webhooks is used to publish Dataverse data directly to an Azure Function.
Power Automate
Logic Apps


 Bengali (Bangladesh) ·
  English (United States) ·