
ARTICLE AD
Introducing model-driven apps
100 XP
5 minutesModel-driven app design is an approach that focuses on adding dashboards, forms, views, and charts to your apps. With little or no code, you can build apps that are simple or complex.
In canvas apps, the app maker has total control over the app layout. In model-driven apps, on the other hand, much of the layout is determined by the components you add. The emphasis is more on quickly viewing your business data and making decisions instead of on intricate app design.

The approach to making model-driven apps
Model-driven apps have three design phases:
Model your business dataDefine your business processesBuild the appModel your business data
Model-driven design uses metadata-driven architecture so that designers can customize apps without writing code. To model business data, you determine what data the app will need and how that data will relate to other data. Metadata means data about data and it defines the structure of the data stored in Microsoft Dataverse.
Define your business processes
Defining and enforcing consistent business processes is a key aspect of model-driven app design. Consistent processes help ensure that your app users can focus on their work and not worry about having to remember to perform a set of manual steps. Processes can be simple or complex, and they often change over time.
Build the app
After modeling data and defining processes, you build your app by selecting and setting up the pages you need in the App Designer.

Components of model-driven apps
100 XP
8 minutesA well designed model-driven app consists of several components you select using the designer to build the appearance and functionality of the finished app. The components and component properties that makers use to create an app become the metadata.
To understand how each of these components relates to app design, they're separated here into data, UI, logic, and visualization categories.
Data components
These components determine what data the app will be based upon and what designer is used to create or edit the component.
Data components are either designed at a table level within an environment, or within a solution contained within the environment.
| Table | A container for records with properties that you track, such as a contact or account. Many standard tables are available. You can customize a non-system standard table (production table) or create a custom table from scratch. | Power Apps table designer |
| Column | A property that is associated with a table. A column is defined by a data type, which determines the type of data that can be entered or selected. Examples include text, number, date and time, currency, or lookup (creates a relationship with another table). Columns typically are used with forms, views, and searches. | Power Apps table designer |
| Relationship | Table relationships define how tables can be related to each other. There are 1:N (one-to-many), N:1 (many-to-one), and N:N (many-to-many) types of relationships. For example, adding a lookup column to a table creates a new 1:N relationship between the two tables and lets you put that lookup column on a form. | Power Apps table designer |
| Choice column | This is a special type of column, which provides the user a set of predetermined options. Each option has a number value and label. When added to a form, this column displays a control for the user to select an option. There are two kinds of choices; choices, where the user can only select one option, and multi-select choices, which allow more than one selection. | Power Apps option set designer |
User interface components
The user interface components determine how users will interact with the app.
| App | Determines the application fundamentals such as components, properties, client type, and URL for your app. | App designer |
| Site map | Specifies the navigation for your app. | Site map designer |
| Form | A set of data-entry columns for a given table that matches the items that your organization tracks for the table. For example, a set of data-entry columns where users input relevant information to track a customer's previous orders along with specific requested reorder dates. | Form designer |
| View | Views define how a list of records for a specific table appears in your app. A view defines the columns shown, the width of each column, the sort behavior, and the default filters. | View designer |

Logic
Determines the business processes, rules, and automation the app will have. Power Apps makers use a designer that is specific to the type of process or rule.
| Business process flow | An online process that walks users through a standard business process. For example, use a business process flow if you want everyone to handle customer service requests the same way, or to require staff to gain approval for an invoice before submitting an order. | Business process flow designer |
| Workflow | Workflows automate business processes without a user interface. Designers use workflows to initiate automation that doesn't require any user interaction. | Workflow designer |
| Actions | Actions are a type of process that lets you manually invoke actions, including custom actions, directly from a workflow. | Process designer |
| Business rule | Used to apply rule or recommendation logic to a form, such as to set column requirements, hide columns, or validate data. App designers use a simple interface to implement and maintain fast-changing and commonly used rules. | Business rule designer |
| Power Automate Flow | Power Automate is a cloud-based service that lets you create automated workflows between apps and services to get notifications, sync files, collect data, and more. | Power Automate |
Visualizations
Determines what type of data visualizations and reporting the app will have available.
| Chart | A single graphic visualization that can be displayed within a view, on a form, or be added to a dashboard. | Chart designer |
| Dashboard | Functions as a palette for one or more graphic visualizations that provide an overview of actionable business data. | Dashboard designer |
| Embedded Power BI | Add embedded Power BI tiles and dashboards to your app. Power BI is a cloud-based service that provides business intelligence insight. | Combination of chart designer, dashboard designer, and Power BI |

Advanced model-driven apps
Solution Explorer is used to make advanced model-driven apps. By using the navigation pane on the left side of the tool, you can navigate a hierarchy that consists of all app components.
To access the classic Solution Explorer, you must first select a Solution then select Switch to classic.


Design model-driven apps
As an App Maker, before you begin building your Power Apps solution, it’s recommended to go through a design process. When you design your Power Apps solution, there are several different factors to consider:
Business requirementsData ModelBusiness LogicOutputBy going through a simple design process, you can flush out any minor issues before they become a larger problem once the app is in production.
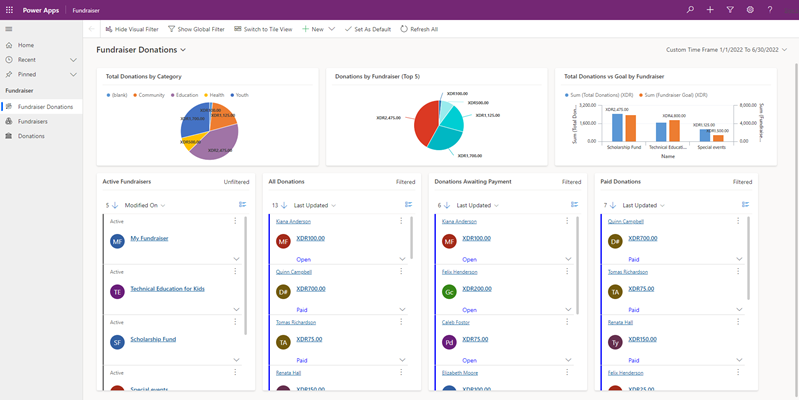
Here's a quick look at the App Designer for an example Model-driven app called “Fundraiser.”

When the app is put into Play Mode, it looks different.
Understand the needs of the user
With Model-driven apps, the name says it all. Your primary design goal is to get your Microsoft Dataverse data model in order. With that in place, you can connect Power Apps, and a Model-driven app will be created for you from that model.
Model-driven apps are created using the App Designer. You'll choose the tables, dashboards, Business Process flows, forms, and other components that you want to make available in your app, and then the app will be created for you. You'll need to spend more time understanding what your user needs than how it's going to look.
Business requirements
The first step in the process is to understand your business requirements. Work with the app stakeholders to consider your security, accessibility, data, and design needs.
For security, the Dataverse has a robust security model. You'll want to consider how securing your app’s data affects your app and what security model best supports your business needs. There are lots of options available, including hierarchy security, row-level security, to name a few. You'll need to confirm your data is secured to meet your needs, and then your app will honor that security. For more information, see Security in Dataverse.
During this process, you'll also want to identify any government regulations or authentication/authorization requirements (if applicable). You may want to implement multi-factor authentication but will need to think about how such requirements will affect users connecting to your application. You don’t necessarily have to have all the answers to your questions here; you just want to flush out all of the requirements.
Finally, does your app need to be available when the user is disconnected from the internet? This availability is called Offline Mode and is supported by the Dataverse and Model-driven apps when using iOS or Android clients. It does require more design considerations. For more information, see Set up mobile offline synchronization.
Data model
As you begin the data modeling process, there are a couple of important questions to ask yourself:
What type of data will your solution be storing and or collecting?How will this data relate or coincide with the other data you're working with?These questions are important when designing a model-driven application because of how model-driven applications function. Remember, model-driven applications use a metadata-driven architecture. A large portion of the model-driven app is based on how your data is modeled, and there's no need to write custom code to alter the app design. To expand on this a little further, when thinking about Metadata, it means “data about data” and this data defines the structure stored in the system.
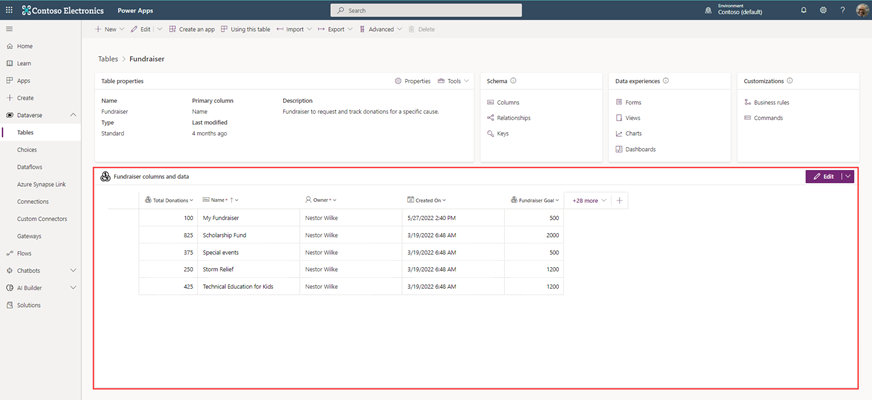
You can view the app metadata by reviewing the table in the Dataverse.
You can also view the app metadata by putting the app in Play mode.

In the example above, for the Donations table, there are multiple pieces of metadata being collected, including:
FromDonation AmountStatus ReasonDate CreatedCategoryEach solution you develop and deploy will have its own set of metadata to collect. This basic understanding of metadata is important as you continue the design process and modeling your app data.
As you think about your data model, also think about column types. When you add columns to your table in the Dataverse, the column type you choose will determine how users enter and view that in your Model-driven app. Option sets show as dropdowns, currency shows with currency symbols, while decimal numbers don’t. These little changes in the table can have a profound effect on how your user experiences your app.
Note
If a column type needs to be changed to a different column type, (i.e. text column to an choice), then you will need to delete that column and recreate with the correct column type. This will cause you to lose any data associated with that column.
User Interface (UI) and User Experience (UX)
When you build a Model-driven app, most of the UI and UX are predetermined for you. You define the data model to build from, and then Power Apps determines the controls used in the app. You can influence these controls by determining what table assets you include. You define in the App Designer What Forms, Views, Charts, and Dashboards are used in the app. You also control the navigation options. As you're planning your app, determine which components are needed in the app design, and create them before building your app.
To continue building off of the example we’ve been using throughout this module, below is a simple Model-driven Form, which captures various pieces of information for creating a New Fundraiser.
Here's an example of what the New Fundraiser form looks like when editing from the App Designer.

Business logic
When you incorporate business logic in your app, there are two primary options available. You can set Business Rules on your Dataverse tables or you can build Business Process Flows.
With Business Rules, you'll define behaviors at the data layer. Business rules are great for changing when a column is required, setting a default value, or even showing or hiding a column based on a criteria. An example could be a table for tracking expenses. You could have a column for type of travel and then build a business rule that says if they choose automobile then the mileage column is required, else it's optional. Business rules give you great power to make sure you maintain data consistency in all scenarios.
Business Process Flows are used to guide users through using your app. These workflows can provide visuals on next steps based on the status of the data and facilitate other actions that you want to occur as the user uses the app. Business Process Flows let you bring automation to your app and make it more of a guided experience than just a place to enter data.
Output
A common output need for apps is to visualize the data. For this requirement, you can implement Dashboards with custom filters and visual graphics to tie all of this data together right in your app. When creating your Dashboards, make sure it’s simple for your users to consume without overwhelming them with all the data. Provide high-level snapshots of your data and allow them to use filters to dive deeper into the data if needed.
More third-party solutions and app accelerators
It's also important to know about the different App accelerators and third-party solutions available to you. Depending on the industry you are in, Health, Financial, Banking, Education, Non- Profit, Automotive, or Media, Microsoft has released many accelerators or foundational components to assist you with quickly standing up your solution. For more information, see Industry accelerators overview.
For more information. see Planning a Power Apps project.
Exercise
In this unit, you'll create a model-driven app by using one of the standard tables available in your Microsoft Power Apps environment.
Create a model-driven app
On the Home page, select the Blank app.
Find Blank app based on Dataverse and then select Create.

On the Create a New App page, enter a name and description for the app.
Select Create. Your new app appears in the App Designer, and you can now add components to it.
Add a page to your app
You add pages to your app within the App Designer.
Select Add Page.
Select Table based view and form, and then select Next. Afterwards, select Account and then Add.
Note
If Account is not an option as a table, you may not have any sample data in your environment. Refer to this exercise on how to create sample apps and data. If the sample data does not appear, refer to this documentation to add sample data.

Here you can explore your My Active Accounts view and the Account form that is automatically created when your Dataverse instance is initialized.
Edit your form
You've successfully added a form to your app, now we'll edit them.
Navigate to https://make.powerapps.com.
Select Dataverse, then Tables.
Select the Account table.
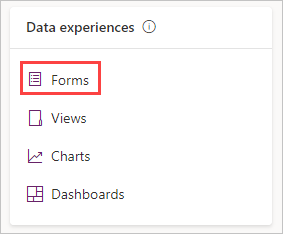
Under Data experiences, select Forms.

In this page you can adjust Form Settings, Add components, fields, business rules, event handlers, custom form libraries, edit table columns and more.
Edit views
Navigate to https://make.powerapps.com.
Select Dataverse, then Tables.
Select the Account table.
Under Data experiences, select Views.
You'll see a list of all the views that you can edit. The default view that is added when you added the Account page to your app is My Active Accounts.
Select My Active Accounts to edit the view.
On this page, you can edit:
Which fields will show up on this viewWhat filters will be appliedDefault sort orderThe order of your columnsThe width of your columns.
Publish your app
On the App Designer toolbar, select Publish in the top right corner. After you publish the app, it's ready for you to run or share with others.
Above My Active Accounts, select Show Chart.
If the sample data for your accounts doesn't have an Industry populated, go into a few accounts and add an Industry. Once you've updated a few accounts with an industry, the chart will update as well. Once populated, your chart will look similar to the chart below.

Exercise - Control security when sharing model-driven apps
Microsoft Power Apps uses role-based security for sharing. A security role includes privileges that define a set of actions that can be performed in the app. All app users must be assigned to one or more predefined or custom security roles.
Roles can be assigned to individual users or to teams. When a user or a team is assigned to a role, that user or all members of that team are granted the set of privileges associated with the role.
In this unit, you'll learn how to share a model-driven app so that others can use it.
Specifically, you'll learn how to:
Create a custom security role.Assign users to the custom security role.Assign the security role to an app.To share an app, you must have the Environment Admin or System Admin role.
Scenario
Note
This scenario builds on ideas and concepts from the previous units. To complete this exercise, you will first need to create an app as described in the previous unit of this module and create the Pet table as described in unit Create a Microsoft Dataverse table of Get started with Dataverse Service module.
This unit uses the example of a company named Contoso, which has a pet grooming business that services dogs and cats. An app that has a custom table for tracking the pet grooming business has already been created and published.
The app must be shared so that the pet grooming staff can use it. To share the app, an admin or app maker assigns one or more security roles to users and to the app.
Create or set up a security role
The Power Apps environment includes predefined security roles. These roles reflect common user tasks. The access levels that are defined follow the security best practice of providing access to the minimum amount of business data that's required to use the app.
Remember that the Contoso pet grooming app is based on a custom table. Because the table is custom, privileges must be explicitly specified before users can work in it. To specify privileges, you can use either of the following approaches:
Expand an existing predefined security role so that it includes privileges on rows that are based on the custom table.Create a custom security role to manage privileges for users of the app.The environment that will maintain the pet grooming rows is also used for other apps that the Contoso company runs. Therefore, a custom security role that's specific to the pet grooming app will be created. Additionally, two different sets of access privileges are required:
Pet grooming technicians just need to read, update, and attach other rows. Therefore, their security role will have read, write, and append privileges.Pet grooming schedulers need all the privileges that pet grooming technicians have. In addition, they must be able to create, append to, delete, and share rows. Therefore, their security role will have create, read, write, append, delete, assign, append to, and share privileges.To learn more about access and the scope of the different privileges, see Security roles.
Create a custom security role
Sign in to Power Apps by using your organizational account. If you don't already have an account, select Get started free.
For your new app, select the ... to the right of the name, and then select Share.
In the Share dialog box, select your app at the top left and then select the drop-down next to the environment on the right. Select Manage security role.

On the All Roles page, select New.
In the Role Name box, enter Pet Grooming Technicians.
In the Security Role designer, on the Custom Entities tab, find the Pet table.
On the Pet row, click Read, Write, and Append four times, to set the scope for each to organization.

The pet grooming app also has a relationship with the account table. On the Core Rows tab, on the Account row select the Read privilege four times until it's set to organization scope.
Select Save and Close.
In the Security Role designer, select New and then in the Role Name box, enter Pet Grooming Schedulers.
On the Custom Tables tab, find the Pet table.
On the Pet row, click each of the following privileges four times, until the organization scope is selected: Create, Read, Write, Delete, Append, Append To, Assign, and Share.
The pet grooming app also has a relationship with the account table, and schedulers must be able to create and change account rows. Therefore, on the Core rows tab, on the Account row, select each of the following privileges four times, until the organization scope is selected: Create, Read, Write, Delete, Append, Append To, Assign, and Share.
Select Save and Close.
Assign security roles to users
Security roles control a user's access to data through a set of access levels and permissions. The combination of access levels and permissions that's included in a specific security role sets limits on the user's view of data and interactions with that data.
Assign a security role to the pet grooming technicians
Select the model-driven app you created in the previous unit and select Share.
In the Share dialog box, select your app on the left and then select the drop-down next to the environment name on the right and then choose the Pet Grooming Technicians role.

In the list below the app, select a few of your users to be pet groomers.
Select the drop-down next to the environment name and choose Pet Grooming Technicians security role to assign it to that user.
Select Share at the bottom when finished.
Assign a security role to the pet grooming schedulers
In the Share dialog box, select your app on the left and then select the drop-down next to the environment name on the right and then choose the Pet Grooming Schedulers role.
In the list below the app, select a few of your users to be pet grooming schedulers.
Select the drop-down next to the environment name and choose Pet Grooming Schedulers security role to assign it to that user.
Select Share at the bottom when finished.
About predefined security roles
The following predefined roles are available with a PowerApps environment. Unless otherwise noted, all the privileges have global scope.
| Environment Maker | None | Users who have this role can create new resources that are associated with an environment. For example: apps, connections, custom application programming interfaces (APIs), gateways, and flows that use Microsoft Flow. But these users can't access the data in an environment. To learn more about environments, see Announcing Power Apps environments. |
| System Administrator | Create, Read, Write, Delete, Customize | This role has full permission to customize or administer the environment, including creating, changing, and assigning security roles. Users who have this role can view all data in the environment. To learn more, see Privileges required for customization. |
| System Customizer | Create (self), Read (self), Write (self), Delete (self), Customizations | This role has full permission to customize the environment. But users who have this role can view rows only for environment tables that they create. To learn more, see Privileges required for customization. |
| Basic User | Read, Create (self), write (self), delete (self) | Users who have this role can run an app in the environment and perform common tasks for the rows they own. |
| Delegate | Act on behalf of another user | This role lets code run as or impersonate another user. This role is typically used with another security role to provide access to rows. To learn more, see Impersonate another user. |
Incorporate business process flows
You can help ensure that people enter data consistently and follow the same steps every time they work with a customer by creating a business process flow.
For example, you could create a business process flow to have everyone handle customer service requests the same way, or to require that people get approval for an invoice before submitting an order. Business process flows use the same underlying technology as other processes, but the capabilities that they provide are different from other features that use processes. To learn how to create or edit a business process flow, see Create a business process flow.
Use business process flows
Why should you use business process flows? Business process flows provide a guide for people to get work done. They provide a streamlined user experience that leads people through the processes their organization has defined for interactions that need to be advanced to a conclusion of some kind. This user experience can be tailored so that people with different security roles can have an experience that best suits the work they do.
You should use business process flows to define a set of steps for people to follow to take them to a desired outcome. These steps provide a visual indicator that tells people where they are in the business process.
Business process flows reduce the need for training because new users don’t have to focus on which table they should be using. They can let the process guide them. You can configure business process flows to support common sales methodologies that can help your sales groups achieve better results.
For service groups, business process flows can help new staff get up to speed more quickly and avoid mistakes that could result in unsatisfied customers.
System business process flows
The following business process flows can be found in Power Automate. To understand how business process flows work, review these system business process flows:
Lead to Opportunity Sales ProcessOpportunity Sales ProcessPhone to Case ProcessMultiple tables in business process flows
You can use a business process flow for a single table or to span multiple tables. For example, you may have a process that begins with an opportunity, then continues to a quote, an order, and then an invoice, before finally returning to close the opportunity.
You can design business process flows that tie together the rows for up to five different tables into a single process. So people using the app can focus on the flow of their process rather than on which table they're working in. This way, they can easily navigate between related table rows.
Multiple business process flows are available per table
Not every user in an organization may follow the same process and different conditions may require that you apply a different process. You can have up to 10 active business process flows per table to provide appropriate processes for different situations.
Exercise - Create a model-driven app
In the exercise from the previous module of this learning path, you created the Prospects table in Microsoft Dataverse and imported the existing leads.
Scenario
In this exercise, you'll use that data to create a model-driven app. If you don't have the Prospects* table, then refer to the previous exercise. This app will help keep the managers up to date on the current leads and forecasted revenue.
Create the model-driven app for the prospects table
You'll need the Prospects table from the previous exercise to build the model-driven app in this exercise.
Sign in to Power Apps by using your organizational account.
Select the environment you want, or go to the Power Apps admin center to create a new one.
On the Home page, select the Blank app and then Create under Blank app based on Dataverse.
Enter the following for the Name and Select Create.
Name: Prospect Entry
Select + Add page.
Under Choose content for the page select Dataverse table and then Next.
With Select existing table selected, find your Prospects table by scrolling through the list or by entering Prospects in the search field.
Select Prospects and then Add. After a few moments, your new app will appear in the app editor screen.
Select Save.
Select Publish. Now that you have an app, let's work on some features for your app.
Create a chart
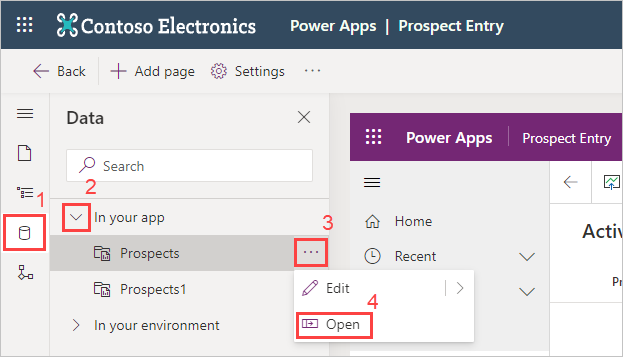
Inside of your app, select the Data tab from the left-side navigation ribbon.
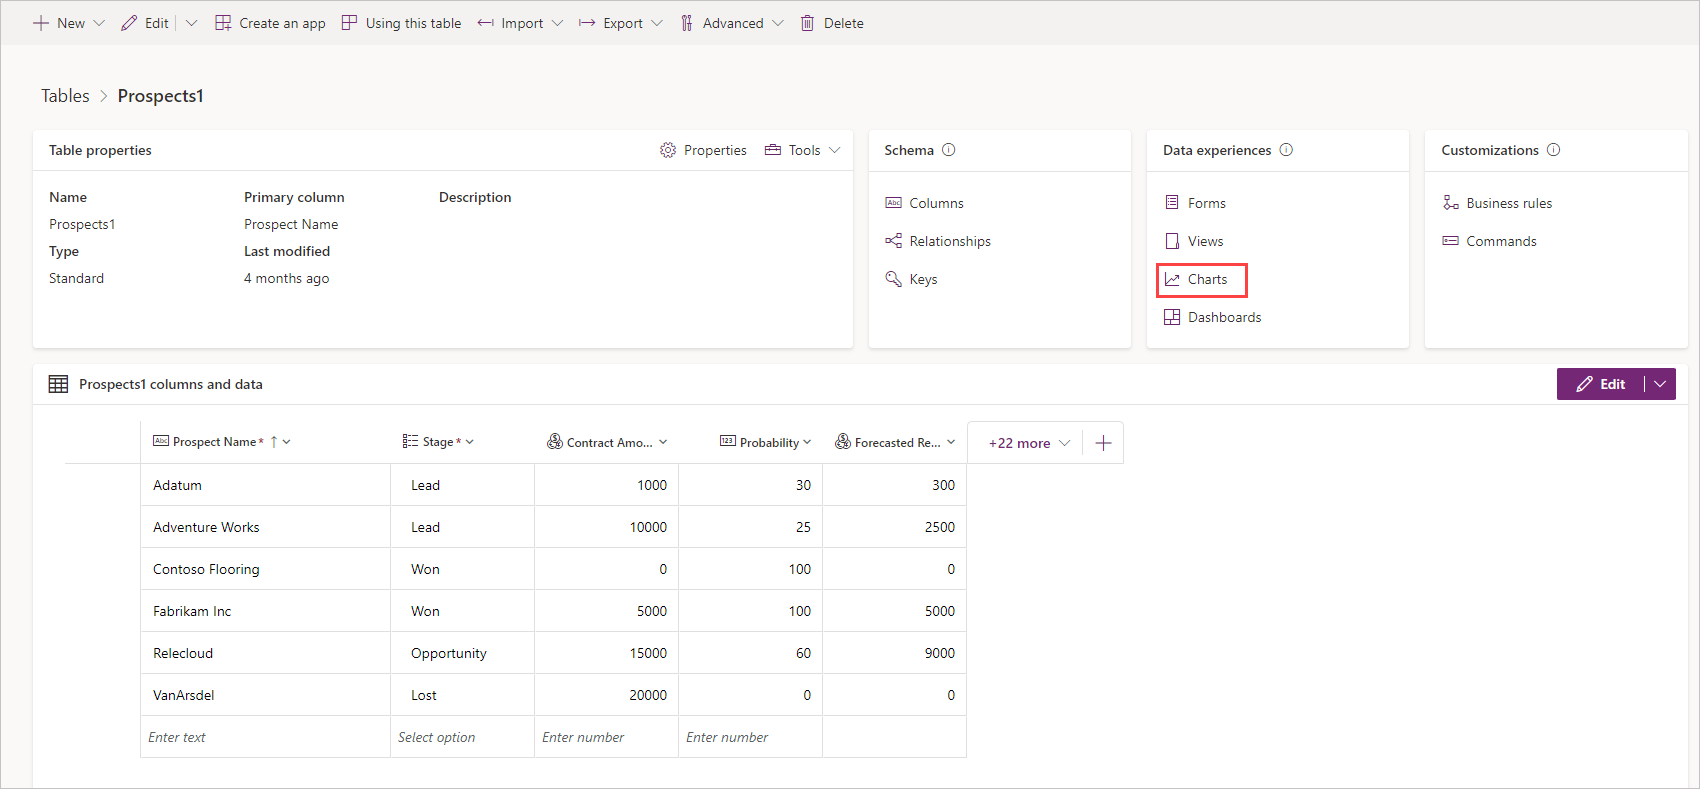
Select/expand In your app and then find/select your Prospects table, then select the ellipsis to the right and select the Open Option. This opens your table editor in a separate browser tab.
Select Charts under Data experiences.
Select New chart from the header ribbon. The Chart:New editor will appear as a new tab in your browser. The following screenshot will help you navigate through the next four steps.
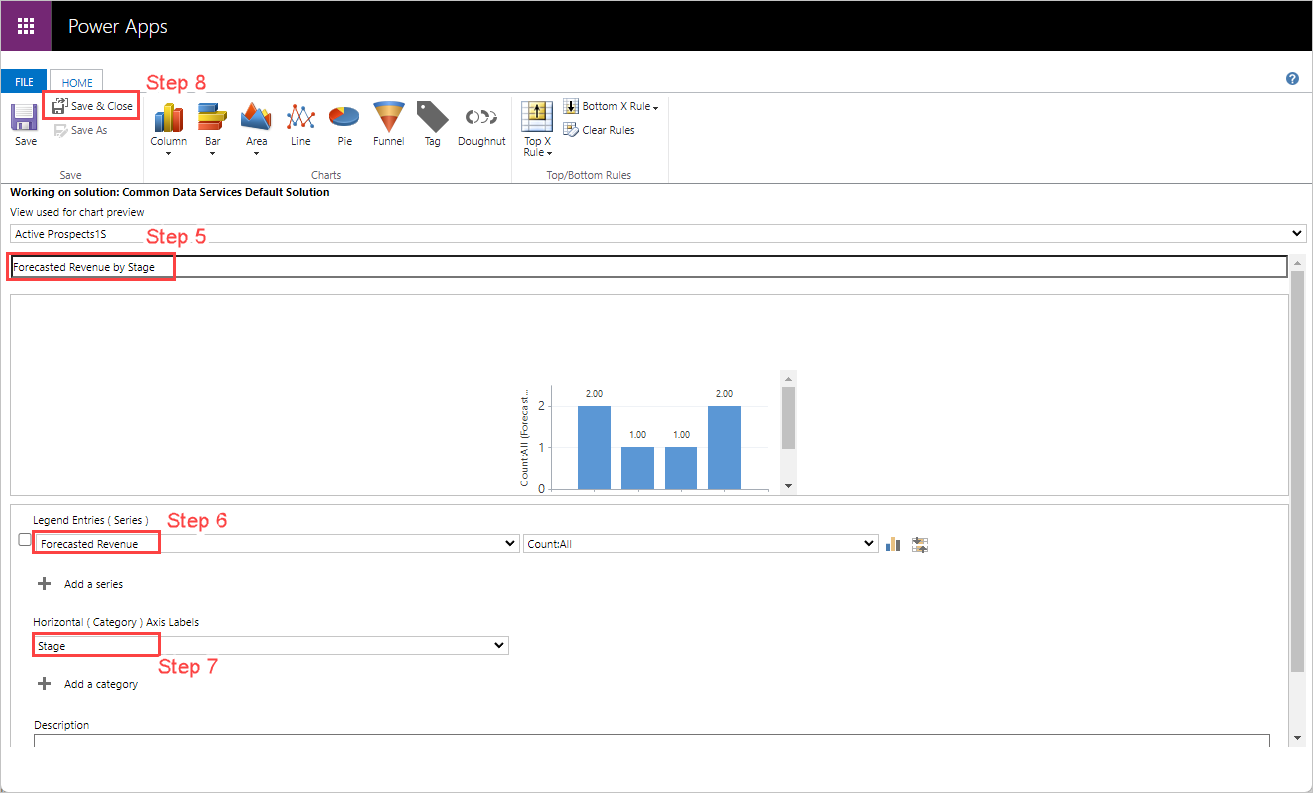
For the Chart Name, enter Forecasted Revenue by Stage.
For Legend Entries (Series), check the box to the left of this item, and select the Forecasted Revenue column.
For Horizontal (Category) Axis Labels, select the Stage column. After a few moments, you'll see a sample graph appear below the chart name that you entered in step 5 above.
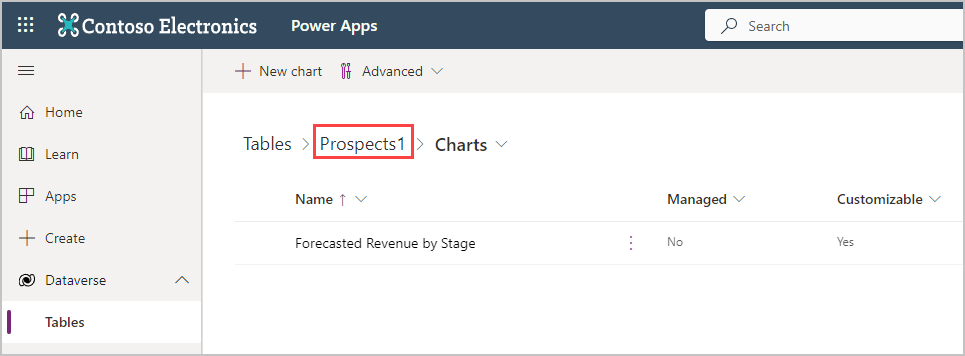
Select Save and Close. The Chart:New editor tab closes and returns you to your Charts table. After a few moments, your Charts table will reflect your new chart (you may need to refresh your browser).
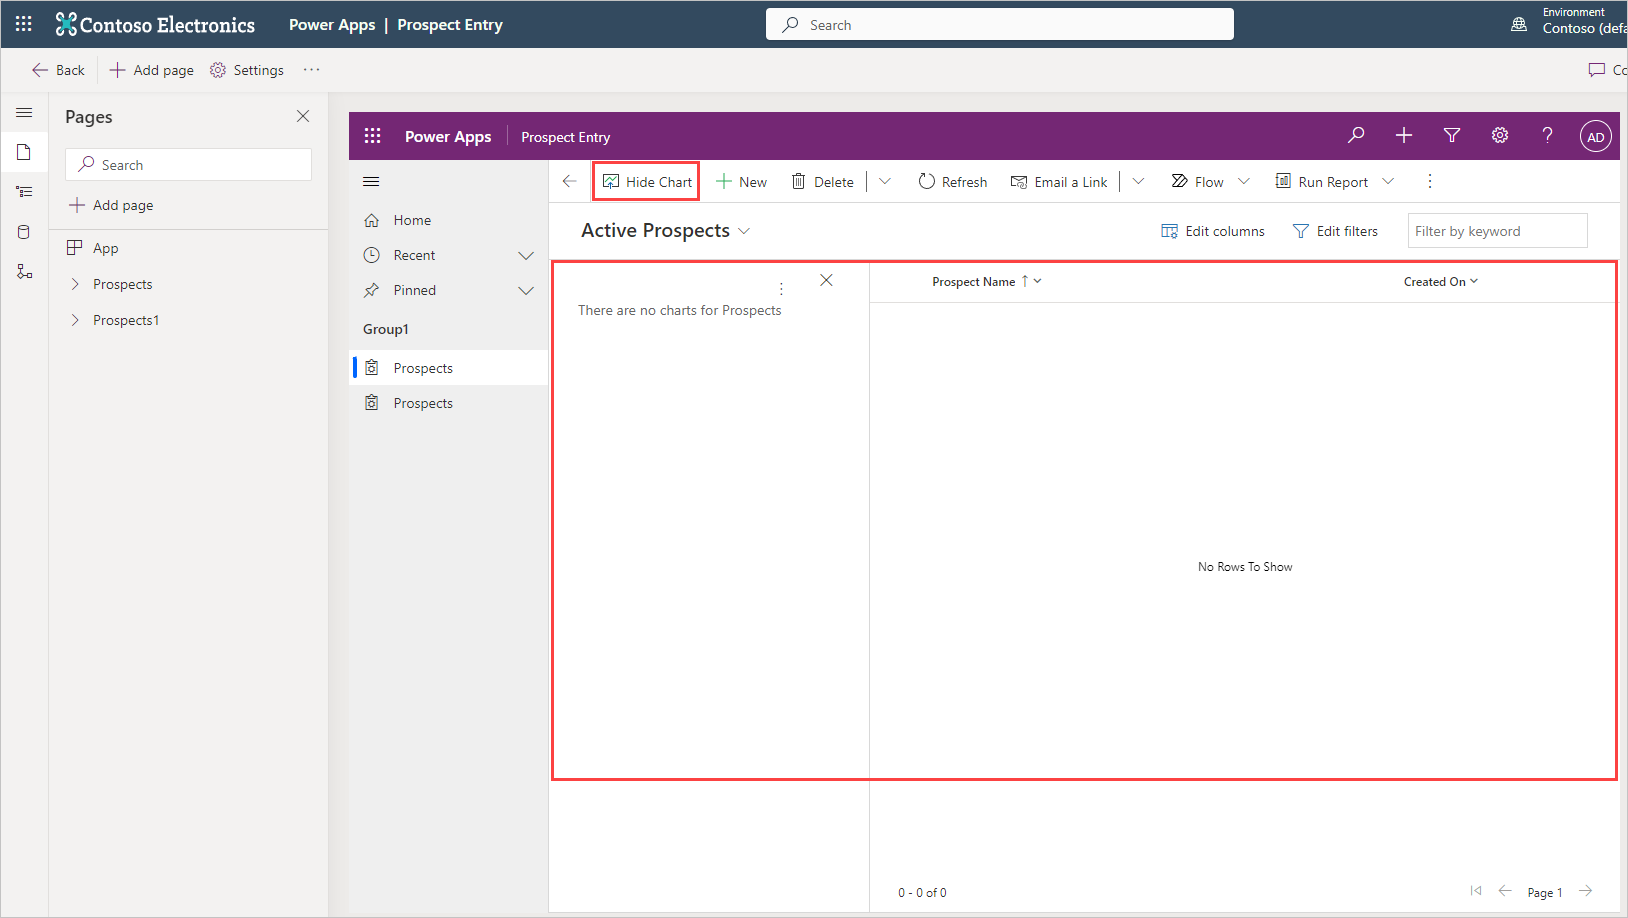
Return to your App Designer, select the Show Chart button in the App screen header ribbon. The Show Chart button toggles to the Hide Chart button, so your user can toggle it on/off. If you have data in your table, you'll see the chart you just produced depicted like this (else you'll see a blank section next to your blank data):
Chart with data:
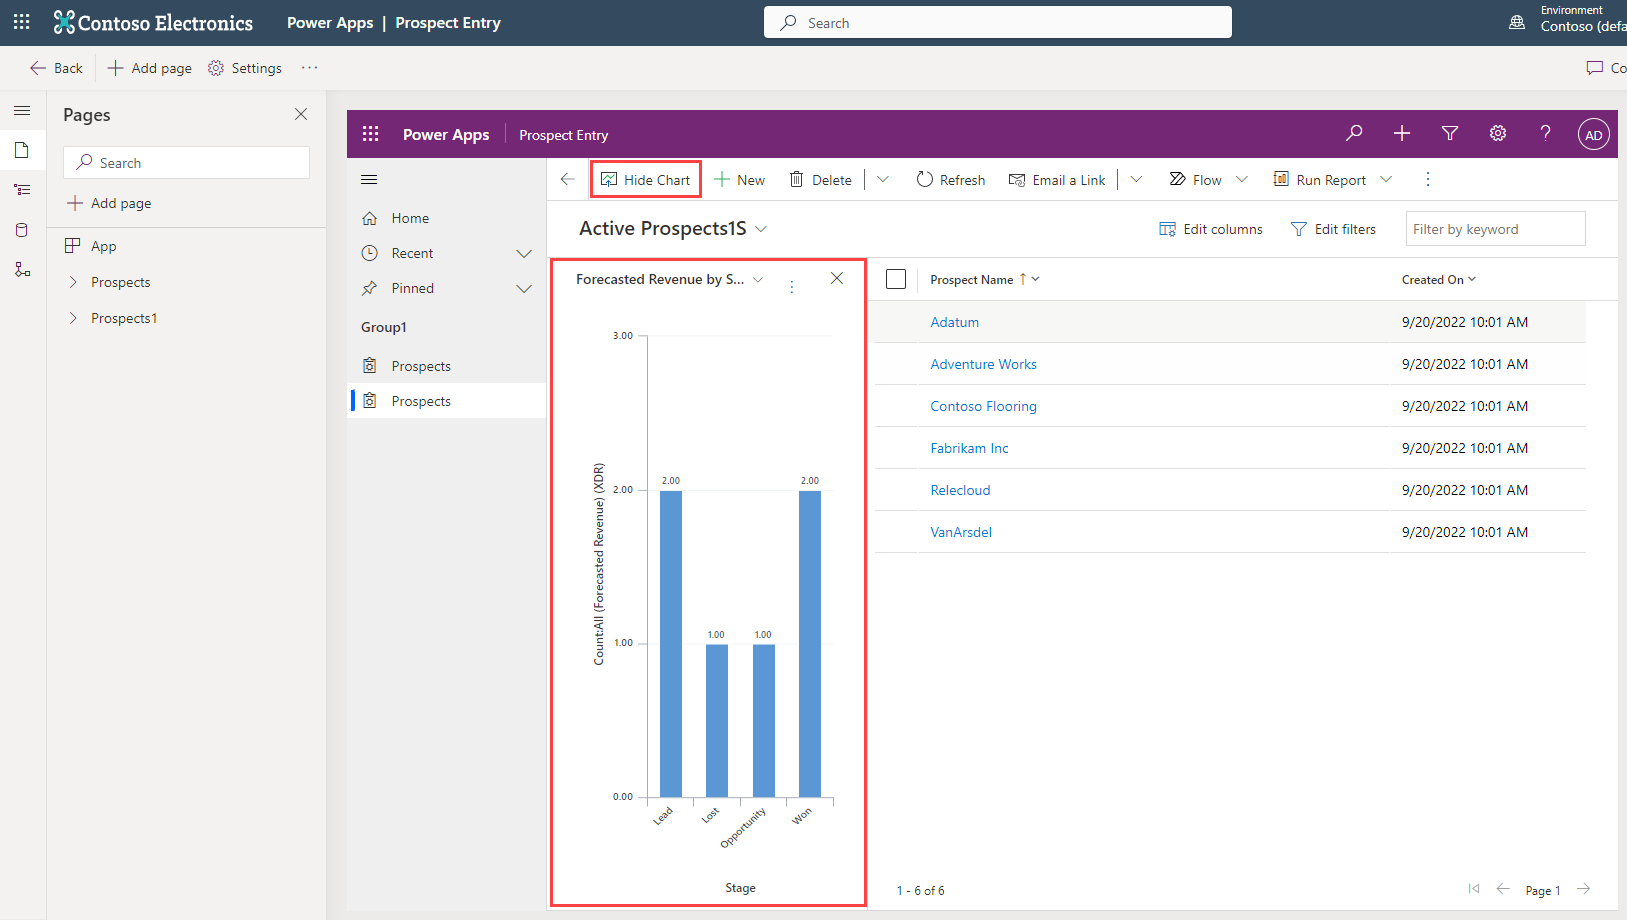
Chart without data:
In your app editor, select Save from the top right of the ribbon.
Select Publish. Next let's add a form that will enable data entry.
Create the form
If you still have the Charts list browser tab open, go to that tab and select your table name to the left of > Charts to return to the table editor; else you can follow the same first two steps we did in the Create a chart section above.
Select Forms under Data experiences.
Select the drop-down arrow next to New form, and then select Main Form.
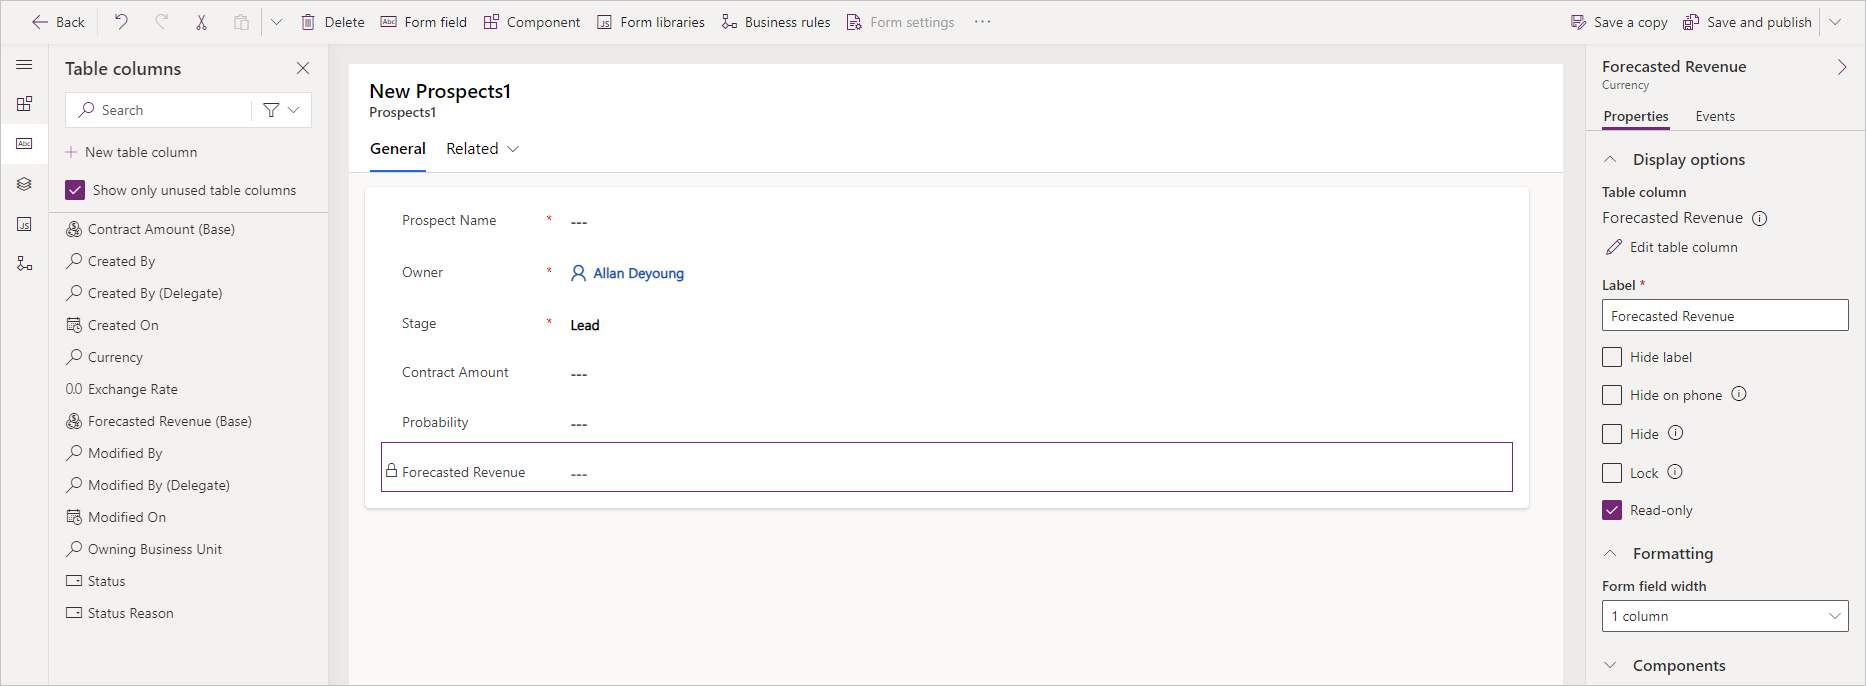
Select or drag the Stage column from the left and place it below the Owner column in the center. Drag and drop functionality is available for any of your table columns to move them around in the form, but simply selecting the columns adds them below the item that is highlighted in your form display.
Select the Contract Amount column to add it below the Stage column.
Select the Probability column to add it below the Contract Amount column.
Select the Forecasted Revenue column to add it below the Probability column.
With Forecasted Revenue still selected look at your Properties tab on the right side of the screen. Select the checkbox for Read-only column. When complete, your form should look similar to this screenshot:
From the ribbon at the top, select Publish. Selecting Publish both saves and publishes your chart. For reference, if you're not ready to publish your chart you can save it.
Select Publish. At this point, you can return to your app to view the form you modified.
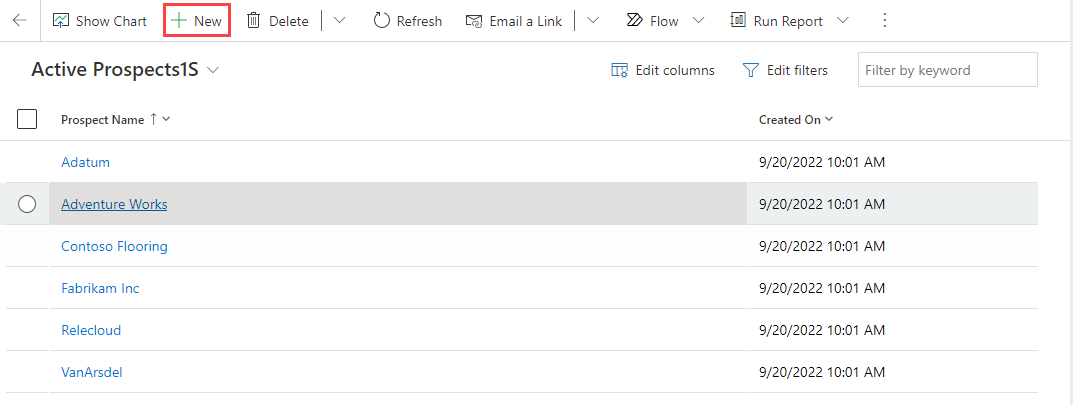
In your app builder, go to your Home screen where you have your Prospects data, and select + New to bring up your new Main form.
Select New:
Your new form ready for data:
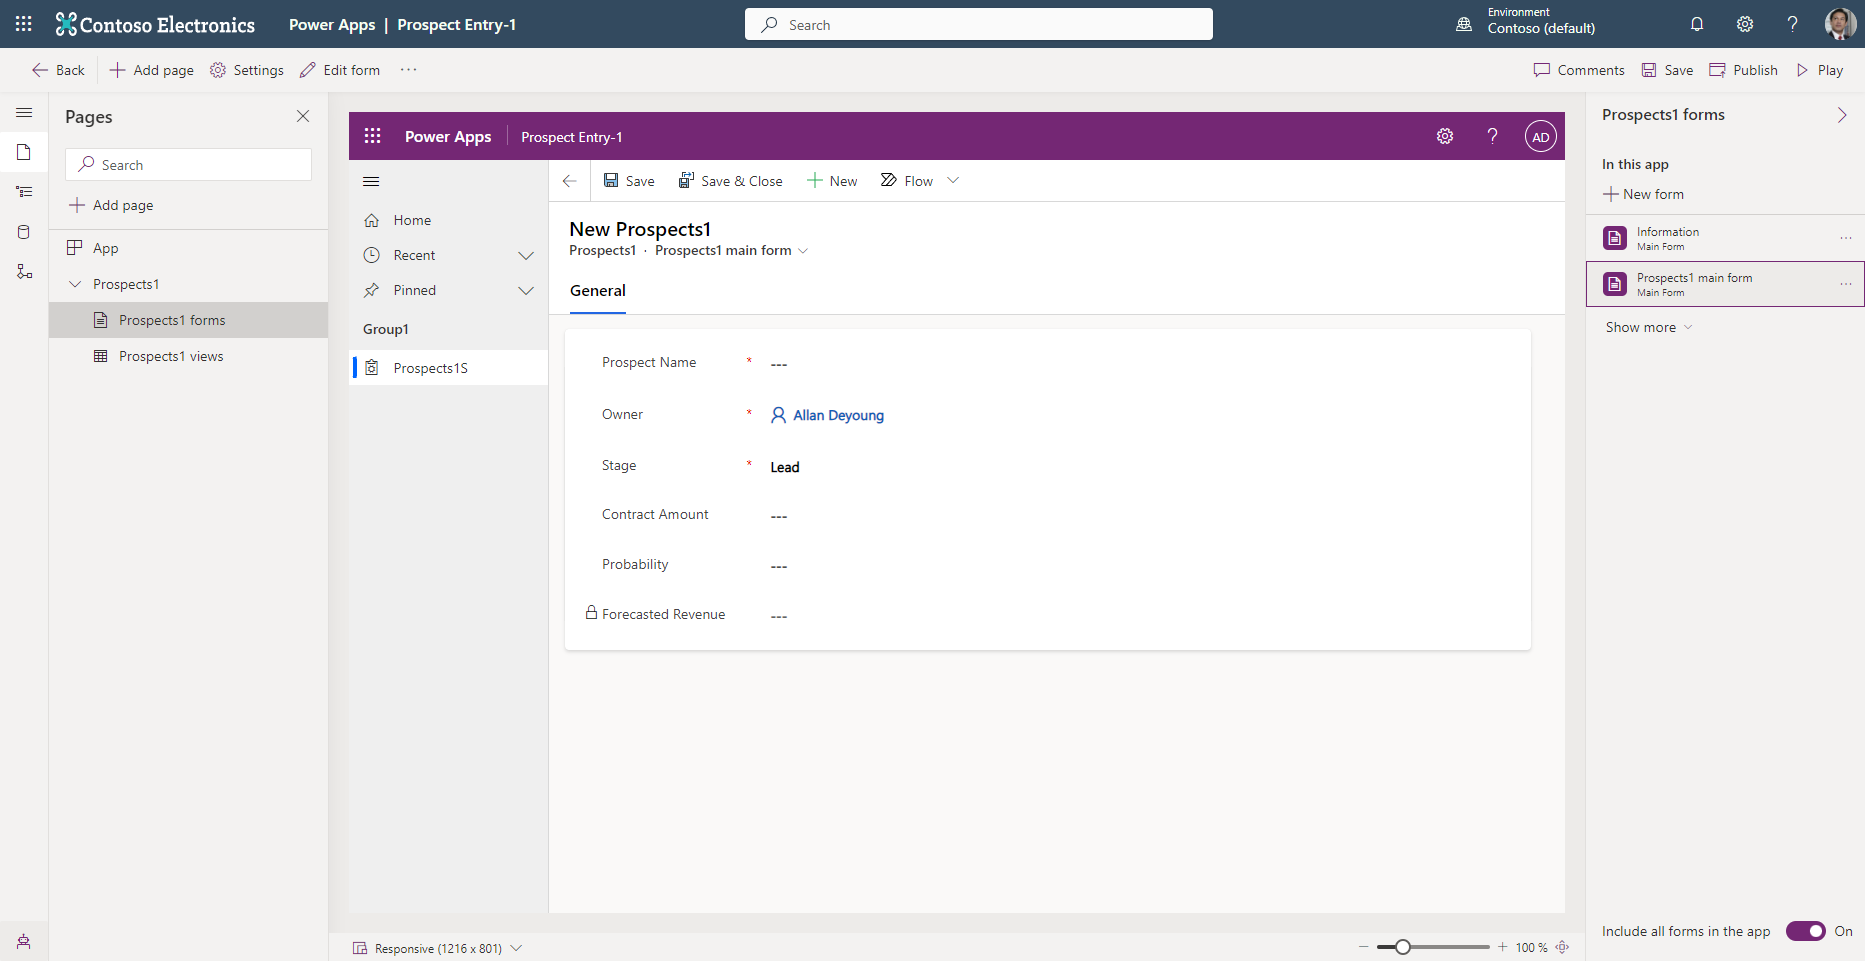
Notice that your Prospect Name, Stage and Probability fields are editable, and your Forecasted Revenue field is read-only.
Finally, Publish your app.
Congratulations! You've successfully created a new model-driven app based on your data. Your new app includes a chart to view a depiction of your data and a form for data entry.
Check your knowledge
Answer the following questions to see what you've learned.
What components make up model-driven apps?
Tables, Columns, Relationships, and Choice columns
Charts, Dashboards, and Embedded Microsoft Power BI
Data, User interface, Logic, and Visualizations
Correct! The components of model-driven apps include Data, User interface, Logic, and Visualizations.
Data and Visualizations
If you wanted to create a standard procedure or process for handling service requests what type of logic would be best to implement?
Business process flow
Business process flow logic should be used.
Business rule
Workflow
Flow
When you share a model-driven app, which of the following statements is true?
Users just need to be added to a predefined security role.
Users just need to be added to a custom security role.
Model-driven apps don't need to be shared, they're accessible to anyone with the app link.
Users need to be added to a predefined or custom security role and then you also need to assign one or more security roles to the app.
To share a model-driven app, you need to add a user to a security role that is assigned to the app.


 Bengali (Bangladesh) ·
  English (United States) ·