
ARTICLE AD
Introduction to creating a code component
100 XP
15 minutesPower Apps provides a ton of functionality out of the box for app makers to build their apps, but sometimes there's a need to build a piece of UI that isn't included. Examples might be replacing a percentage value with a gauge, rendering a bar code rather than an ID, or replacing existing controls with controls that have more functionality—like a drag-and-drop grid view. You can also wrap the Power Apps component framework around existing components you've written in other web frameworks, like React or Angular.
Creating these components allows you to use the full breadth of the modern web development ecosystem: the libraries, frameworks, and other tools you may be familiar with, and packages that capability into a form that allows app makers to build apps with your code, as if it were an out of the box part of the platform.
Note
You can find other sample components including those that use Angular or React in our documentation.
Custom Power Apps components are frequently referred to as code components because they require custom code to implement them. They consist of three elements: a manifest, an implementation, and resources. In the following exercise, you'll write your own custom code component: a hello world message that will look like the following image.
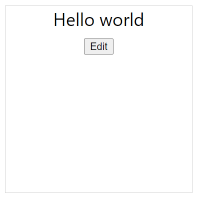
This component will listen to changes coming from the host app, and allow the user to make changes that are then pushed to the host app. The following steps will help you build this component.
Install Power Platform CLI
To prepare your computer to build code components, follow these steps:
Install Npm (comes with Node.js) or Node.js (comes with npm). We recommend that you use a LTS (Long-Term Support) version.
Install Visual Studio Code.
Install Power Platform Tools extension.
Create a new component project
To create a new component project, follow these steps:
Create a directory where you'll build your component. In this sample, you'll place the component in C:\source\hello-pcf; however, you can create your own directory. To create your own directory, you'll use a Visual Studio Code.
Start Visual Studio Code.
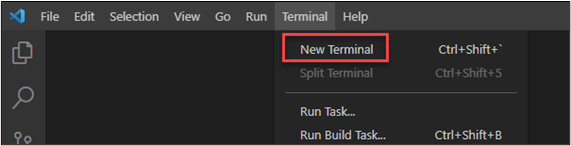
Select Terminal and select New Terminal.
Change directory to your source folder.
ConsoleCopy
cd sourceFrom your source directory, create a directory named hello-pcf.
ConsoleCopy
md hello-pcfChange directory to hello-pcf.
ConsoleCopy
cd hello-pcf
Initialize your component project by using Power Platform CLI with the following command:
Copy
pac pcf init --namespace SampleNamespace --name HelloPCF --template fieldThe following image shows an example of the output that you should see.

Install the project build tools by using the command npm install. You might see some warnings displayed; however, you can ignore them.
Copy
npm installRun the command below to open project in Visual Studio Code.
Copy
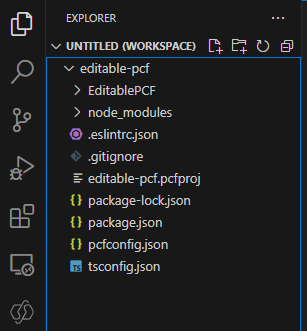
code -a .The project contents should look like the image below.
Update your code component's manifest
Update the manifest file to accurately represent your control.
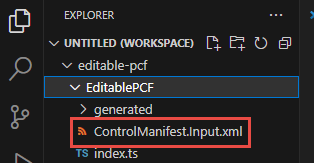
Expand the HelloPCF folder and open the ControlManifest.Input.xml file.
Change the version to 1.0.0 and description-key to Says hello.

Locate the <property node.
Change the name value to Name, display-name-key to Name, and description-key to A name.

Locate the <resources> node.
Include a reference to a CSS file named hello-pcf.css that you'll create.
cssCopy
" style="box-sizing: inherit; outline-color: inherit; font-family: SFMono-Regular, Consolas, "Liberation Mono", Menlo, Courier, monospace; font-size: 1em; direction: ltr; border-width: 0px; border-style: initial; line-height: 1.3571; display: block; position: relative;"><css path="css/hello-pcf.css" order="1" />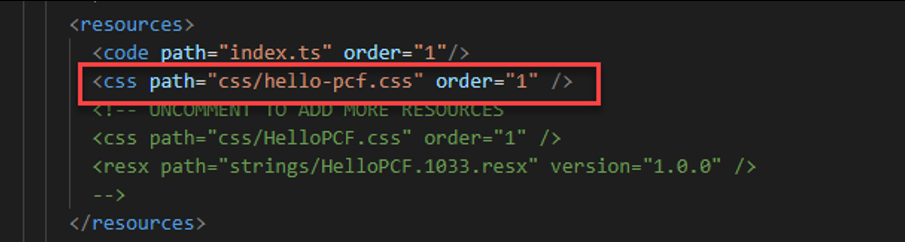
Save your changes by selecting File and then Save.
Add styling to your code component
To add styling to your code component, follow these steps:
Make sure you still have the ControlManifest.Input.xml file selected and then select New Folder.
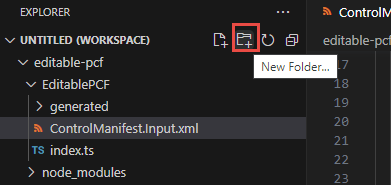
Name the new folder css.
Select the css folder you created and select New File.
Name the new file hello-pcf.css.
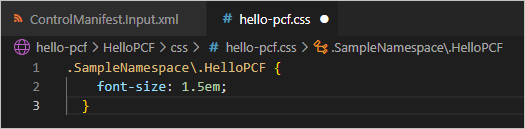
Open the new hello-pcf.css file you created, and paste the following CSS snippet.
cssCopy
.SampleNamespace\.HelloPCF { font-size: 1.5em; }The content of the CSS file should now look like the image below.
Select File and select Save.
Build your code component
Before you can implement your component logic, you need to run a build on your component. This makes sure that the right TypeScript types are generated to match the properties in your ControlManifest.xml document.
Go back to the terminal and build your project by using the following command.
cssCopy
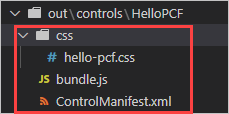
npm run buildThe component is compiled into the out/controls/HelloPCF directory. The build artifacts include:
css folder
bundle.js - Bundled component source code
ControlManifest.xml - Actual component manifest file that is uploaded to the Microsoft Dataverse organization
Implement your code component's logic
To implement your code component's logic, follow these steps:
Open index.ts file.
Above the constructor method, insert the following private variables:
TypeScriptCopy
; // The wrapper div element for the component\ private container: HTMLDivElement; // The callback function to call whenever your code has made a change to a bound or output property\ private notifyOutputChanged: () => void; // Flag to track if the component is in edit mode or not\ private isEditMode: boolean; // Tracking variable for the name property\ private name: string | null; " style="box-sizing: inherit; outline-color: inherit; font-family: SFMono-Regular, Consolas, "Liberation Mono", Menlo, Courier, monospace; font-size: 1em; direction: ltr; border-width: 0px; border-style: initial; line-height: 1.3571; display: block; position: relative;">// The PCF context object\ private context: ComponentFramework.Context<IInputs>; // The wrapper div element for the component\ private container: HTMLDivElement; // The callback function to call whenever your code has made a change to a bound or output property\ private notifyOutputChanged: () => void; // Flag to track if the component is in edit mode or not\ private isEditMode: boolean; // Tracking variable for the name property\ private name: string | null;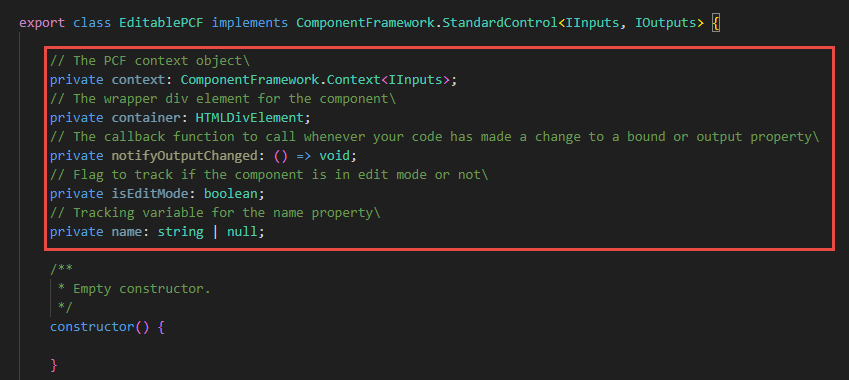
Locate the init method and replace it with the method below.
TypeScriptCopy
, notifyOutputChanged: () => void, state: ComponentFramework.Dictionary, container: HTMLDivElement) { // Track all the things this.context = context; this.notifyOutputChanged = notifyOutputChanged; this.container = container; this.isEditMode = false; } " style="box-sizing: inherit; outline-color: inherit; font-family: SFMono-Regular, Consolas, "Liberation Mono", Menlo, Courier, monospace; font-size: 1em; direction: ltr; border-width: 0px; border-style: initial; line-height: 1.3571; display: block; position: relative;">public init(context: ComponentFramework.Context<IInputs>, notifyOutputChanged: () => void, state: ComponentFramework.Dictionary, container: HTMLDivElement) { // Track all the things this.context = context; this.notifyOutputChanged = notifyOutputChanged; this.container = container; this.isEditMode = false; }Add the snippet below to the init method. This snippet will create the span that will hold the hello message.
TypeScriptCopy
// Create the span element to hold the hello message const message = document.createElement("span"); message.innerText = `Hello ${this.isEditMode ? "" :context.parameters.Name.raw}`;Add the snippet below to the init method. This code will create a textbox to edit the name.
TypeScriptCopy
// Create the textbox to edit the name const textbox = document.createElement("input"); textbox.type = "text"; textbox.style.display = this.isEditMode ? "block" : "none";Add the below if statement to init method.
TypeScriptCopy
if (context.parameters.Name.raw) { }Add the snippet below inside the if statement. This snippet will set the textbox value and wrap the textbox and the message in a div.
TypeScriptCopy
textbox.value = context.parameters.Name.raw; // Wrap the two above elements in a div to box out the content const messageContainer = document.createElement("div"); messageContainer.appendChild(message); messageContainer.appendChild(textbox);Add the snippet below inside the if statement. This snippet will create a button that will switch between edit and read mode.
TypeScriptCopy
{ this.buttonClick(); }); " style="box-sizing: inherit; outline-color: inherit; font-family: SFMono-Regular, Consolas, "Liberation Mono", Menlo, Courier, monospace; font-size: 1em; direction: ltr; border-width: 0px; border-style: initial; line-height: 1.3571; display: block; position: relative;">// Create the button element to switch between edit and read modes const button = document.createElement("button"); button.textContent = this.isEditMode ? "Save" : "Edit"; button.addEventListener("click", () => { this.buttonClick(); });Add the snippet below inside the if statement. This snippet will add the message container and a button to the main container.
TypeScriptCopy
// Add the message container and button to the overall control container this.container.appendChild(messageContainer); this.container.appendChild(button);The init method should now look like the image below.

Add button select handler method. Add the following method below the init method.
TypeScriptCopy
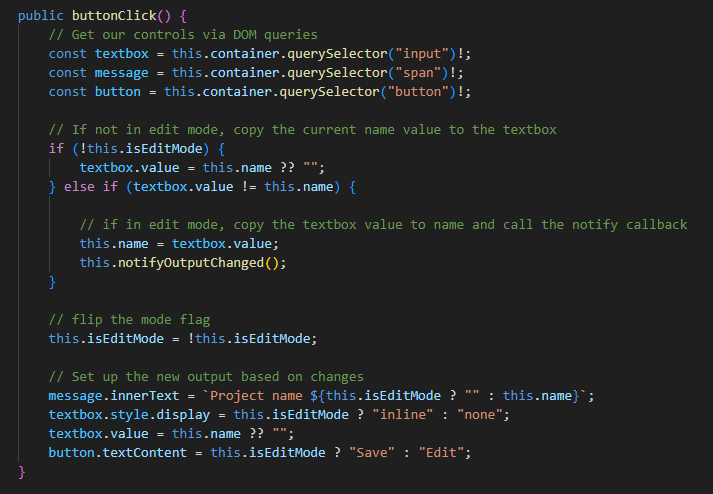
public buttonClick() { }Add the snippet below inside the buttonClick method. This snippet will get the controls via DOM queries.
TypeScriptCopy
// Get our controls via DOM queries const textbox = this.container.querySelector("input")!; const message = this.container.querySelector("span")!; const button = this.container.querySelector("button")!;Add the snippet below inside the buttonClick method. This snippet will copy the text value to name and the call the notify method if in edit mode.
TypeScriptCopy
// If not in edit mode, copy the current name value to the textbox if (!this.isEditMode) { textbox.value = this.name ?? ""; } else if (textbox.value != this.name) { // if in edit mode, copy the textbox value to name and call the notify callback this.name = textbox.value; this.notifyOutputChanged(); }Add the snippet below inside the buttonClick method. This snippet will flip the mode flag.
TypeScriptCopy
// flip the mode flag this.isEditMode = !this.isEditMode;Add the snippet below inside the buttonClick method. This snippet will set up new output, based on the changes.
TypeScriptCopy
// Set up the new output based on changes message.innerText = `Hello ${this.isEditMode ? "" : this.name}`; textbox.style.display = this.isEditMode ? "inline" : "none"; textbox.value = this.name ?? ""; button.textContent = this.isEditMode ? "Save" : "Edit";The buttonClick method should now look like the image below.
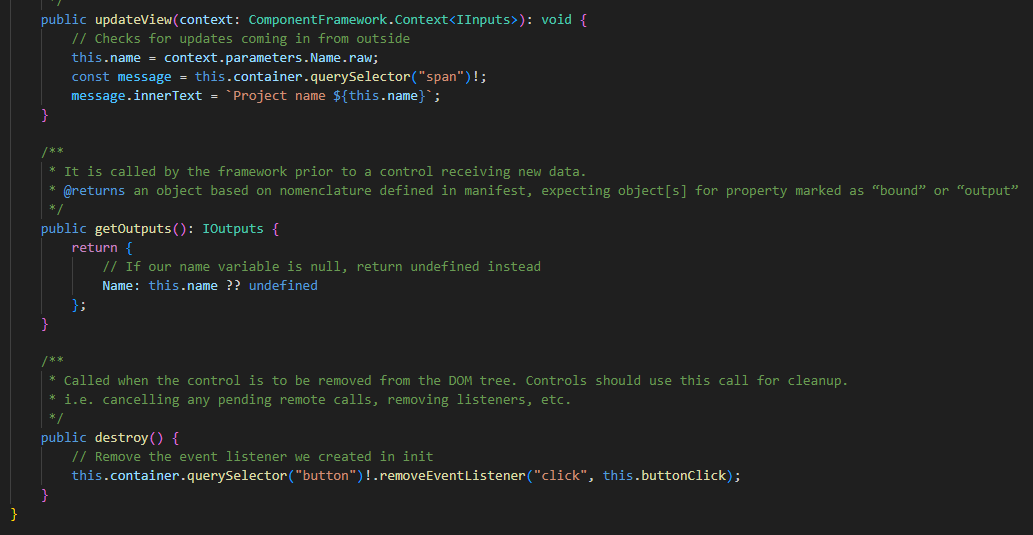
Locate the updateView method and replace it with the method below.
TypeScriptCopy
): void { // Checks for updates coming in from outside this.name = context.parameters.Name.raw; const message = this.container.querySelector("span")!; message.innerText = `Hello ${this.name}`; } " style="box-sizing: inherit; outline-color: inherit; font-family: SFMono-Regular, Consolas, "Liberation Mono", Menlo, Courier, monospace; font-size: 1em; direction: ltr; border-width: 0px; border-style: initial; line-height: 1.3571; display: block; position: relative;">public updateView(context: ComponentFramework.Context<IInputs>): void { // Checks for updates coming in from outside this.name = context.parameters.Name.raw; const message = this.container.querySelector("span")!; message.innerText = `Hello ${this.name}`; }Locate the replace getOutputs and replace it with the method below.
TypeScriptCopy
public getOutputs(): IOutputs { return { // If our name variable is null, return undefined instead Name: this.name ?? undefined }; }Locate the destroy method and replace it with the method below.
TypeScriptCopy
public destroy() { // Remove the event listener we created in init this.container.querySelector("button")!.removeEventListener("click", this.buttonClick); }The updateView, getOutputs, and destroy methods should now look like the image below.
Rebuild and run your code component
To rebuild and run your code component, follow these steps:
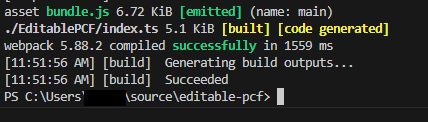
Now that your component's logic is implemented, go back to the terminal and rebuild it by using the command below.
ConsoleCopy
npm run buildThe build should succeed.
Run your component in Node's test harness by running the command below.
ConsoleCopy
npm startNote
You can also enable watch mode to ensure that any changes to the following assets are made automatically without having to restart the test harness by using the npm start watch command.
index.ts file.
ControlManifest.Input.xml file.
Imported libraries in index.ts.
All resources listed in the manifest file
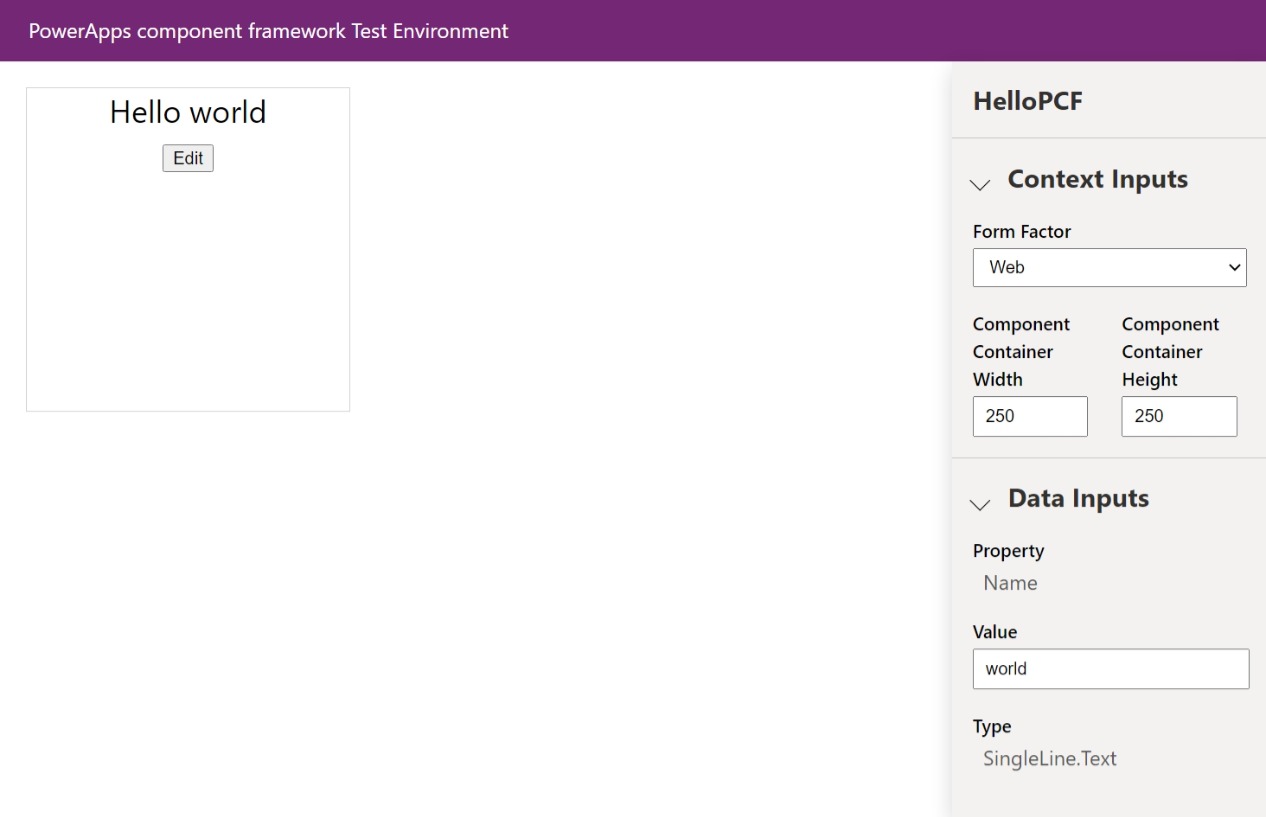
New browser window should load the test harness. (The window should open automatically, but you can also reference the address as found in the command window).
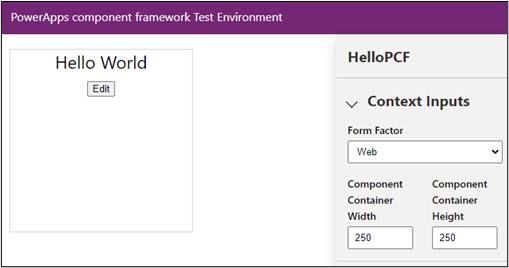
Select Edit.

Enter World and select Save.
You may change the container size.
The test harness should now look like the image below.
Close the test harness browser window.
Go back to the terminal and stop the watcher by holding [CONTROL] + C.
Type Y and then [ENTER].
Create a code component solution package
100 XP
15 minutesTo use a code component in Power Apps, it must be deployed to an underlying Microsoft Dataverse environment. To deploy the component, your first task is to package your code component into a solution file that can then be distributed for import. You can accomplish this in two ways. You can use the CLI Push command to use a temporary solution to quickly push your component to allow testing. This is great for use during development of the component. The other option is to create a solution for the component and import it separately into Dataverse. This option is good for use in build pipelines or manual deploys to other than your development environment. In the rest of this article, we'll explore both options in more detail.
Prerequisites
You must have an existing code component project that is already built. You can follow these steps for any other code component project, such as the Sample components.
Push a component to a Dataverse environment during development
To push a code component using the Power Platform CLI, follow these steps:
Navigate to Power Platform admin center and select Environments.
Select to open the environment you're using for this lab.
Right select on the Environment URL and select Copy link.
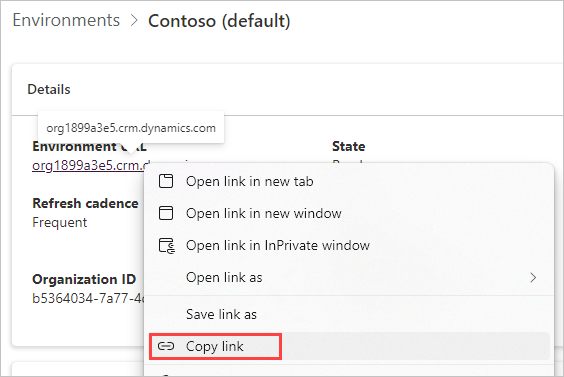
Save the Environment URL on a notepad.
Start Visual Studio Code and select Explorer.
Select Open Folder.
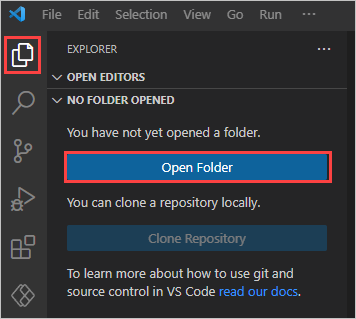
Select the hello-pcf project folder you created in the previous lab and select Select Folder.
Select the Power Platform tab and select Add Auth Profile
Look for a Sign in to your account popup and select the account you wish to use.
The profile you added will show up under Auth Profiles, along with the associated Environments & Solutions.
Select Terminal and select New Terminal.
Build then project by running the command below and make sure it builds successfully.
ConsoleCopy
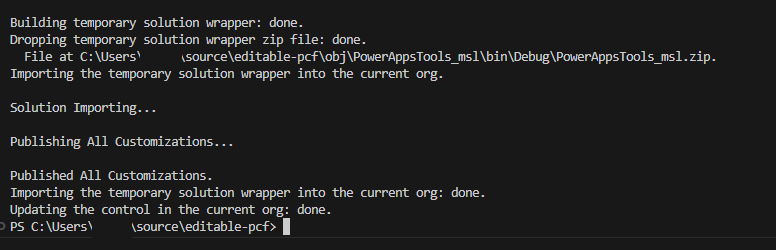
npm run buildPush the custom control to your environment by running the command below.
ConsoleCopy
pac pcf push --publisher-prefix mslThe solution should get imported into your environment and published.
Navigate to Power Apps maker portal and make sure you are in the correct environment.
Select Solutions.
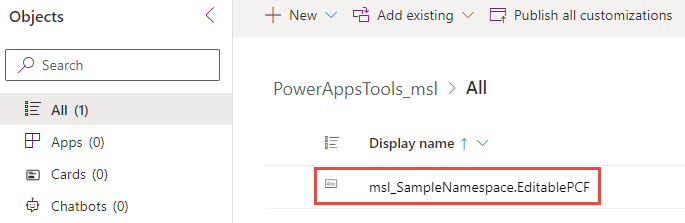
You should see PowerAppsTools_msl solution. Select to open the solution.
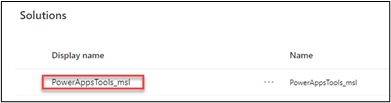
You should see the custom control you created.
Create a solution file with Power Platform CLI
To create a solution file with Power Platform CLI, follow these steps:
Go back Visual Studio Code and make sure you have the HELLO-PCF project open.
Go to the terminal and create new folder by running the command below.
ConsoleCopy
md SolutionChange directory to the Solution folder you created. Run the command below.
ConsoleCopy
cd SolutionInitialize your Dataverse solution project with the following command:
ConsoleCopy
pac solution init --publisher-name mslearn --publisher-prefix mslInform your solution project its components will be added during the build. To accomplish this task, use the following command
.NET CLICopy
pac solution add-reference --path ..To generate your solution's zip file, use Microsoft Build Engine, or msbuild for short. You'll only need to use the /restore flag the first time the solution project is built. In every subsequent build, you'll need to run msbuild only. The path to your MSBuild.exe can be different depending on the version of Visual Studio you've installed on your machine.
ConsoleCopy
C:\Program Files (x86)\Microsoft Visual Studio\2019\BuildTools\MSBuild\Current\Bin\MSBuild.exe\" /t:build /restoreThe build should succeed.
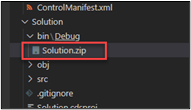
Locate the Solution folder you created and expand it.
Expand the bin\debug folder.
You should see the solution.zip file here.
Note
To run MSBuild, you need to have either Visual Studio or the Visual Studio Build Tools installed. You can install the build tools from the Visual Studio Downloads. To access MSBuild, you might need to add it to the path directory of your Windows environment variables. For example, Visual Studio 2022 stores MSBuild at C:\Program Files (x86)\Microsoft Visual Studio\2022\Enterprise\MSBuild\Current\Bin. You can also use the Visual Studio Developer Command Prompt to access MSBuild, or run it by using the full qualified path ("C:\Program Files (x86)\Microsoft Visual Studio\2022\Enterprise\MSBuild\Current\Bin\MSBuild.exe"/t:build /restore).
The default package type is a Managed solution. If you want to export as Unmanaged (or Both), you can clear (or uncomment) the comment in the following section from your Solutions.cdsproj and edit the SolutionPackageType node accordingly:
TypeScriptCopy
Unmanaged " style="box-sizing: inherit; outline-color: inherit; font-family: SFMono-Regular, Consolas, "Liberation Mono", Menlo, Courier, monospace; font-size: 1em; direction: ltr; border-width: 0px; border-style: initial; line-height: 1.3571; display: block; position: relative;"> <!-- Solution Packager overrides un-comment to use: SolutionPackagerType Managed, Unmanaged, Both)--> <PropertyGroup> <SolutionPackageType>Unmanaged</SolutionPackageType> </PropertyGroup>You can set the msbuild configuration to Release to issue a production build, for example, msbuild /p:configuration=Release.
You can manually import the containing zip file that is found in bin\Debug or bin\Release, depending on your release configuration. You can also programmatically deploy your code components by using the Power Platform CLI. For more information, see Connecting to your environment and Deploying code components sections of the Package a code component documentation.
Test and debug code components
100 XP
10 minutesAs you begin to develop more complex components, you might need to test and debug their logic in interactive ways. One useful utility that you have is the Power Apps Component Test Harness, which allows you to test different data and context inputs to ensure that your component is functioning properly. Also, because your components are built with standard web technologies like TypeScript, CSS, and HTML, you have numerous utilities that are provided through that ecosystem, such as client debugging capabilities that are available in most modern browsers.
Test and debug your code component in the Power Apps Component Test Harness
The Power Apps Component Test Harness is a utility built by Microsoft that helps you quickly render a Power Apps component in a localized environment. If you've gone through the exercise in this module on writing a code component, you've already seen this utility in action. You can start a local test harness from within a Power Apps component project by using the npm start command.
After the Test Harness has started, your component will display in a browser window, like the one that you built in the previous exercise.
Context Inputs
Within the test harness, you can provide your component with various inputs to specify how it's rendered (which is useful for ensuring that the component renders properly under different display contexts).
In the Context Inputs drop-down menu, you can select Form Factor such as Web, Tablet, and Phone. You can also provide explicit width and height fields to see how the component renders in various dimensions.
Data Inputs
The Data Inputs dropdown menu helps you ensure that the component functions as expected when different data parameters are provided, and also allows you to determine how the component will render based on the type specified in a given field.
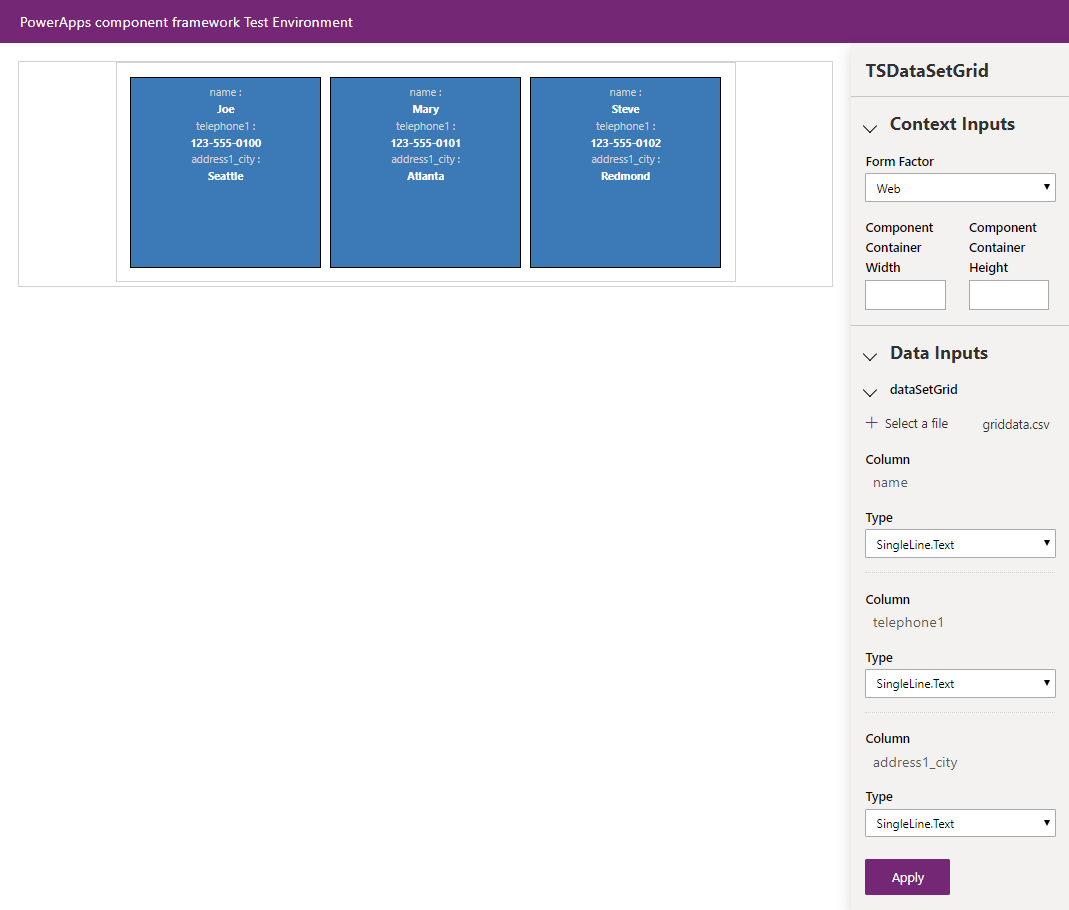
If your component is a dataset component, you can load CSV files with mock data. You can export a CSV from a sample target environment against which you're building your component, or you can build a new one.
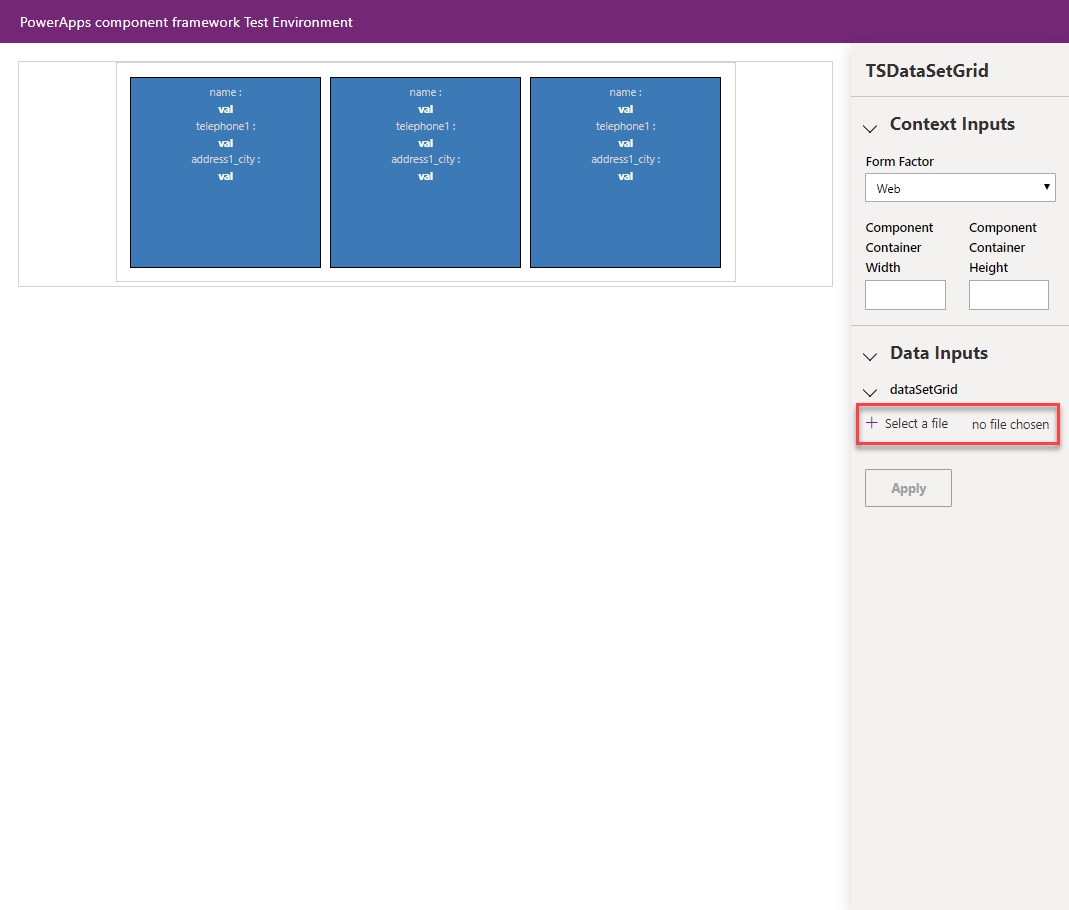
In the previous example, if you wanted to build a new CSV file, it should look similar to the following sample:
name, telephone1, address1_city
Joe, 123-555-0100, Seattle
Mary, 123-555-0101, Atlanta
Steve, 123-555-0102, Redmond
After the CSV has successfully loaded, the component will display its records and, as with your property controls, you can assign various types as specified by the component's corresponding type group (which is defined in the component's ControlManifest.Input.xml file).
Debug a code component by using browser debugging
Most modern browsers have various built-in debugging capabilities. Microsoft Edge, Google Chrome, Mozilla Firefox, and Apple Safari each have built-in developer tools that allow for interactive debugging experiences. For more information on each browser, see the following links.
| Microsoft Edge | https://learn.microsoft.com/microsoft-edge/devtools-guide-chromium |
| Google Chrome | https://developers.google.com/web/tools/chrome-devtools |
| Mozilla Firefox | https://developer.mozilla.org/docs/Tools/Debugger |
| Apple Safari | https://support.apple.com/guide/safari-developer/welcome/mac |
For this exercise, you'll use Microsoft Edge. Start Microsoft Edge's DevTools by pressing F12 on your keyboard.
Inspect your HTML with the Elements panel
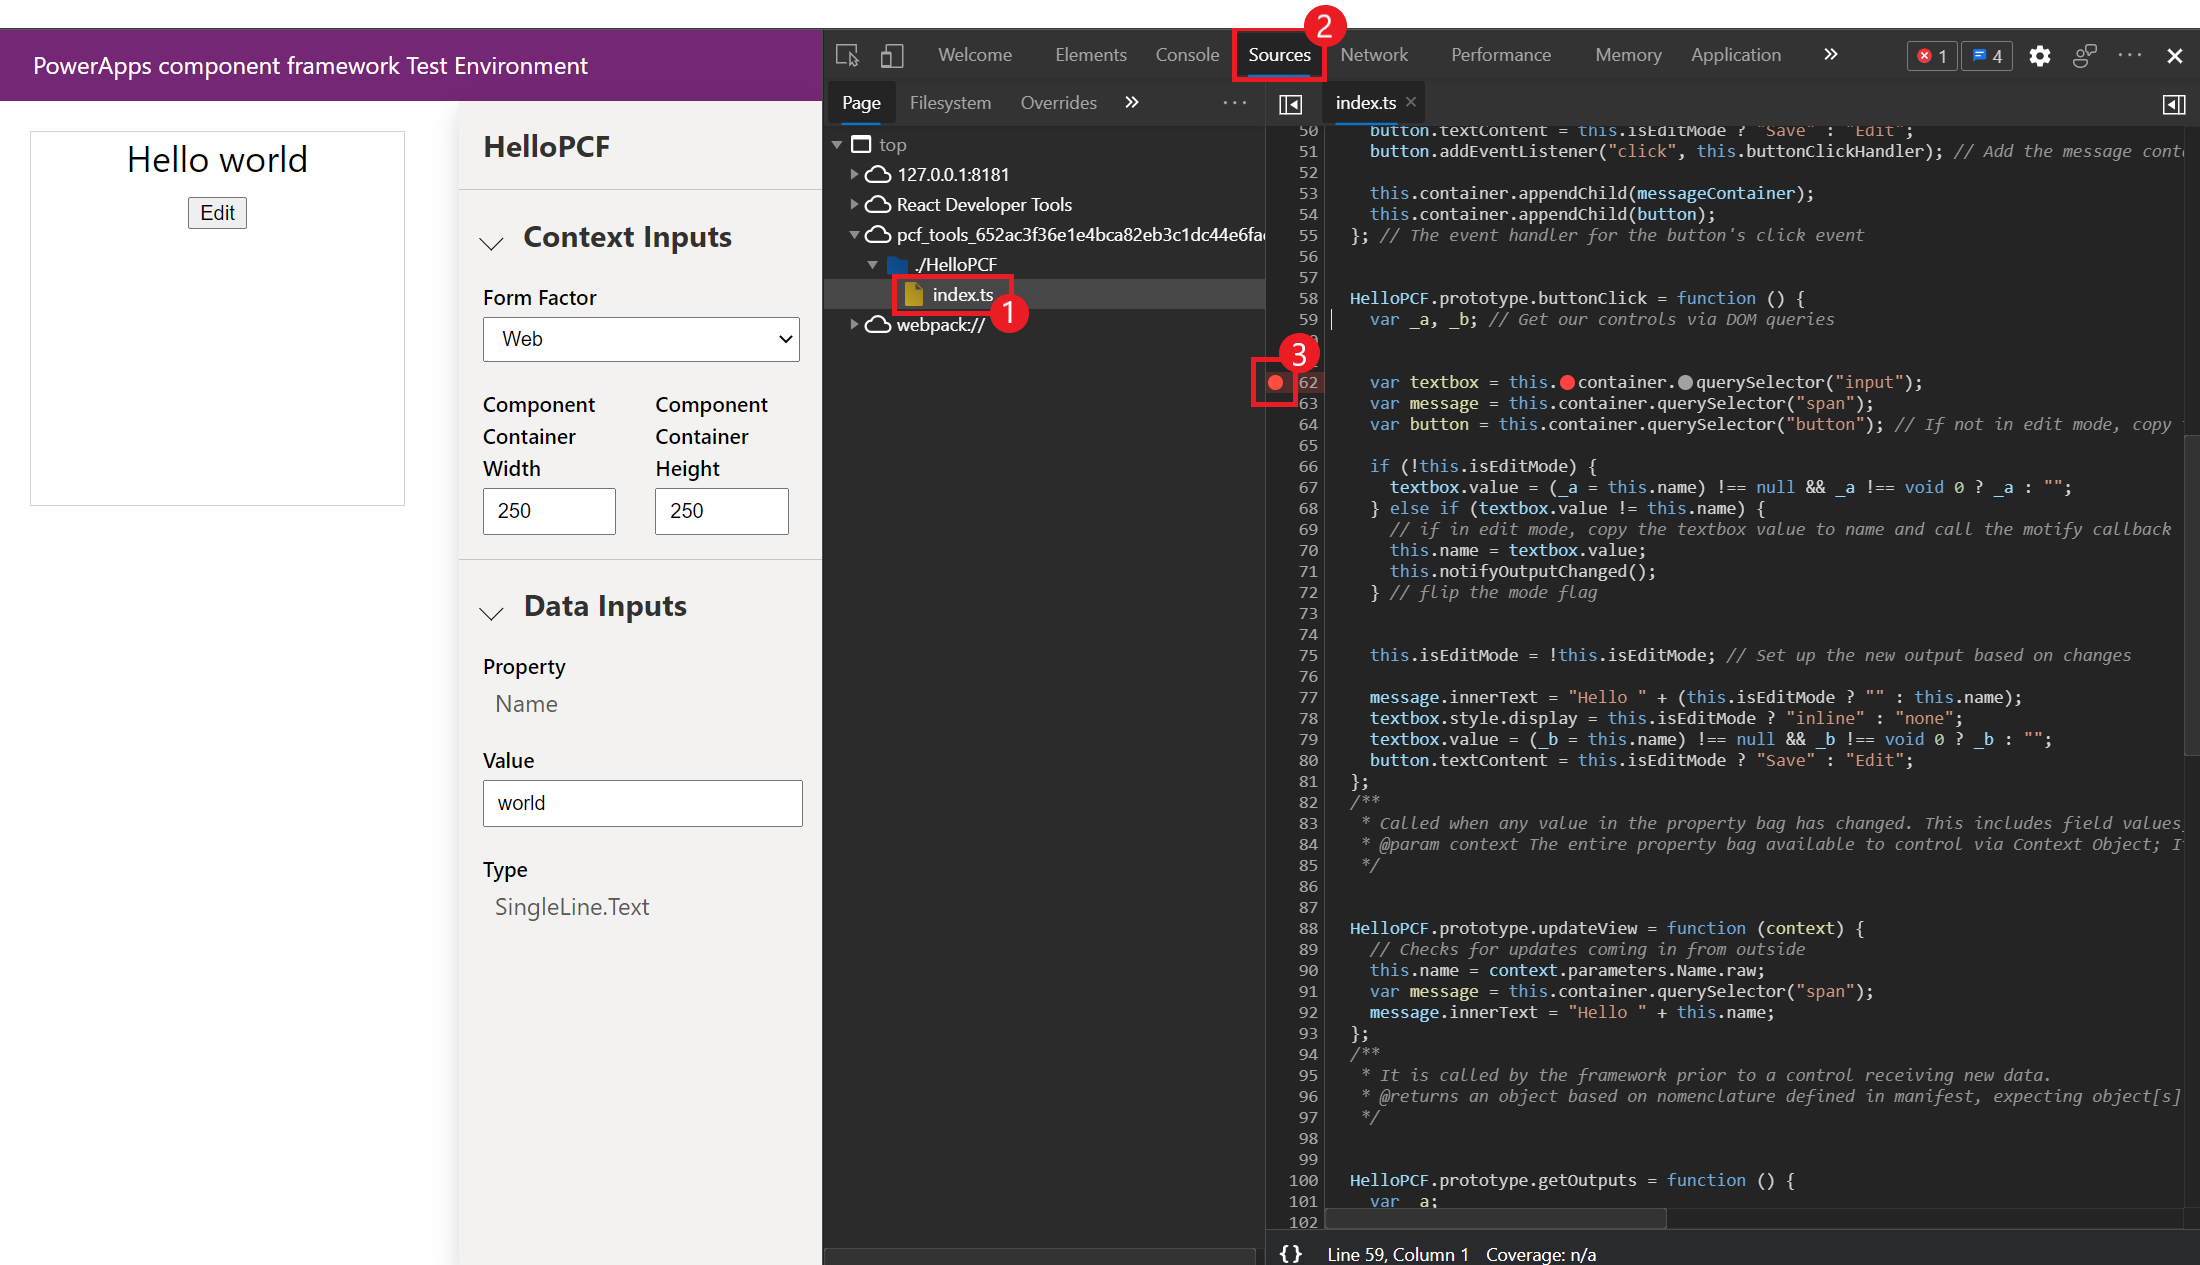
In DevTools, the first available tab after Welcome is Elements. Select Elements and the Elements panel provides you with a way to view the HTML that is rendered within the page. You can go to where your control is being rendered by using the Inspect functionality, which can be accessed in one of three ways:
Click on the Select an element in the page to inspect it icon at the top left of the Elements panel (see 1 in the diagram below), and then select the element in the Component Test Harness (see 2 in the diagram below). This action selects that element in your viewer on the right (see 3 in the diagram below).
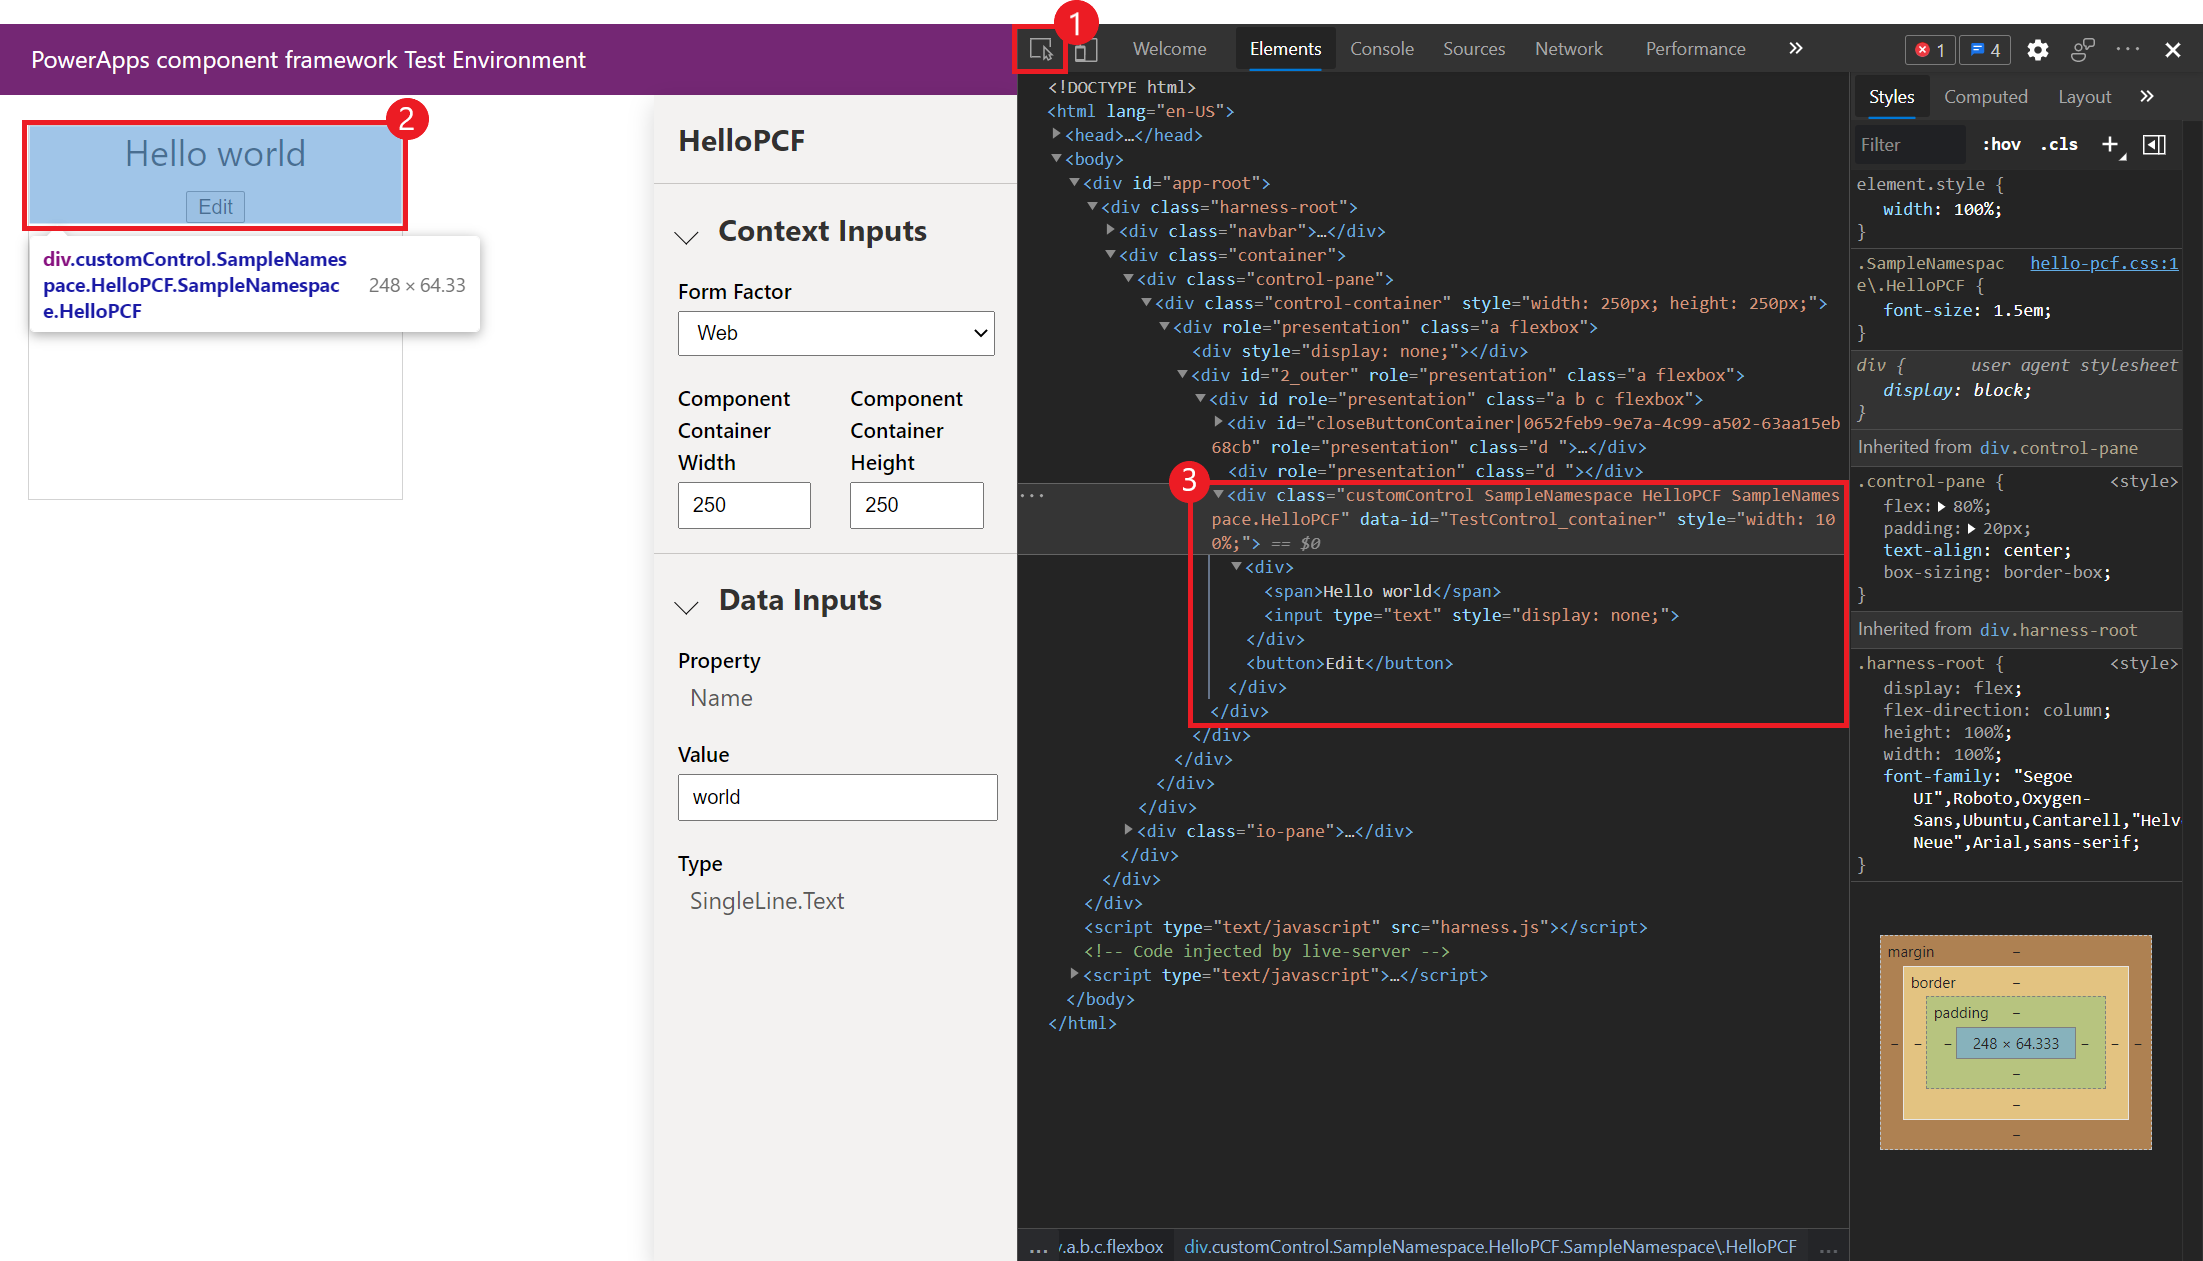
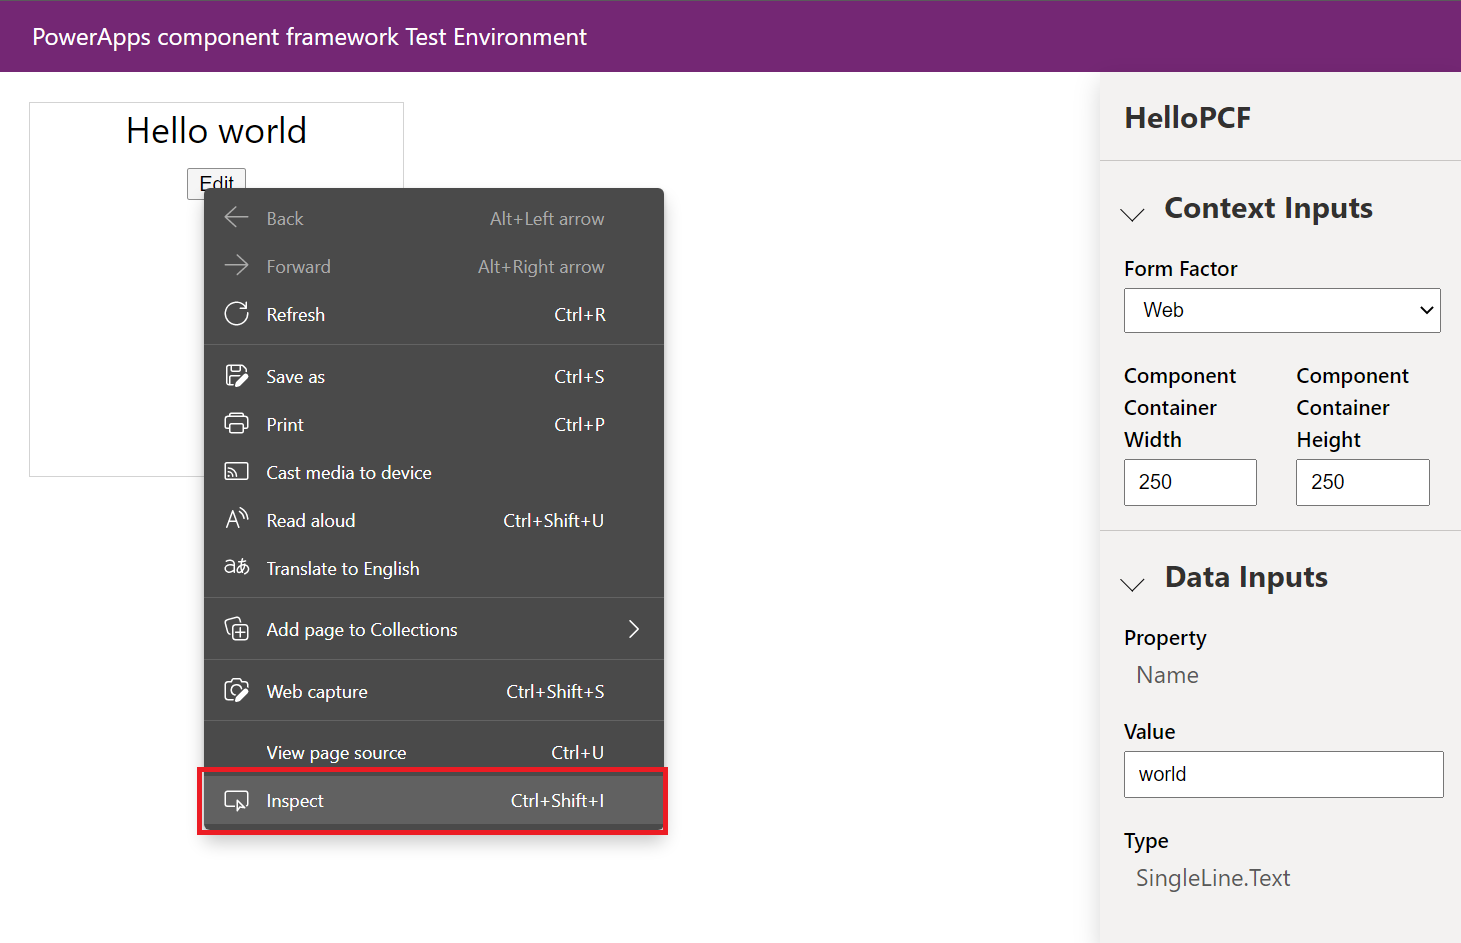
Highlight and right-click an element within your component and then select Inspect.
Select any element from the Elements panel.
Inspect console logs and run script in the Console panel
A frequent mechanism for providing debug context within client script is to use the console.log() method. If you want to provide logging inside of your component's logic, you can use this method. These logs are displayed in the DevTools console panel whenever they're run, which provides a valuable way to trace logic as it runs within your component. The following image shows an example of a couple of logs that were written by your test harness.

You also have the ability to run your own script from within the console. This method can be valuable for testing various method calls and logic from within the context of a live environment.

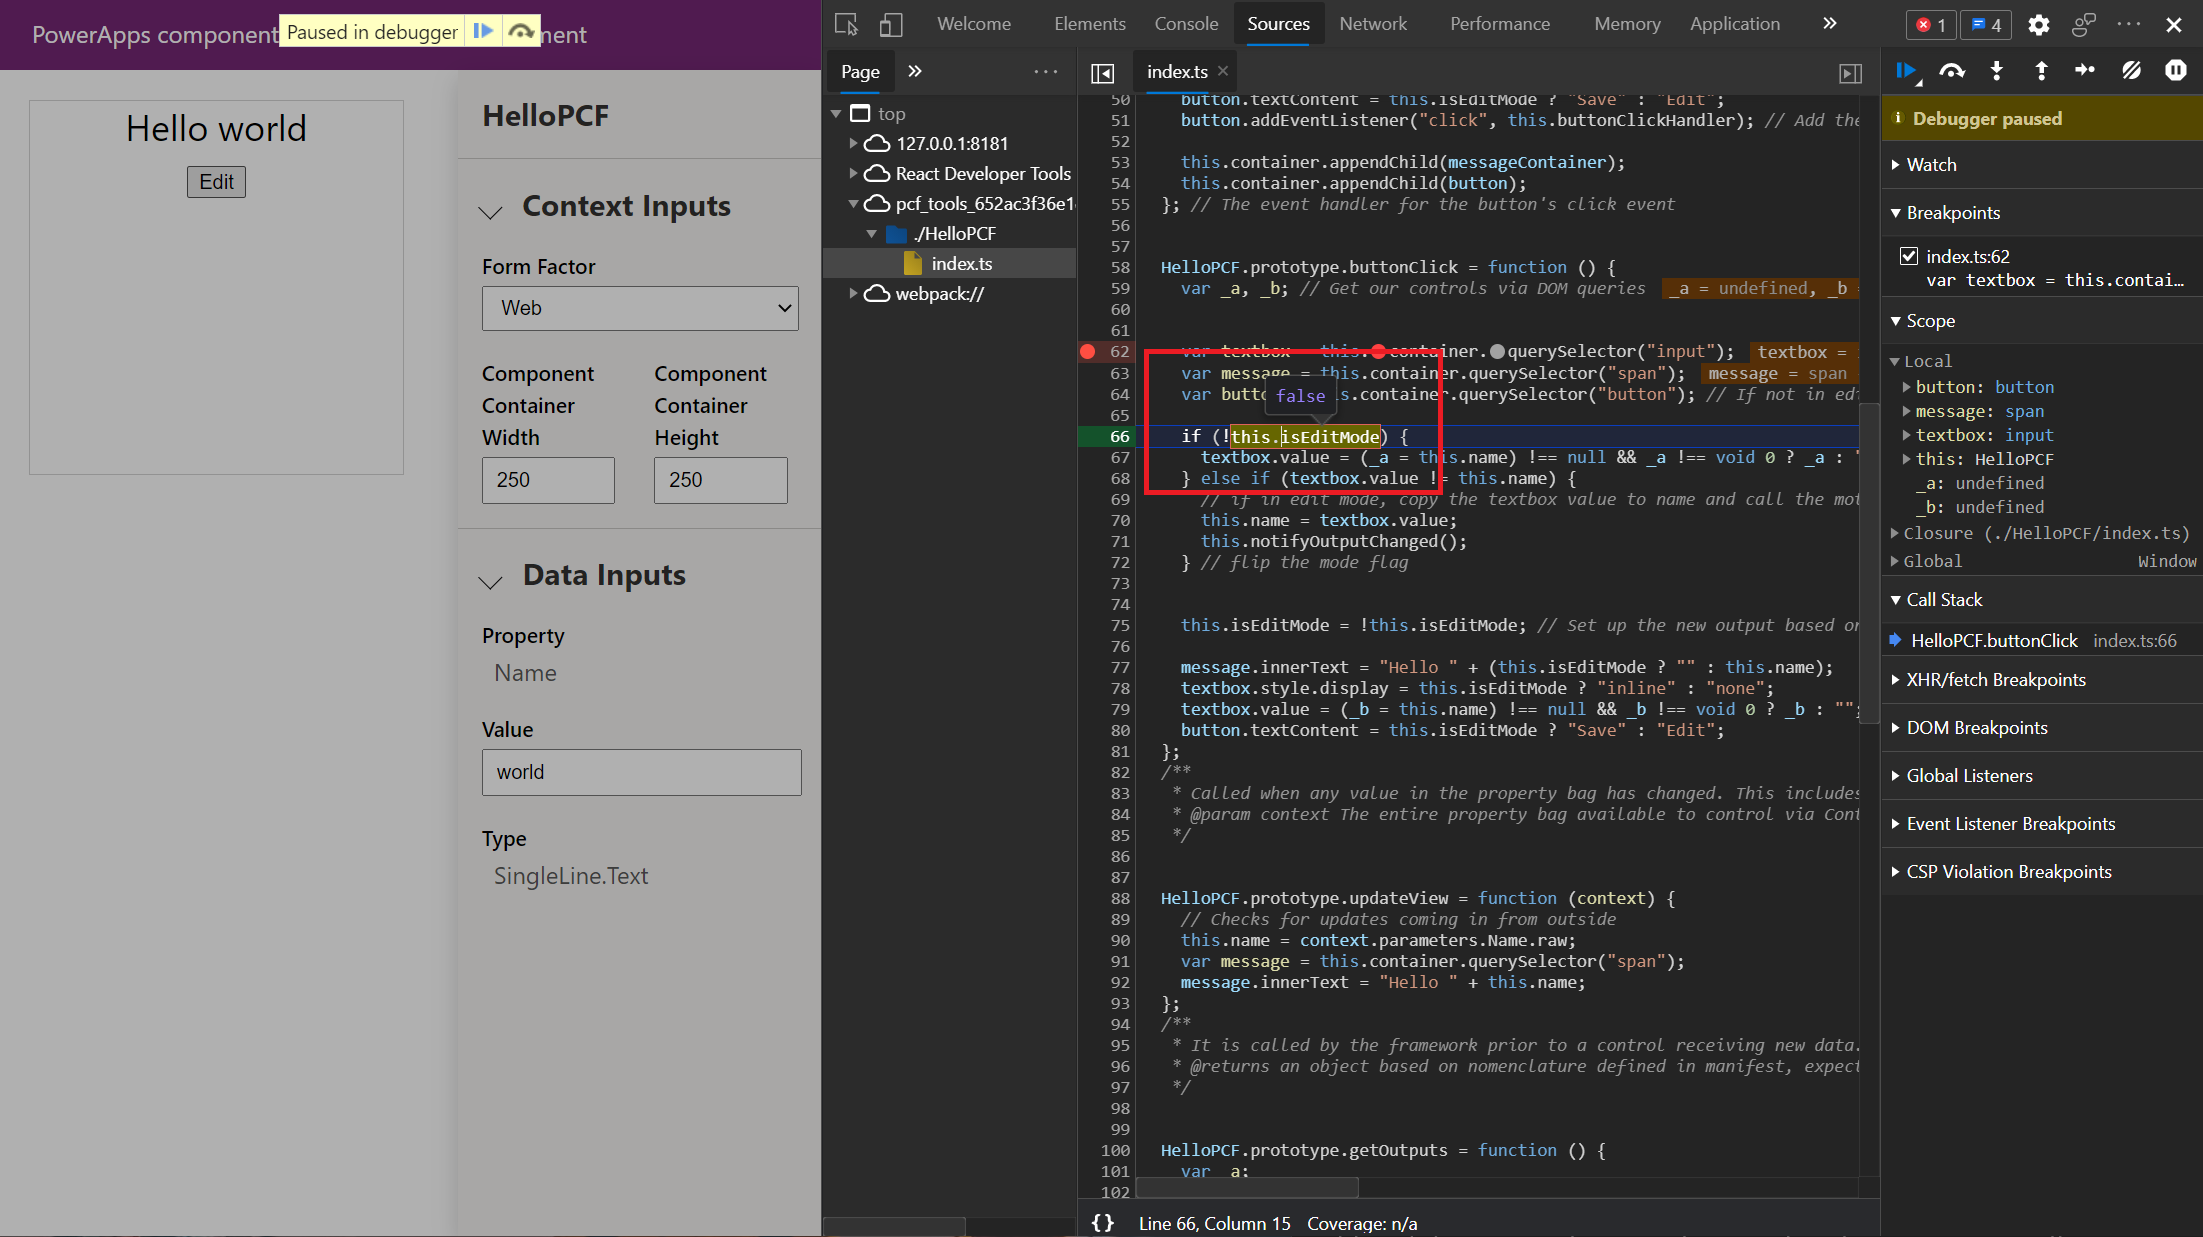
Set debugger breakpoints in the Sources panel
One of the most valuable utilities in DevTools is the ability to set debugger breakpoints in your code so that you can inspect variables and the flow of your method implementation. This example sets a breakpoint in your index.ts file that you developed as part of your Power Apps component. In the following example, a breakpoint is set to run anytime that the refreshData method is called.
If you select the button of your hello world control, this breakpoint is hit, providing you with the ability to manually step through the logic of the event handler. Additionally, you can inspect values, such as those that have changed, as shown in the following image.
Check your knowledge
200 XP
5 minutesAnswer the following questions to see what you've learned.
1.
Which Power Platform CLI command do you use to initialize a code component project?
pac pcf init
The command that you would use to initialize a code component project is pac pcf init.
pac pcf new
npm start
pac pcf
2.
What build engine is used to generate a Power Apps component solution package?
npm
MSBuild build engine is used to generate a Power Apps component solution package.
.NET
Node.js
MSBuild
MSBuild build engine is used to generate a Power Apps component solution package.
3.
During the build of a custom grid component, what file format is supported to load mock data into the Power Apps Component Test Harness?
CSV
During the build of a custom grid component, CSV is supported to load mock data into the Power Apps Component Test Harness.
JSON
XML


 Bengali (Bangladesh) ·
  English (United States) ·