
ARTICLE AD
Introduction
100 XP
3 minutesLet's face it, sometimes we simply can't pick and choose our data sources. We have to use what is in use and available at that point in time.
This is where Power Automate's large ecosystem of Software as a Service (SaaS) connectors comes in handy. A connector, that is simply a wrapper around an API (Application Programming Interface), allows the underlying service to talk to Microsoft Power Automate. It provides a way for users to connect their data and use a set of prebuilt actions and triggers to build their flows.
In this unit, we'll take a look at some of the popular data sources such as Dataverse, SQL and SharePoint.
So, let's get started!
Exercise - Build a flow that runs when an event in Dynamics 365 occurs
100 XP
10 minutesYou can create flows that start when an event occurs in Microsoft Dataverse or some other service. These flows then perform an action in that service.
In Power Automate, you can set up automated workflows between your favorite apps and services to sync files, get notifications, collect data, and more.
In this unit, we'll look to build two flows:
The first flow creates a task in Microsoft Dataverse when a new Account has been created in another instance of Microsoft Dataverse.The second flow copies a list item to the Planner when a task is created in Microsoft Dataverse.Here are some other examples of flows that you can create by using Microsoft Dataverse:
Create a list item in Microsoft SharePoint when an object is created in Microsoft Dataverse.Create Microsoft Dataverse account records from a Microsoft Excel table.Prerequisites
Access to Power Automate.An environment with a Microsoft Dataverse database. (Applicable only for work or school accounts).A basic understanding of Power Automate and experience with creating a flow is recommended.Important
To invoke a flow trigger, the Microsoft Dataverse customer engagement table that's used with the flow must have change tracking turned on. For more about how to turn on change tracking, see Enable change tracking to control data synchronization.
Example one: Create a task from a new account
This example shows how to create a task in Microsoft Dataverse whenever an Account is created in another instance of Microsoft Dataverse.
Sign in to Power Automate using your organizational account.
In the Environment field, select the environment where the flow should create the record. This doesn't have to be the same environment that the event is triggered from.
In the left pane, select My flows.
Select + New flow, and then select Automated cloud flow.
In the list of flow triggers, enter Microsoft Dataverse in the search all triggers field and then select Microsoft Dataverse - When a row is added, modified Or deleted. Microsoft Dataverse keeps information in the Dataverse, so we'll use this connector throughout.
Select Create.
If you're prompted to sign in to Dataverse, do so.
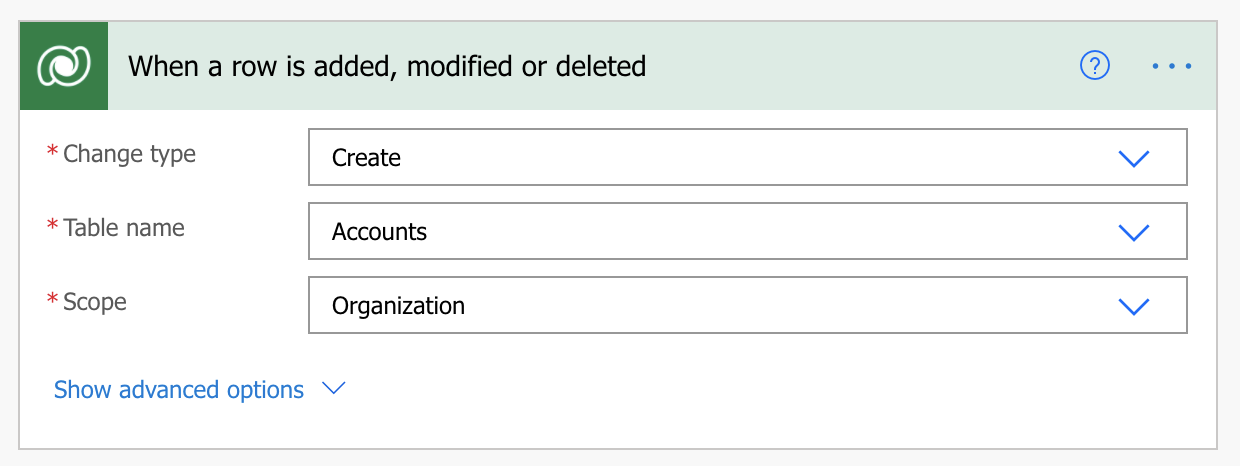
In the Change type field, select Added.
In the Table name field, select the Table to listen to. This Table will act as a trigger that starts the flow.
For this unit, select the Accounts table.
For Dataverse, you also need to specify the Scope. This will determine if your flow runs if you create a new record, if a user within your business unit creates a new record, or if any user in your organization creates a new record. For this example, choose Organization.
Select + New step.
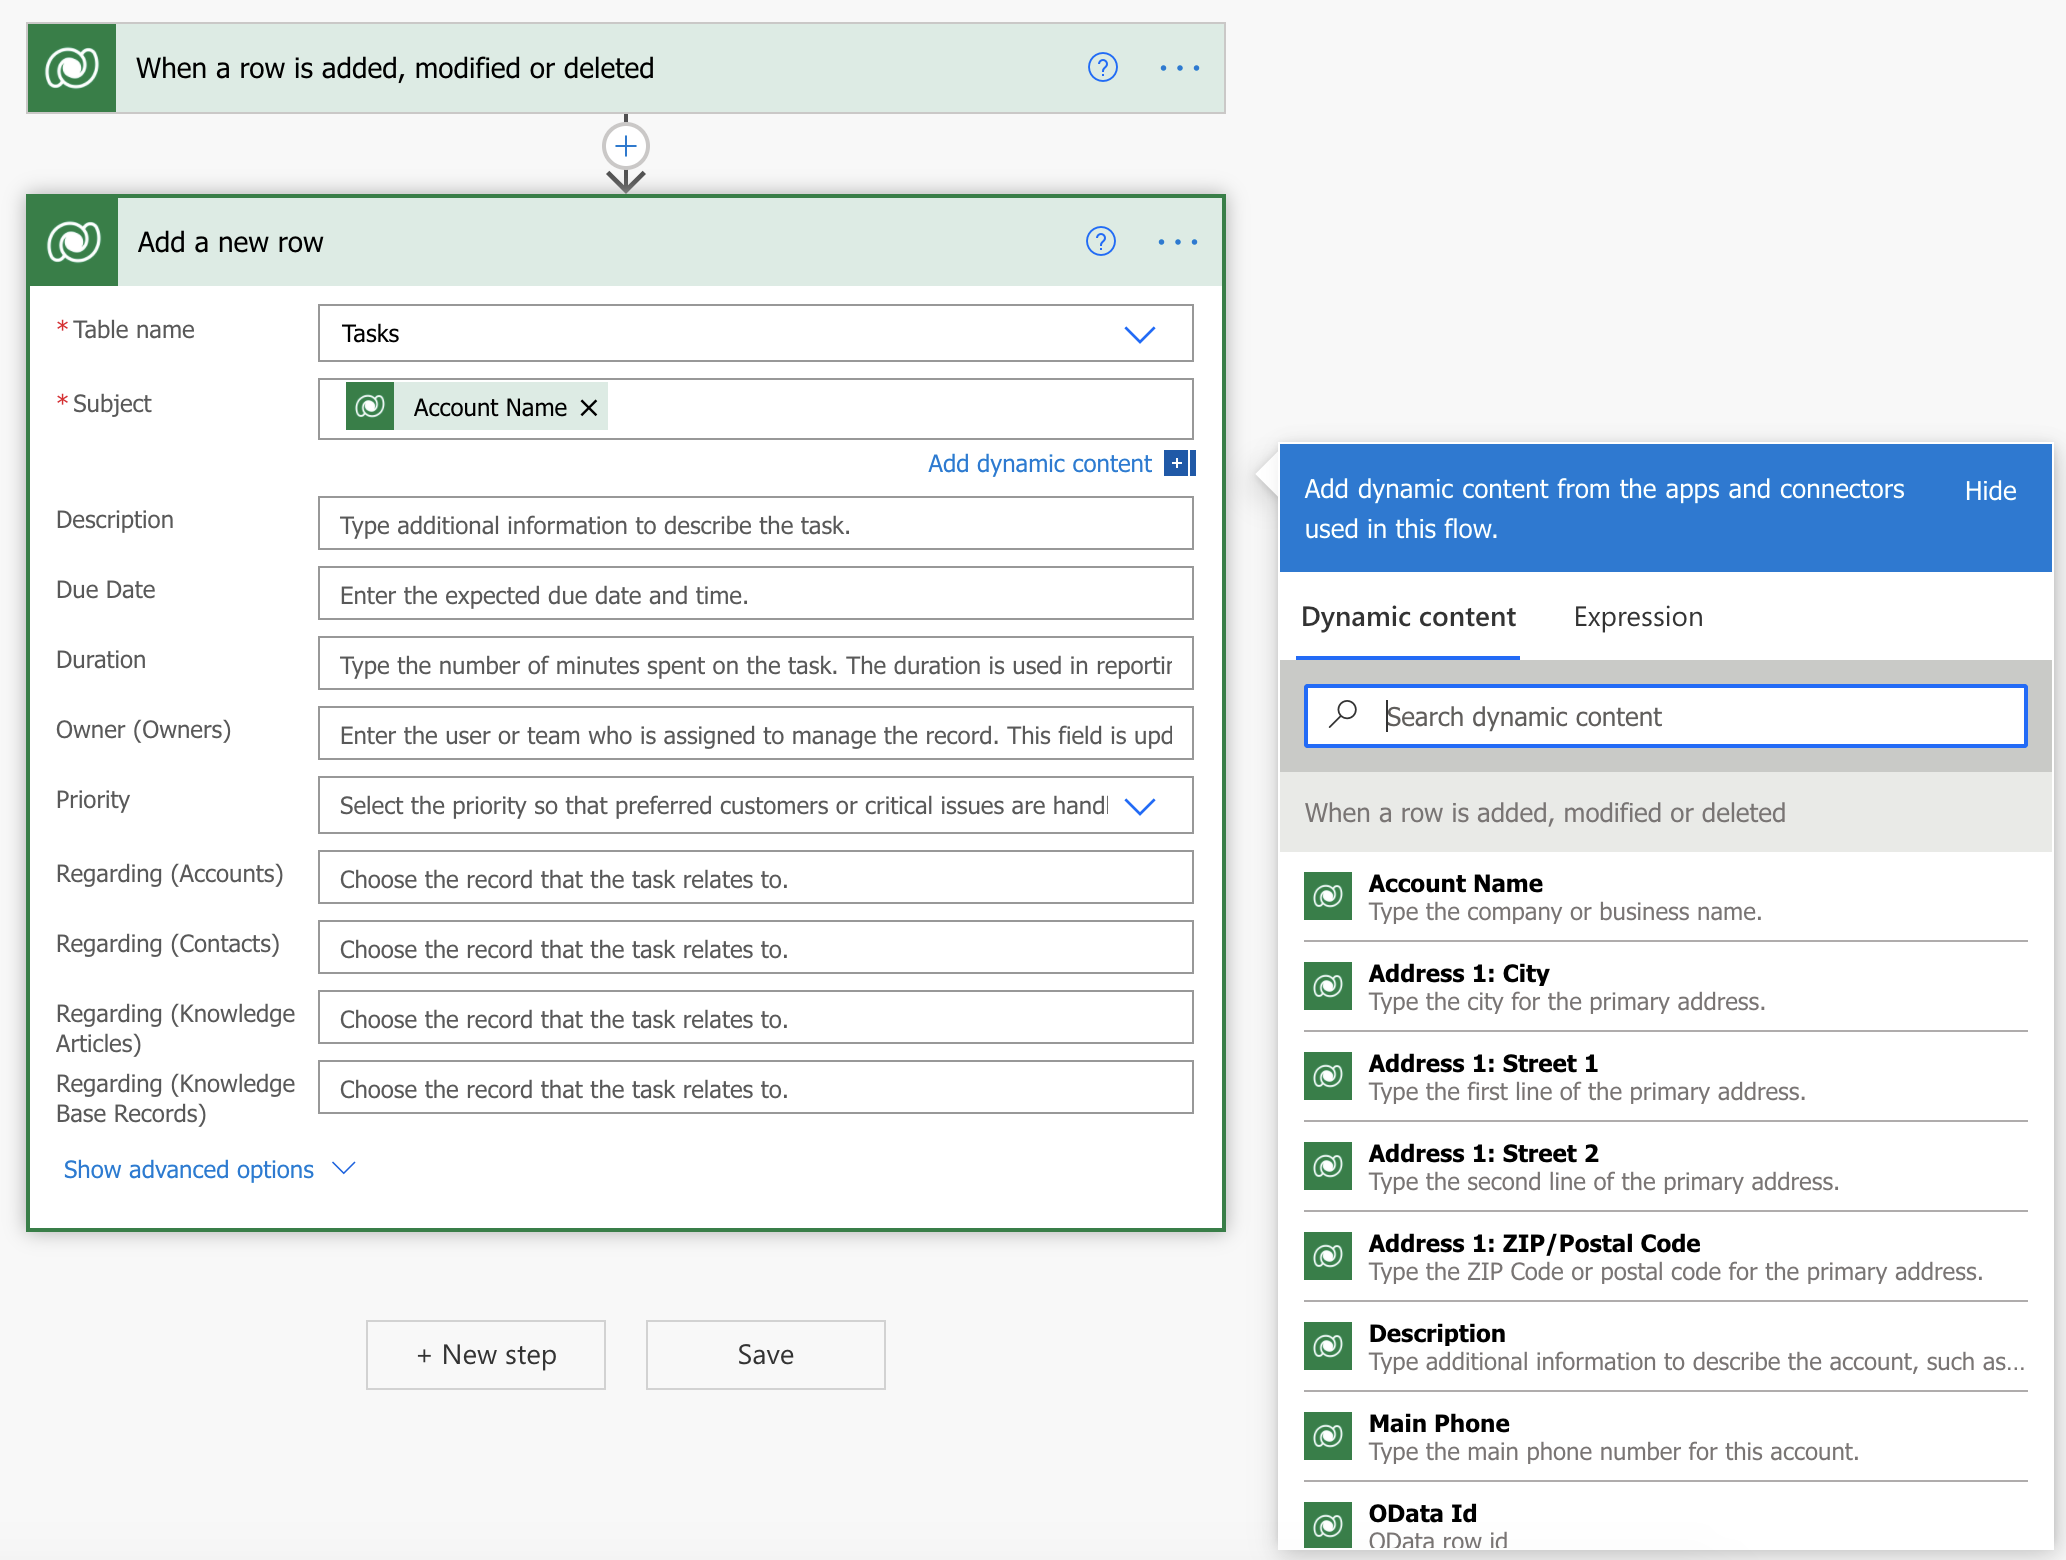
In the search field, enter Microsoft Dataverse and select Microsoft Dataverse – Add a new row.
In the Table Name field, select the Table that will create a record when the event occurs.
For this unit, select the Tasks table.
More fields appear on the table selection. Select the Subject field. A dynamic content pane appears, where you can select fields from the previous steps.
For this unit, select Account name.
Select Save.
Example two: Create a planner task from a Microsoft Dataverse task
This example shows how to create a task in Microsoft Planner whenever a task is created in Microsoft Dataverse. Planner is a service that you can use to create to-do lists, add reminders, and track errands.
Sign in to Power Automate using your organizational account.
In the left pane, select My flows.
Select + New flow, and then select Automated cloud flow.
In the list of flow triggers, enter Microsoft Dataverse in the search all triggers field and then select Microsoft Dataverse - When a row is added, modified or deleted.
If you're prompted to sign in to Dataverse, do so.
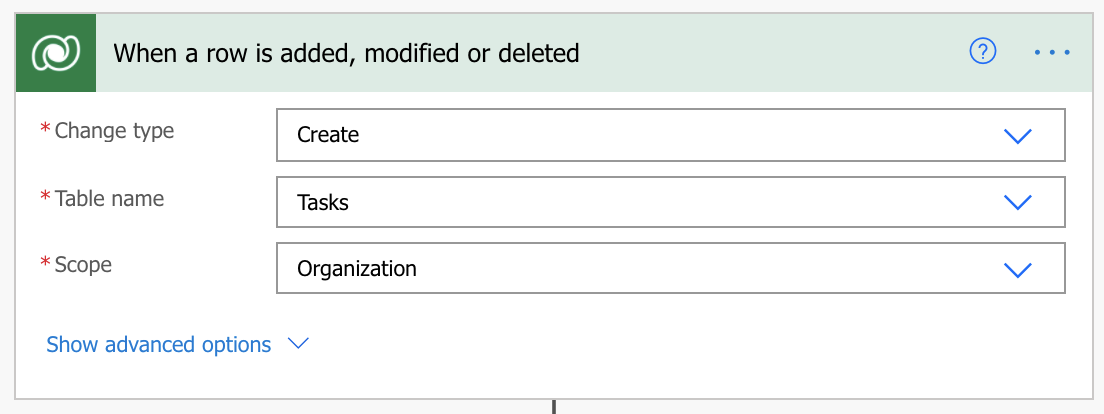
In the Change type field, select the instance where the flow should listen.
In the Table Name field, select the table to listen to. This table will act as a trigger that starts the flow.
For this unit, select the Tasks table.
In the Scope field, choose Organization.
Select + New step.
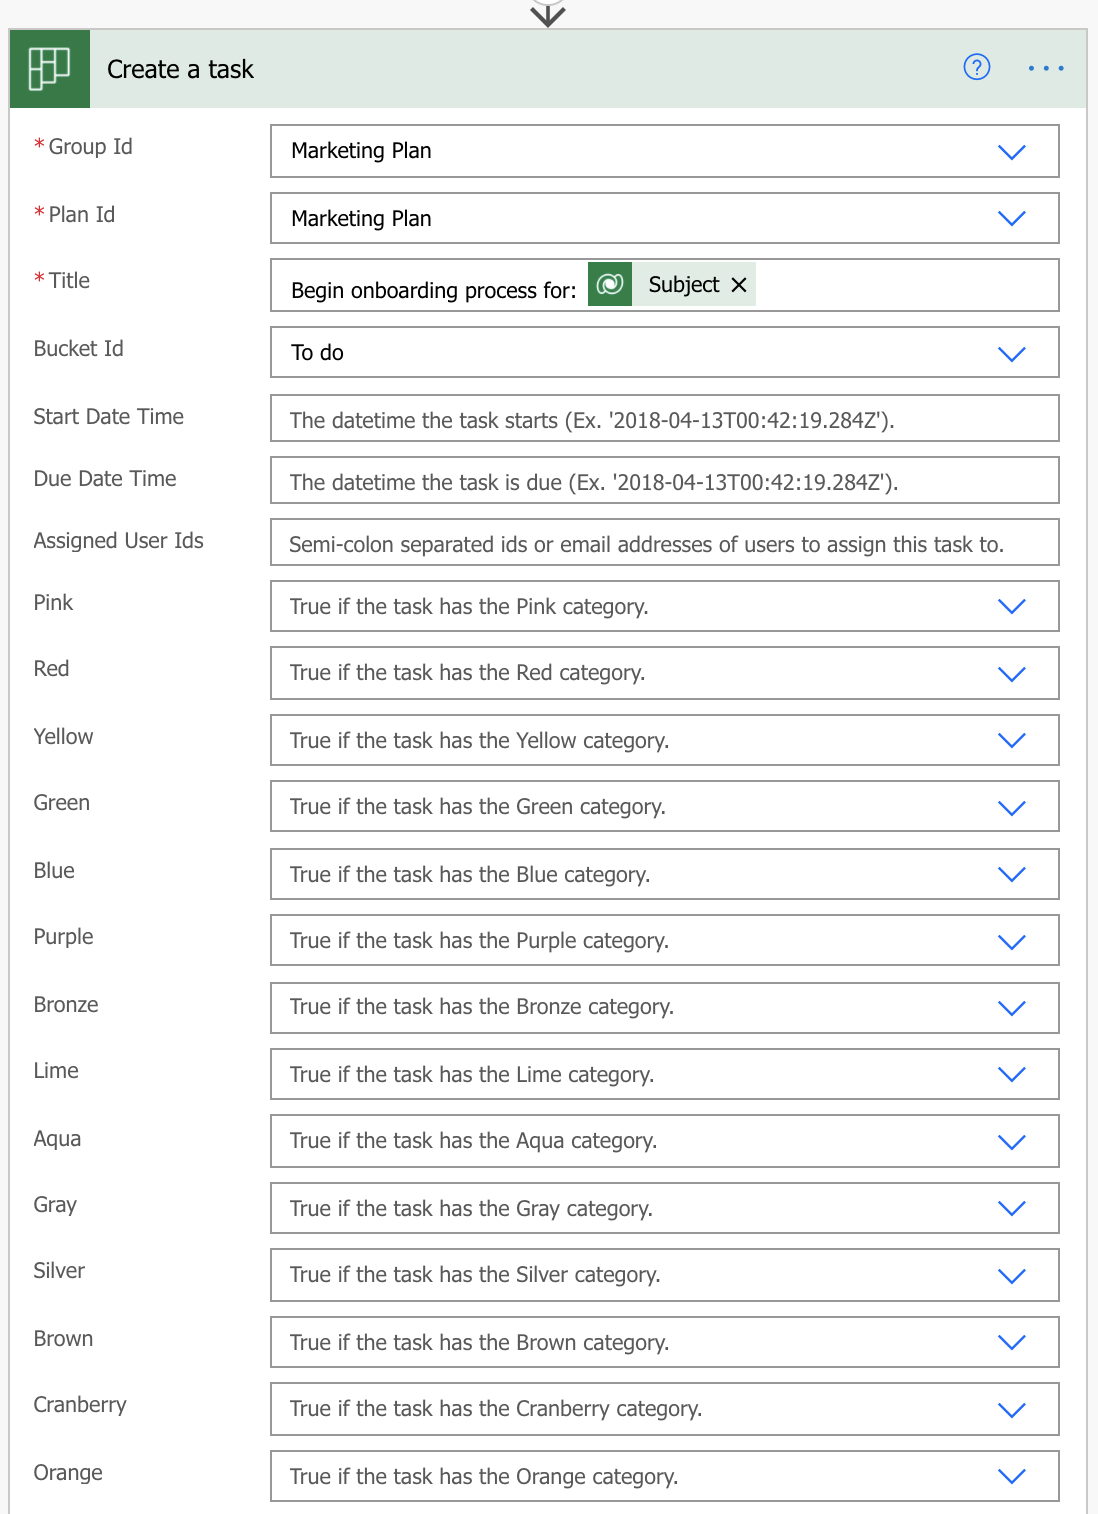
In the search field, enter Planner, and then select Planner – Create a task.
For Group ID, hit the dropdown and select a Group. In our example, I'll select Marketing Plan.
For Plan ID, hit the dropdown and select a Plan.
In the Title field, enter some text and then add the Subject, from the dynamic content pane. In our example, for the Title field, I'll enter Begin onboarding process for:. This will give my new Planner task some more clarity, when it shows up in the Planner App.
For Bucket ID, hit the dropdown and select a Bucket (optional).
See create a task parameters for information about the fields.
Select Save.
Limitations of trigger-based logic
Triggers like When a record is created, When a record is updated, and When a record is deleted will start your flow within a few minutes after the event occurs. In rare cases, it might take up to two hours for your flow to be triggered.
When the trigger occurs, the flow receives a notification, but the flow runs on the data that exists when the action runs. For example, if new record creation triggers your flow, and you update the record twice before the flow runs, your flow runs only once with the latest data.
Specify advanced options
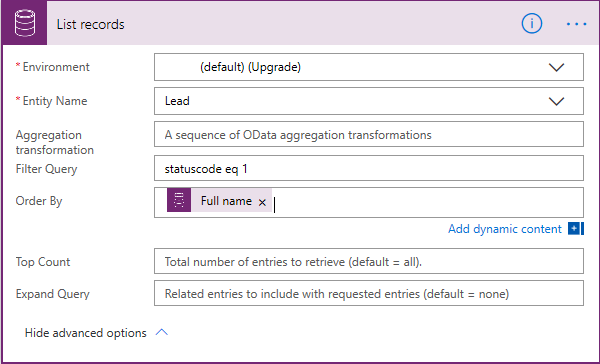
When you add a step to a flow, you can select Show advanced options to add a filter or order-by query that controls how the data is filtered in the flow.
For example, you can use a filter query to retrieve only active contacts, and you can order them by last name. Enter the statuscode eq 1 Open Data Protocol (OData) filter query and select Full name in the dynamic content pane. For more about filter and order by queries, see MSDN: $filter and MSDN: $orderby.
Best practices for advanced options
When you add a value to a column, you must match the column type. You must match it regardless of whether you enter a value or select a value in the dynamic content pane.
Exercise - Build a flow that uses SQL
This unit shows how to create a flow that monitors a source for new or changed items, and then copies those changes to a destination. You might create a flow of this type if your users enter data in one location, but your team needs that data in a different location or format.
In this unit, you'll copy data from a list in Microsoft Lists, the source, to a Microsoft Azure SQL Database table, the destination.
Keep in mind that you can copy data over more than 275 services that Power Automate supports.
Important
Changes that you make in the destination aren't copied back to the source, because two-way synchronization isn't supported. If you try to set up two-way synchronization, you'll create an infinite loop where changes are sent endlessly between the source and destination.
Prerequisites
Access to a data source and a destination. This unit doesn't include the steps to create the source and destination.Access to Power Automate.A basic understanding of how your data is stored.Familiarity with the basics of creating flows. For this unit, it's assumed that you know how to perform these actions.Tip
Column names in the source and destination don't need to match, but you must provide data for all required columns when you insert or update an item. Power Automate identifies the required fields for you.
Quick overview of the steps
If you're comfortable with Power Automate, use these quick steps to copy data from one data source to another.
Identify the source that you'll monitor and the destination that you'll copy changed data to. Confirm that you have access to both the source and the destination.
Identify at least one column that uniquely identifies items in the source and destination. In the example that follows, we use the Title column, but you can use any columns.
Set up a trigger that monitors the source for changes.
Search the destination to check whether the changed item exists.
Use a condition like this:
If the new or changed item doesn't exist in the destination, create it.If the new or changed item exists in the destination, update it.Trigger your flow, and then confirm that new or changed items are being copied from the source to the destination.
Note
If you haven't previously created a connection to SharePoint or a SQL Database, follow the instructions when you're prompted to sign in.
Here are the detailed steps to create the flow.
Monitor the source for changes
First, we'll set up the SharePoint site to monitor changes.
Launch Power Automate and sign in using your organizational account.
In the left pane, select My flows.
Select + New flow, and then select Automated cloud flow.
Under Flow name, you can either enter a flow name now or one will be generated automatically.
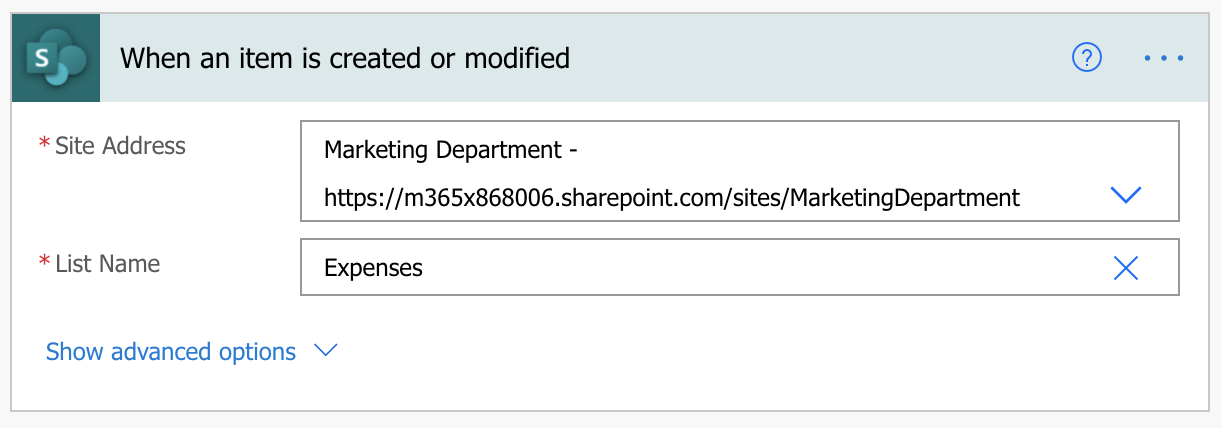
In the Search all triggers field, enter When an item is created and then select the SharePoint - When an item is created or modified trigger.
Select Create.
On the When an item is created or modified card, enter the site address, and then select the name of the list in Microsoft Lists that your flow monitors for new or updated items.
Search the destination for the new or changed item
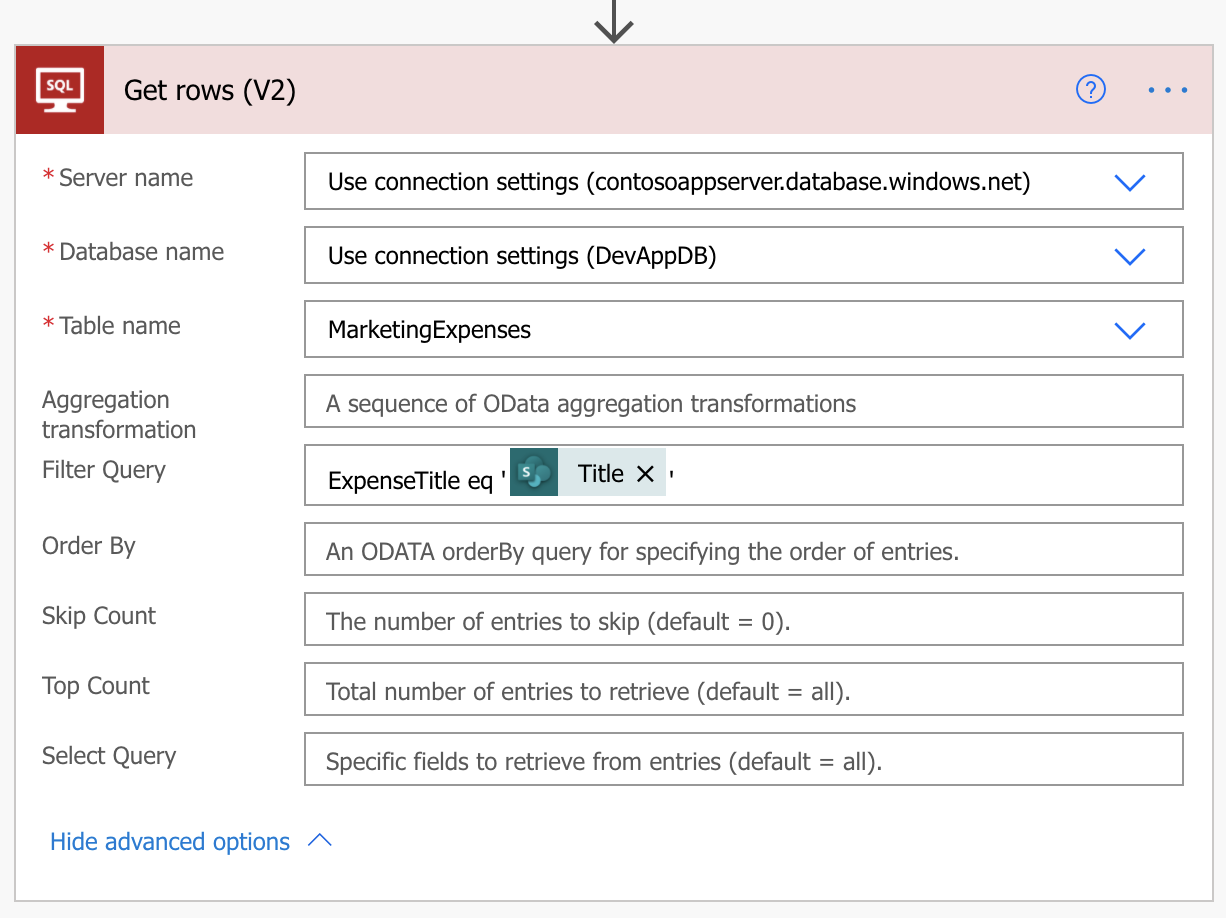
Next, we'll use the SQL Server - Get rows action to search the destination for the new or changed item.
Select + New step.
Under Choose an operation, search for SQL Get rows, and then select SQL Server - Get rows (V2).
Set the Server name, Database name, and Table name for the table you wish to monitor.
Select Show advanced options.
In the Filter Query box, enter Title eq followed by a space and a single quotation mark ('). Then select the Title token in the dynamic content list, and enter another single quotation mark (').
This step assumes that you're matching the titles, or in this example the ExpenseTitle field in SQL (destination) to the Title column in SharePoint (source).
The Get rows card should now look like this image.
Check whether the new or changed item was found
Next, we'll check whether the new or changed item was found.
Select + New step, and then select Condition.
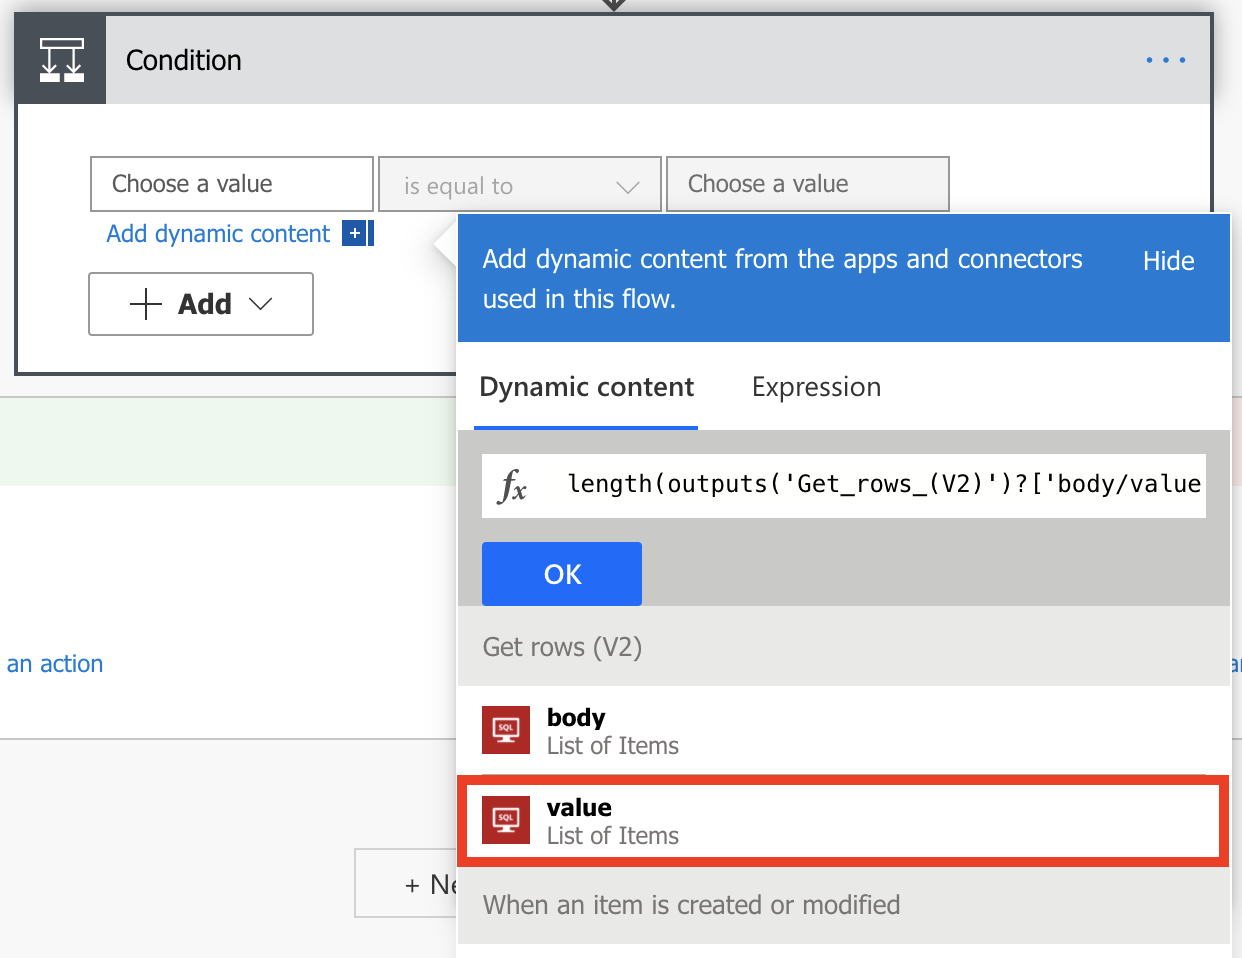
On the Condition card, select the field on the left.
The Add dynamic content from the apps and connectors used in this flow list opens.
Select Expression and choose length. Your cursor should be between the parentheses in the equations.
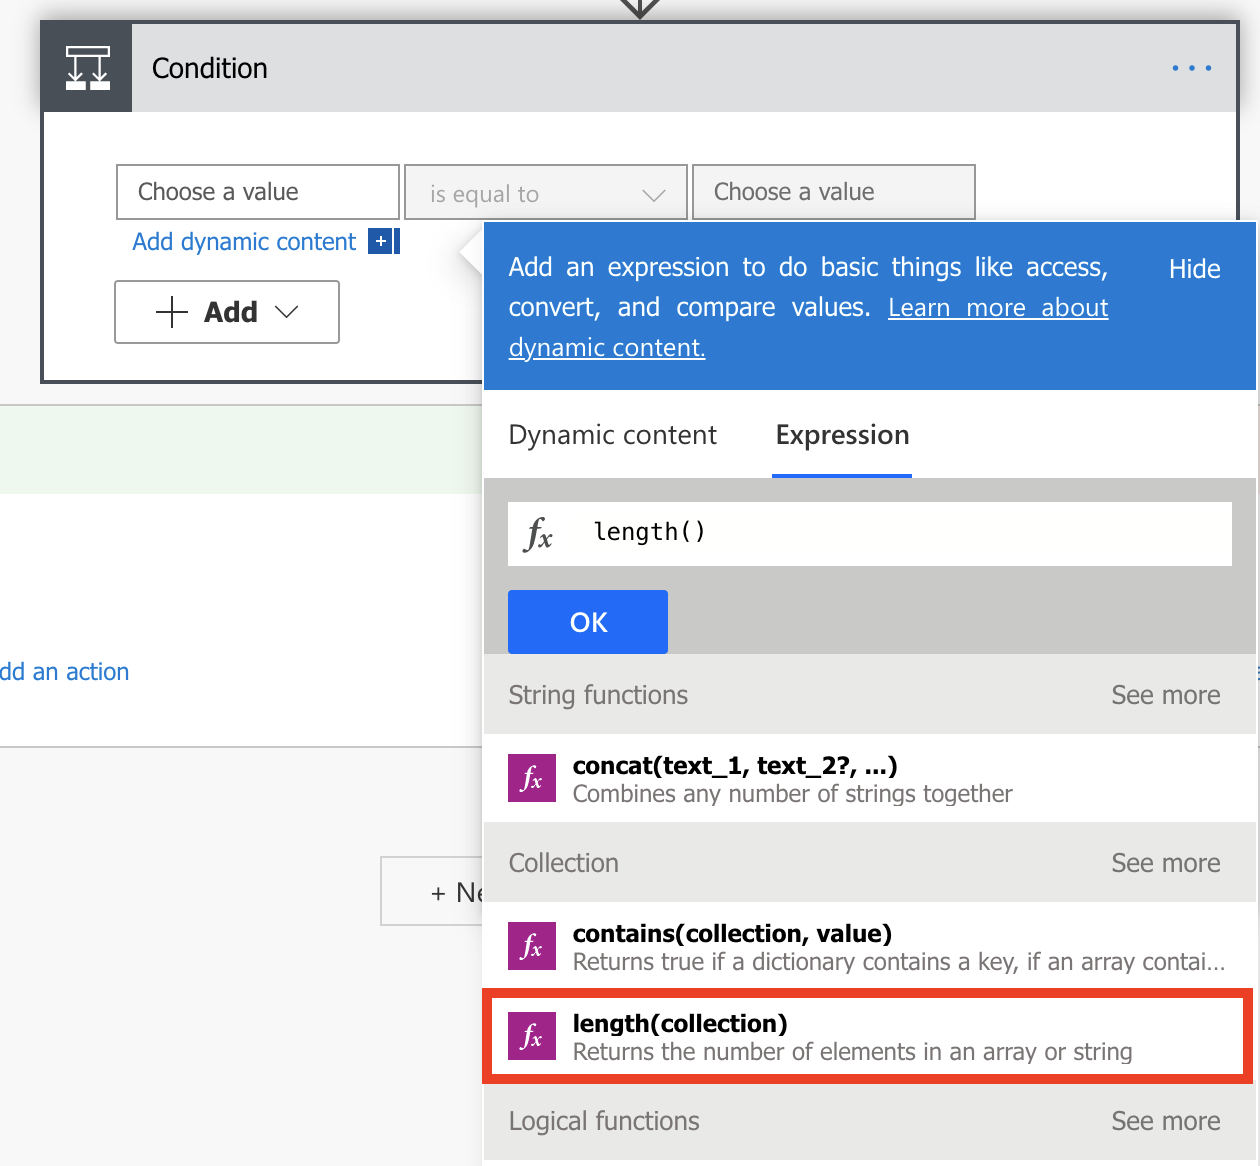
Without leaving the open pane, select Dynamic content.
In the Get rows (V2) category, select value and then select OK.
Tip
Confirm that you've selected value in the Get rows (V2) category. Don't select value in the When an item is created or modified category.
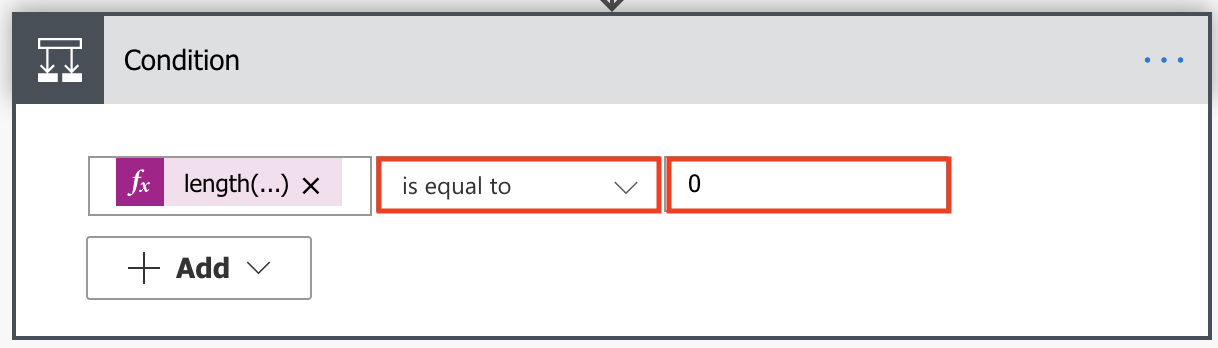
In the field in the center, select is equal to.
In the field on the right, enter 0 (zero).
The Condition card should now look like this image.
Tip
The addition of the length() function lets the flow check the value list and check whether it has any items.
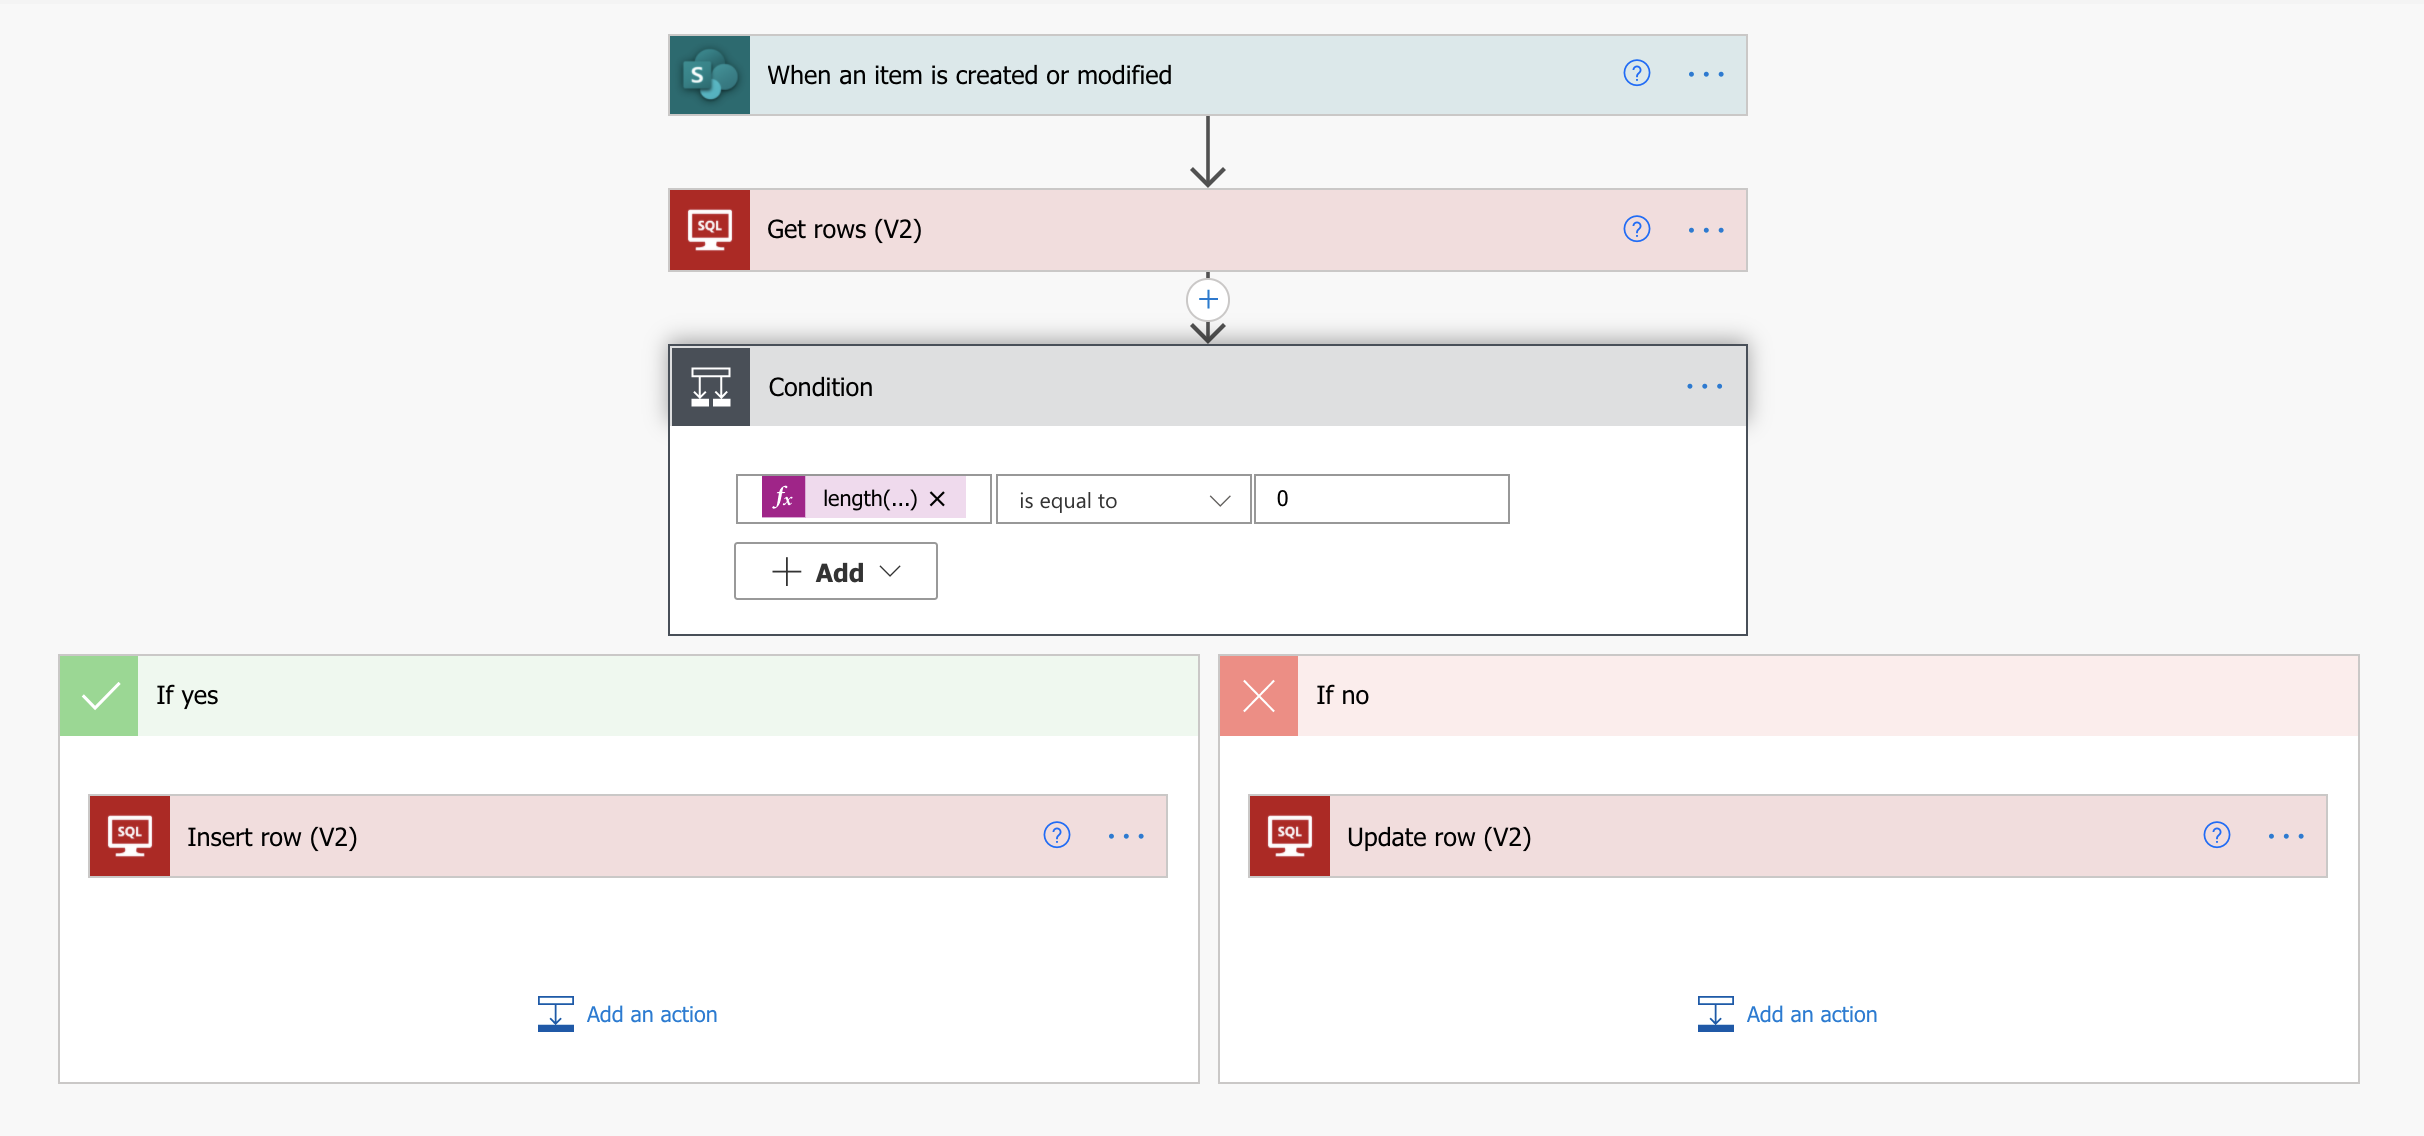
When your flow gets items from the destination, there are two possible outcomes.
| The item exists. | Update the item. |
| The item doesn't exist. | Create a new item. |
Create the item in the destination
If the item doesn't exist in the destination, create it by using the SQL Server - Insert row action.
On the If yes branch of the condition, select Add an action, search for insert row SQL, and then select SQL Server - Insert row (V2).
On the Insert row card, set the Server name, Database name, and Table name for the table to insert the new item into (the information you entered above).
The Insert row card expands and shows all fields in the selected table. Fields that are marked with an asterisk (*) are required and must be filled in for the row to be valid.
Select each field that you want to fill in, and enter the data.
You can manually enter the data, select one or more tokens in the dynamic content pane, or enter any combination of text and tokens into the fields.
Note
The Insert row and Update row cards show the names of the columns in the SQL Database table that's being used in the flow. Therefore, the cards that are shown in the images in this procedure might differ from the cards that you see.
Update the item in the destination
Next, if the item exists in the destination, update it with the changes.
Add the SQL Server - Update row action to the If no branch of the condition.
Select Save to save the flow.
Now, whenever an item in your list, the source, changes, your flow is triggered. It either inserts a new item or updates an existing item in SQL Database, the destination.
Note
Your flow isn't triggered when an item is deleted from the source. If this scenario is important to you, consider adding a separate column that indicates when an item is no longer needed.
xercise - Integrate Power Apps, Power Automate, and SharePoint
The data that fuels business processes is often buried in separate systems that are difficult to connect to and navigate. This is one reason why business processes continue to be complex, and why people rarely stop worrying about them.
The Microsoft Power Platform with Power Automate, Power Apps, and Power BI along with tools like Microsoft SharePoint make it all easier. Together, these apps and services provide advantages like these:
Data can easily be accessed.Critical business decisions can be made quicker and more intelligently.People can worry less about what their data is doing and concentrate more on moving their business forward.This unit gives an overview of:
Integration of Power Automate with Power Apps.Integration of Power Automate and Power Apps with SharePoint for easy sharing of data in lists.Add a flow in Power Apps
Adding a flow to a Power Apps application is straightforward.
Go to https://make.powerapps.com, and sign in by using your organizational account.
Open your app for editing.
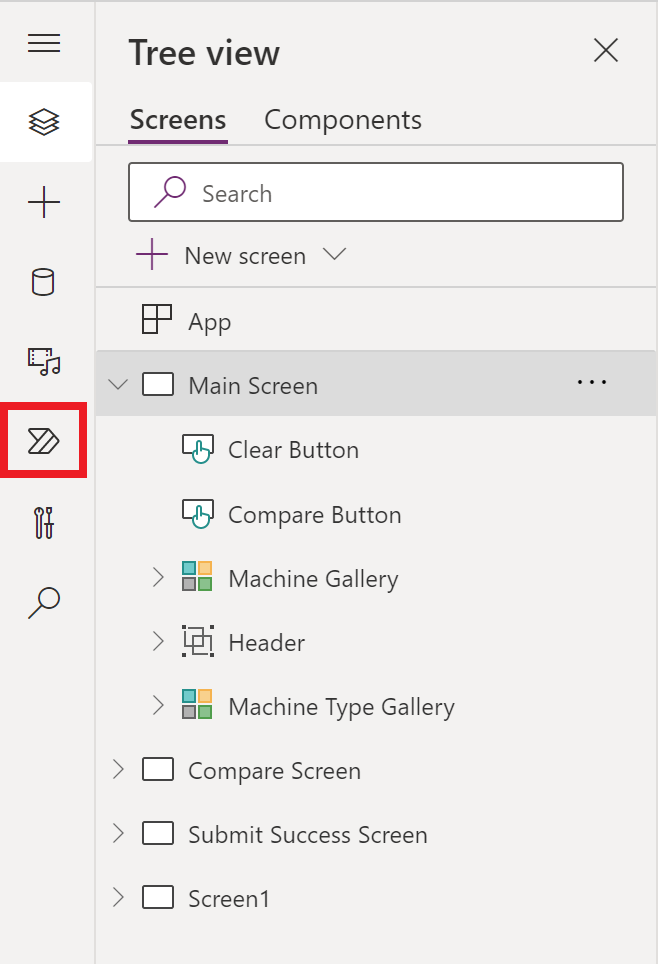
On the left navigation menu, select the Power Automate icon.
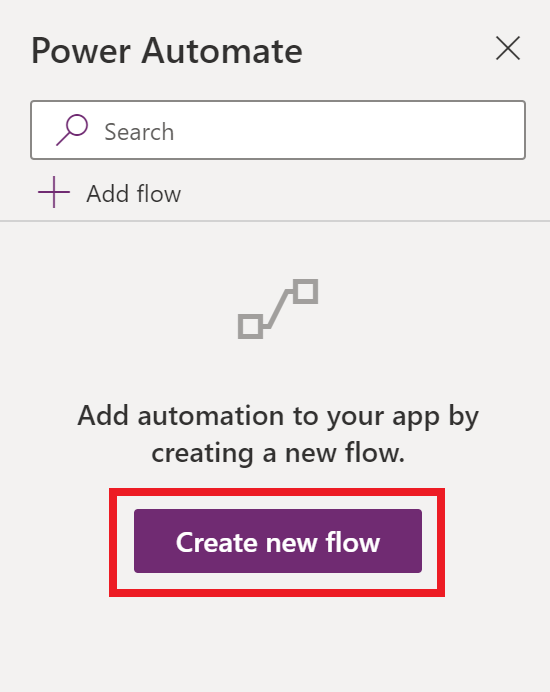
From the Power Automate flyout, select Create new flow.
A Power Automate window opens and by default templates will be filtered to only show Power Apps Templates. You could also select the + Create from Blank option to build your flow from scratch.
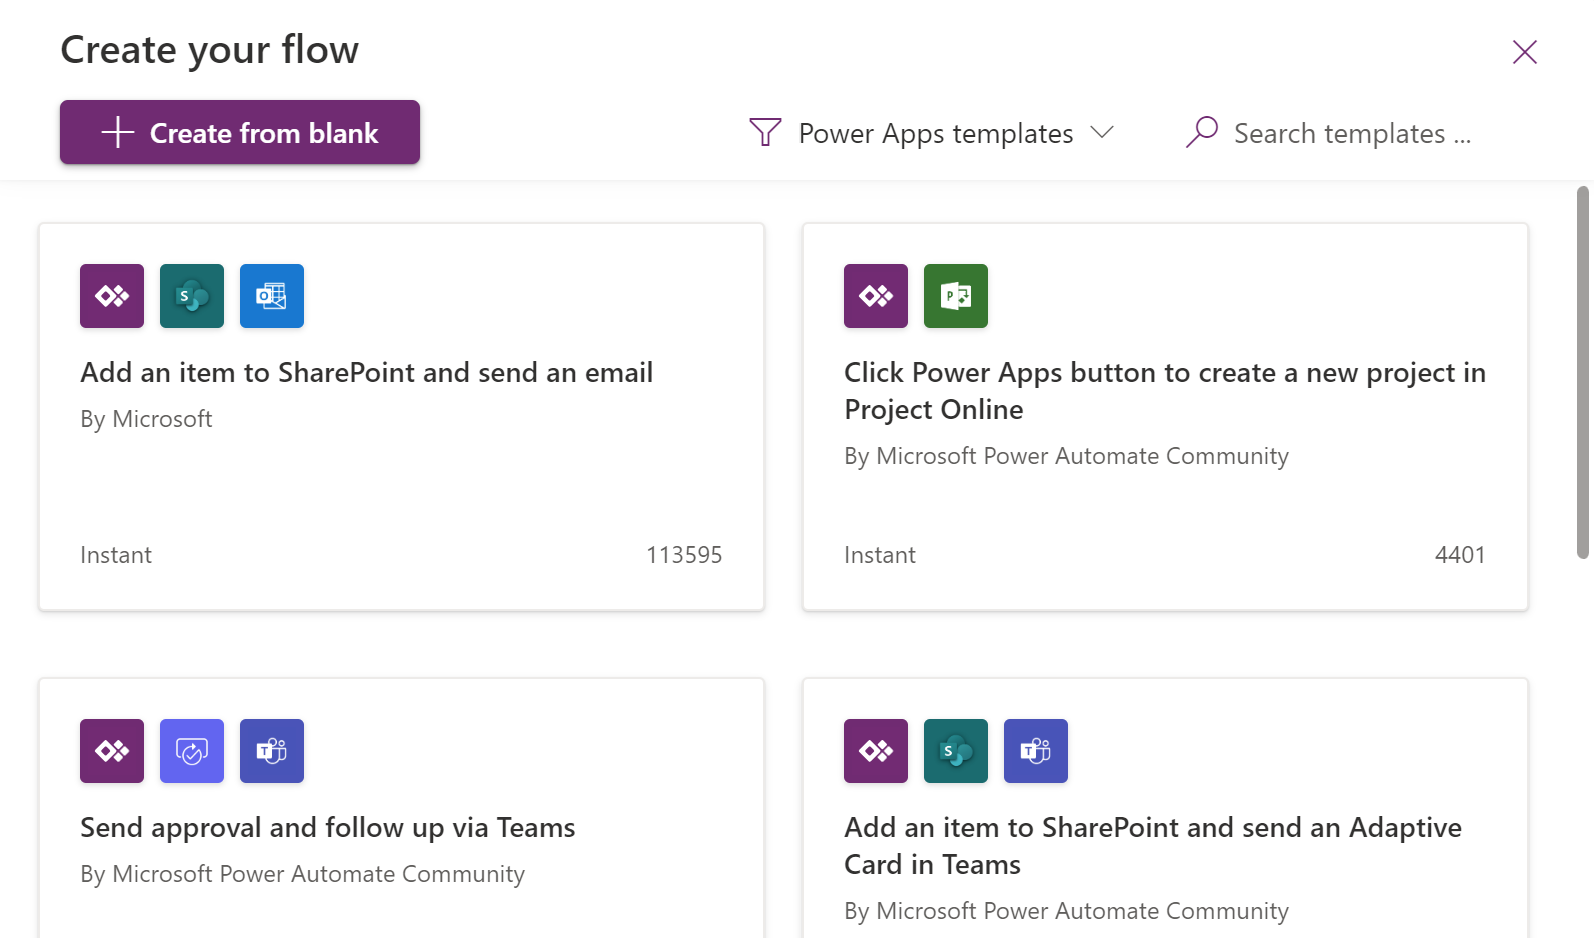
For more about how to create flows, see Create a flow from a template in Power Automate.
Add a Power Apps application from Power Automate
You can also go in the other direction. You can start in Power Automate and then select a template to add an app from Power Apps.
Launch Power Automate and sign in using your organizational account.
In the left pane, select Templates.
Select one of the many Power Apps templates.
To see all the Power Apps templates that are available, you can search for Power Apps.
Once the template is selected and opened, you can start building your flow.
For more about how to create apps by using Power Apps, see Create a canvas app from a template in Power Apps.
Integration of SharePoint with Power Automate
Customers regularly exchange data between Microsoft Lists and other systems to support business processes. These scenarios become more powerful through the deep integration of Power Automate with Microsoft Lists.
Power Automate lets you automate the exchange of workflows and data between SharePoint and various Microsoft and third-party services. You can create and start flows directly from a list in Microsoft Lists, and store and change that data in SharePoint.
From a list in Microsoft Lists, select Integrate on the top toolbar, and then hover your cursor over Power Automate.
Select Create a flow.

In the Create a flow pane, select the template to use.
Power Automate is started, and you can finish creating the flow.
Integration of SharePoint with Power Apps
Power Apps lets you connect to, create, and share business apps on any device in minutes. You can build efficient mobile forms and apps directly from Microsoft Lists, without writing a line of code.
Power Apps and Power Automate share a common connector framework. The framework lets you weave in dozens of data sources that are located on premises or in the cloud. These data sources include:
Microsoft ExchangeMicrosoft SQL ServerMicrosoft DataverseSalesforceGoogleMailChimpTwitterFrom a list in Microsoft Lists, select Integrate on the top toolbar, and then hover your cursor over Power Apps.
Select Create an app.

In the Create an app pane, enter a name for your app, and then select Create.
Power Apps is started, and you can finish creating the app.
Exercise - Monitor flows
You can view a summary of the number of times that each flow succeeded or failed today, yesterday, and on previous days. You can also explore details about each run, such as:
When it ranHow long each step tookIf a step failed, why it failedPrerequisites
Install the Power Automate mobile app for Google Android or Apple iOS on a supported device. The screenshots in this unit were taken on the Apple iPhone version of the app, but the mobile app for Android and Windows Phone is similar.
If you've completed all of the Units in this Learning Path, you'll have many flow runs available for review. If you don't already have a flow, you'll want to create one now on the Power Automate website before proceeding with this unit. For easier testing, use a flow that you can trigger yourself instead of waiting for an external event.
Tip
For testing, you can set up the flow with your personal email address. Then, when the flow is ready for real use, you can set it up with a different address (for example, your manager's).
Show a summary of activity
If your flow hasn't run before, trigger a run to generate data.
It might take some time for the data to appear in the app.
From your phone, open the Power Automate Mobile app.
At the bottom of the screen, select the Activity tab. This tab organizes data by day, and today's data appears at the top.
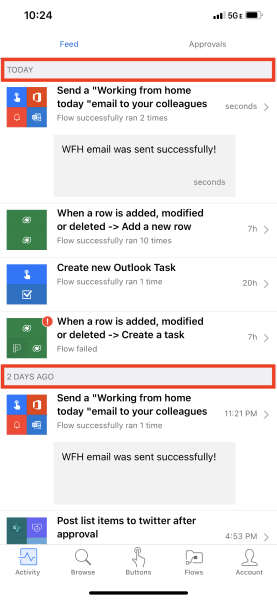
Each entry shows the name of the flow and icons that correspond to the flow's trigger events and actions.
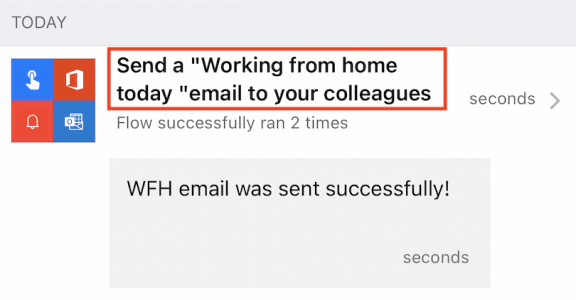
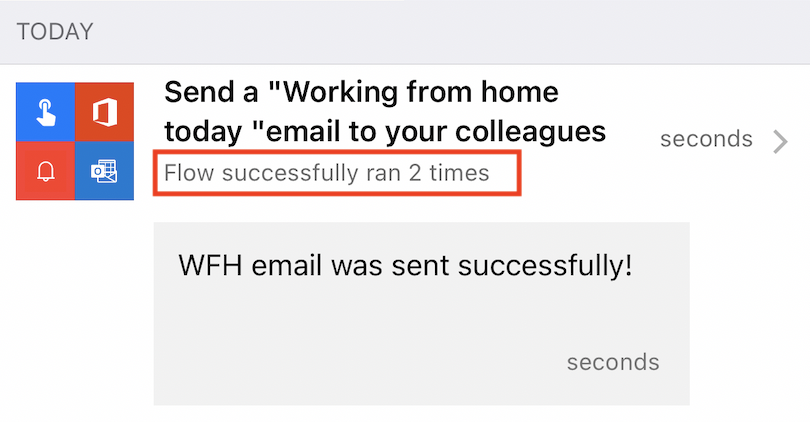
If at least one run of a flow has succeeded in a day, an entry shows the number of successful runs and the time of the most recent success. A different entry shows similar information if a flow has failed.
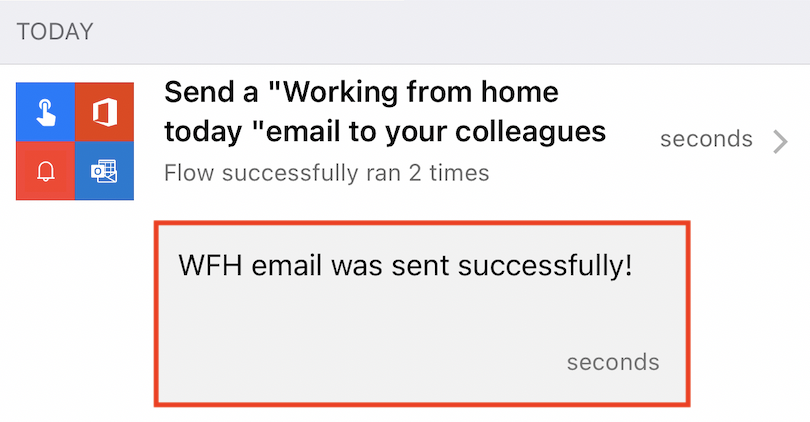
If a flow sends push notifications, the text of the most recent notification appears at the bottom of the entry for successful runs.
Show details of a run
From the Activity Feed, select the > icon next to one of your flows to show details about the flows run.
For each event and action, a green Checkmark symbol indicates the step was successful and a red X symbol indicates that there was an issue with the step. If it succeeded, the amount of time that it took (in seconds) also appears.
![]()
In the upper right-hand corner of the screen, select the ... and then select See previous runs.

Any of the runs in your flow history can be selected to show run details and or Resubmit the Flow, if one or more had failed.
Check your knowledge
Answer the following questions to see what you've learned.
What are connectors used for in Power Automate?
Connectors are used to start a flow.
Connectors let you build a flow that accepts user input.
Connectors let you connect to a service like Salesforce, Microsoft 365, Twitter.
Connectors let you connect to a service like Salesforce, Microsoft 365, Twitter.
What are the key items to build a flow across multiple data sources?
Data source location (online/on-premises), license requirement, column types, and column names.
Data source location (online/on-premises), license requirements, and flow type.
Data source location, environment type, and flow type.
Data source location and license type.
Data source location and license type are the key requirements to consider.
When creating flows across data sources do the column names need to match?
Yes.
Yes, but only for numerical column types.
No.
Yes, but only for choice type column types.
In order to copy data over the names of choice type, columns need to match.


 Bengali (Bangladesh) ·
  English (United States) ·