
ARTICLE AD
Introduction to the Microsoft Dataverse Web API
100 XP
10 minutesWeb API vs. the Organization service
The two main ways to interact with data and metadata in Microsoft Dataverse are the Web API and the organization service. You can use the organization service when writing plug-ins or workflow extensions by using the .NET Framework SDK assemblies that are provided by Microsoft.
At the time of this writing, all data operations go through the underlying organization service. As such, the Web API allows you to perform the same operations as the organization service but in a RESTful style. (More information on REST will be provided later in this module.)
The following graphic is a decision tree that can help you determine when to use the Web API versus the organization service (through SDK Assemblies) and also when to use XRM Tooling Assemblies (available from Microsoft) for Windows applications.
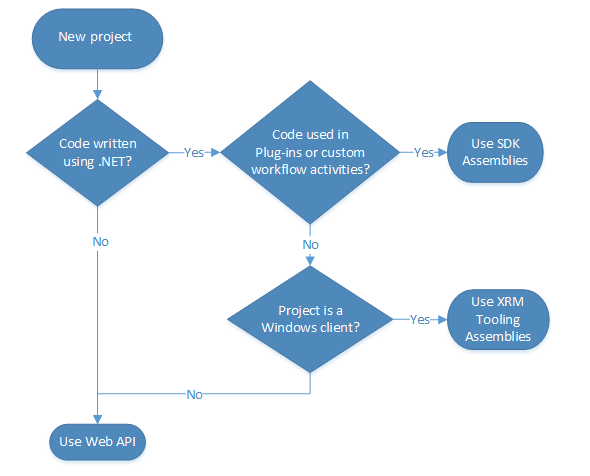
This module focuses on the Web API. For more information on the organization service, see Use the Dataverse Organization service in the Dataverse Developer Guide.
If you'd like to learn more about the XRM Tooling Assemblies that are available for Windows client applications, see Build Windows client applications using the XRM tools, also in the Dataverse Developer Guide. XRM is considered the predecessor to Dataverse, so you'll frequently see this name embedded into documentation and tooling that is provided by Microsoft.
OData 4.0
Dataverse Web API is implemented as an OData (OASIS Open Data Protocol) service. By using an industry standard such as this, you're provided all the benefits of open standard development, such as cross-platform compatibility and simple implementation against a common, predefined protocol.
Dataverse doesn't provide specific .NET assembly tooling for the Web API. Instead, we recommend that you use community libraries that conform to the OData protocol. If you want more information about which libraries exist, see https://www.odata.org/libraries/.
OData lets you interact with Dataverse data with CRUD operations that are available through standard GET, POST, PATCH, and DELETE HTTP methods. (More information about these methods will be provided later in this module.) You can also perform almost any other operation that is exposed through Dataverse Event Framework by invoking an OData function or action that has the same name as its corresponding organization service message. CRUD-related messages are the only ones that are not available, because those messages are achieved with the previously described standard HTTP methods.
REST
Fundamentally, OData protocol is a set of RESTful (REpresentational State Transfer) APIs, a time-tested industry standard for providing interoperability between systems. REST consists of six guiding principles that restrict the way that a service can process and respond to requests to ensure that non-functional properties of that service are met (such as performance, scalability, simplicity, reliability, and so on).
For the purposes of this lesson, you should keep in mind that OData conforms to these constraints and that the Dataverse Web API in turn also conforms to the constraints because it implements the OData 4.0 protocol.
FetchXML
FetchXML is a robust query language that allows for complex querying of Dataverse data. Microsoft provides a way for users to run FetchXML queries within a Web API query. This approach can be valuable if you encounter a scenario where FetchXML is a better fit for your particular query versus using OData query syntax. More information about FetchXML is provided in a later unit in this module.
Authenticate against Microsoft Dataverse by using OAuth
100 XP
15 minutesMicrosoft's Microsoft Dataverse uses OAuth 2.0 as its authentication standard. OAuth 2.0 provides an industry-standard for authenticating client applications and granting them access to a resource.
Authentication vs. authorization
Authentication is the process or action of verifying the identity of a user or process. Microsoft's solution to this verification process is Azure Active Directory (Azure AD). Azure AD supports many options to verify the identity of a user or process. Abstracting your identity provider allows for a good separation of concerns because managing usernames and passwords can be a difficult (and risky) process.
Authorization is the process or action of verifying whether an authenticated user is authorized to access the resources that are being provided. Presently, Dataverse authorization is at the Azure AD tenant level, while management of the detailed permissions is delegated to the application based on the current signed-in user. Therefore, you won't use OAuth 2.0 to govern app-level security, which is instead handled with the Power Apps admin center.
If you want to learn more about the concepts of authentication and authorization, see Authentication basics.
Register Dataverse apps with Azure AD
To successfully connect to your Dataverse, you must first register an app with Azure Active Directory, which can be completed in the Azure portal. Depending on the type of app that you want to make, a few different settings are available for you to configure (web apps versus native apps that are installed natively on a device). For more information on settings that are required for each of these types, see Types of app registration.
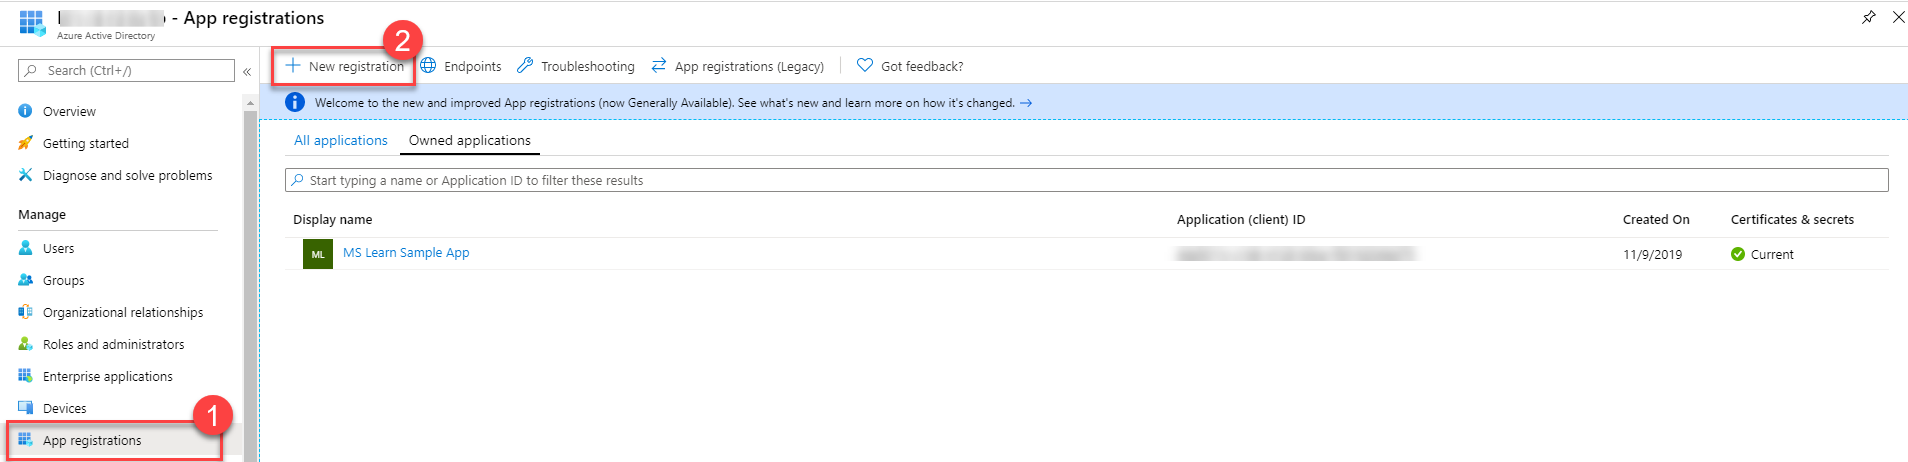
To register an app with Azure AD, you can go to the App Registrations section of the Azure Active Directory menu blade and then select New Registration.
Specify the name of your app and what type of account access you need. If you're registering a web app, specify a Redirect URI by going to the Authentication section, setting the type to Web, and then entering a redirect URI.
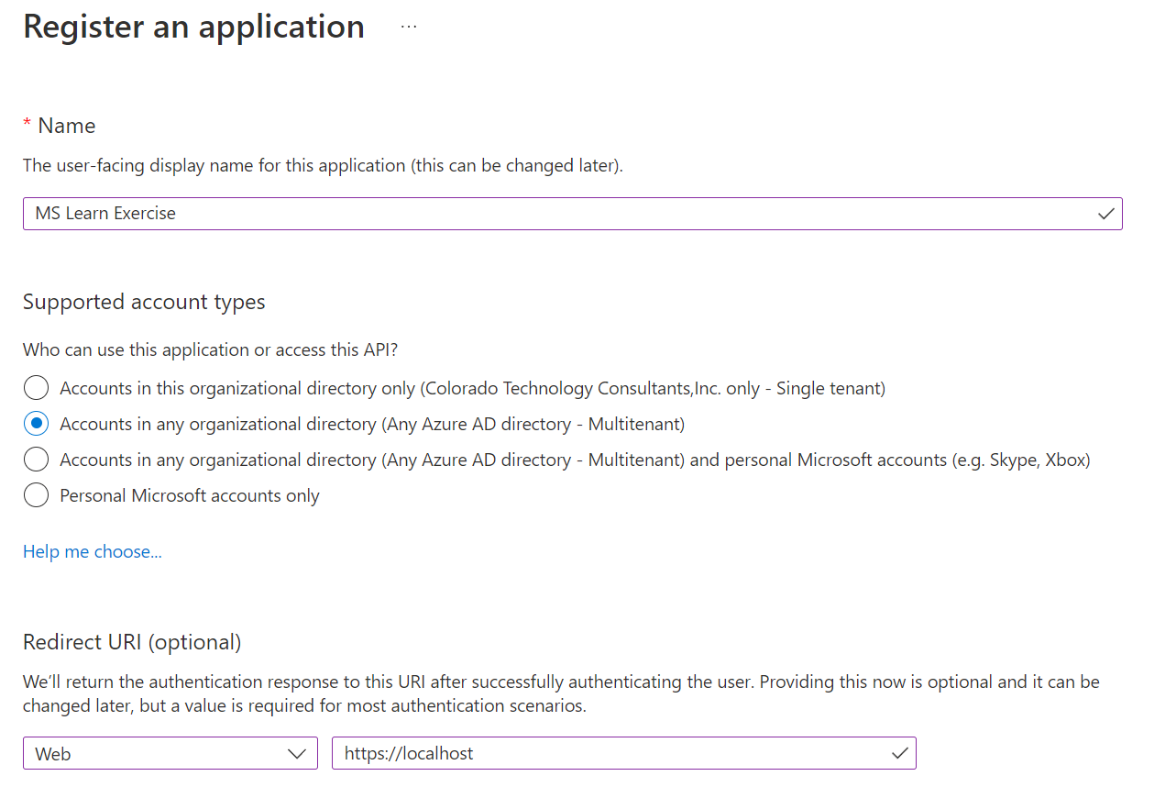
The following list summarizes when to use the different account types:
Accounts in this organizational directory only (Single tenant)
All user and guest accounts in your directory can use your application or API.
Use this option if your target audience is internal to your organization.
Accounts in any organizational directory (Any Azure AD directory - Multitenant)
All users with a work or school account from Microsoft can use your application or API, including schools and businesses that use Microsoft 365.
Use this option if your target audience is business or educational customers and to enable multitenancy.
Accounts in any organizational directory (Any Azure AD directory - Multitenant) and personal Microsoft accounts (for example, Skype and Xbox)
All users with a work, school, or personal Microsoft account can use your application or API. It includes schools and businesses that use Microsoft 365 and personal accounts that are used to sign in to services like Xbox and Skype.
Depending on the complexity of your application setup, you might want to configure other authentication settings. Refer to the Azure Active Directory documentation for steps on how to complete this task.
Access Dataverse using the Web API
All access to Dataverse is done in the context of a signed-in user. This can be a normal interactive user or a non-interactive user using Server-to-Server (S2S) authentication.
When an application accesses Dataverse on behalf of an interactive user the registered application must be configured with API permissions to access Dataverse with delegated permission. When an application directly accesses Dataverse, an Application User associated with the Azure AD application registration must be created in Dataverse. When using S2S authentication, Dataverse API delegated permissions isn't required.
In all cases, the authenticated users must have security roles associated with the user permitting the operations being performed using the Web API.
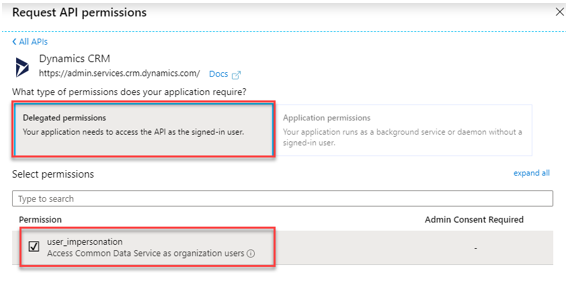
Configure API permissions
If your application will be accessing Dataverse on behalf of a signed in user, go to the API permissions tab on the application registered and ensure that your application is granted user impersonation access to your Dataverse environment.
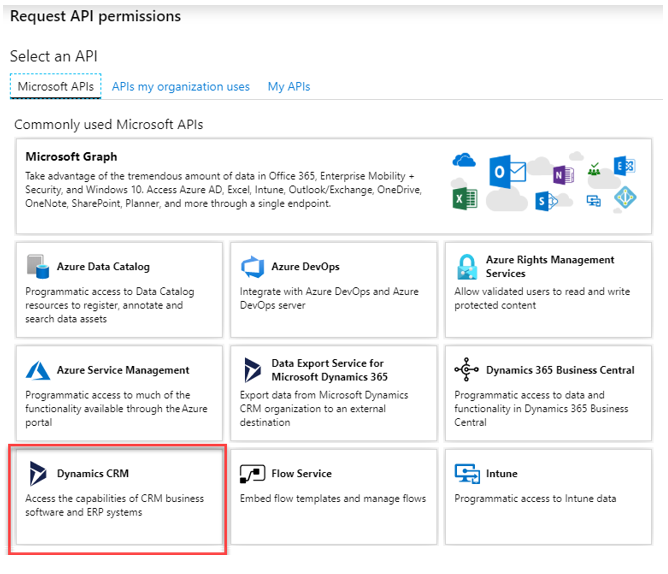
The label says Dynamics CRM, which is a historical name of the precursor product to Dataverse.
Configure a Dataverse application user
When using S2S authentication a Dataverse Application User must be configured in each Dataverse environment, you'll be accessing with the Web API.
Configuration of Dataverse Application Users is done from the Power Platform admin center as a System Administrator.
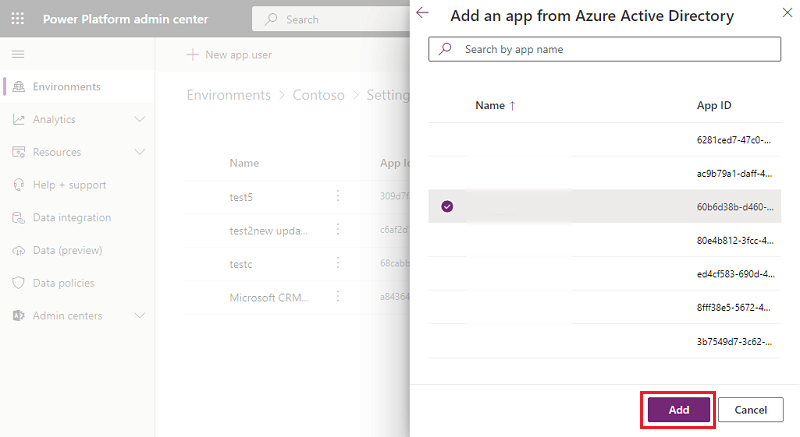
From the admin center you can perform the following steps
Create a new application user
Associate the application user with the Azure AD app or managed identity
Configure which Dataverse security roles will apply
For more detailed step-by-step review Manage application users in the Power Platform admin center.
Use authentication libraries to connect
Once your application is registered use one of the Microsoft identity platform authentication libraries to perform authentication and acquire an access token for use with the Web API.
The following is an excerpt from the Enhanced QuickStart sample that uses the Microsoft Authentication Library (MSAL). The following OAuthMessageHandler class implements a class derived from DelegatingHandler which will be passed to the constructor of the HttpClient. This handler will allow you to override the HttpClient.SendAsync method so that the access token will be refreshed by the AcquireToken* method calls with each request sent by the Http client.
C#Copy
SendAsync( HttpRequestMessage request, System.Threading.CancellationToken cancellationToken) { request.Headers.Authorization = authHeader; return base.SendAsync(request, cancellationToken); } } " style="box-sizing: inherit; outline-color: inherit; font-family: SFMono-Regular, Consolas, "Liberation Mono", Menlo, Courier, monospace; font-size: 1em; direction: ltr; border-width: 0px; border-style: initial; line-height: 1.3571; display: block; position: relative;"> class OAuthMessageHandler : DelegatingHandler { private AuthenticationHeaderValue authHeader; public OAuthMessageHandler(string serviceUrl, string clientId, string redirectUrl, string username, string password, HttpMessageHandler innerHandler) : base(innerHandler) { //Build Microsoft.Identity.Client (MSAL) OAuth Token Request var authBuilder = PublicClientApplicationBuilder.Create(clientId) .WithAuthority(AadAuthorityAudience.AzureAdMultipleOrgs) .WithRedirectUri(redirectUrl) .Build(); var scope = serviceUrl + "//.default"; string[] scopes = { scope }; AuthenticationResult authBuilderResult; if (username != string.Empty && password != string.Empty) { //Make silent Microsoft.Identity.Client (MSAL) OAuth Token Request var securePassword = new SecureString(); foreach (char ch in password) securePassword.AppendChar(ch); authBuilderResult = authBuilder.AcquireTokenByUsernamePassword(scopes, username, securePassword) .ExecuteAsync().Result; } else { //Popup authentication dialog box to get token authBuilderResult = authBuilder.AcquireTokenInteractive(scopes) .ExecuteAsync().Result; } //Note that an Azure AD access token has finite lifetime, default expiration is 60 minutes. authHeader = new AuthenticationHeaderValue("Bearer", authBuilderResult.AccessToken); } protected override Task<HttpResponseMessage> SendAsync( HttpRequestMessage request, System.Threading.CancellationToken cancellationToken) { request.Headers.Authorization = authHeader; return base.SendAsync(request, cancellationToken); } }You could then have a helper method to get the HttpClient instance using the handler:
C#Copy
static HttpClient GetHttpClient(string url, string clientId, string redirectUrl, string version = "v9.2") { try { HttpMessageHandler messageHandler = new OAuthMessageHandler(url, clientId, redirectUrl, \"\", \"\", new HttpClientHandler()); HttpClient httpClient = new HttpClient(messageHandler) { BaseAddress = new Uri(string.Format("{0}/api/data/{1}/", url, version)), Timeout = new TimeSpan(0, 2, 0) //2 minutes }; return httpClient; } catch (Exception) { throw; } }And finally, using the client instance to make a Web API call:
C#Copy
using (HttpClient client = GetHttpClient("https://yourenvname.api.crm.dynamics.com", "51f81489-12ee-4a9e-aaae-a2591f45987d", "http://localhost:8080")) { // Use the WhoAmI function var response = client.GetAsync("WhoAmI").Result; if (response.IsSuccessStatusCode) { //Get the response content and parse it. JObject body = JObject.Parse(response.Content.ReadAsStringAsync().Result); Guid userId = (Guid)body["UserId"]; Console.WriteLine("Your UserId is {0}", userId); } else { Console.WriteLine("The request failed with a status of '{0}'", response.ReasonPhrase); } Console.WriteLine("Press any key to exit."); Console.ReadLine(); }You should now have an app registered that can successfully connect to your Dataverse environment. You also have a simple example of connecting and using the registered app to access a Web API operation.
Interact with Microsoft Dataverse Web API by using Postman
100 XP
30 minutesPostman is a valuable tool to use for composing ad hoc Web API queries and verifying the behavior of Web API Operations without having to write a program to do so. If you're new to Postman, see the First 5 things to try if you're new to Postman article for an introduction to the topic.
Register an app in Azure Active Directory
To connect Postman to Microsoft Dataverse, you must first ensure that you have an application registered in your Azure AD environment.
Get the current version of your Web API endpoint
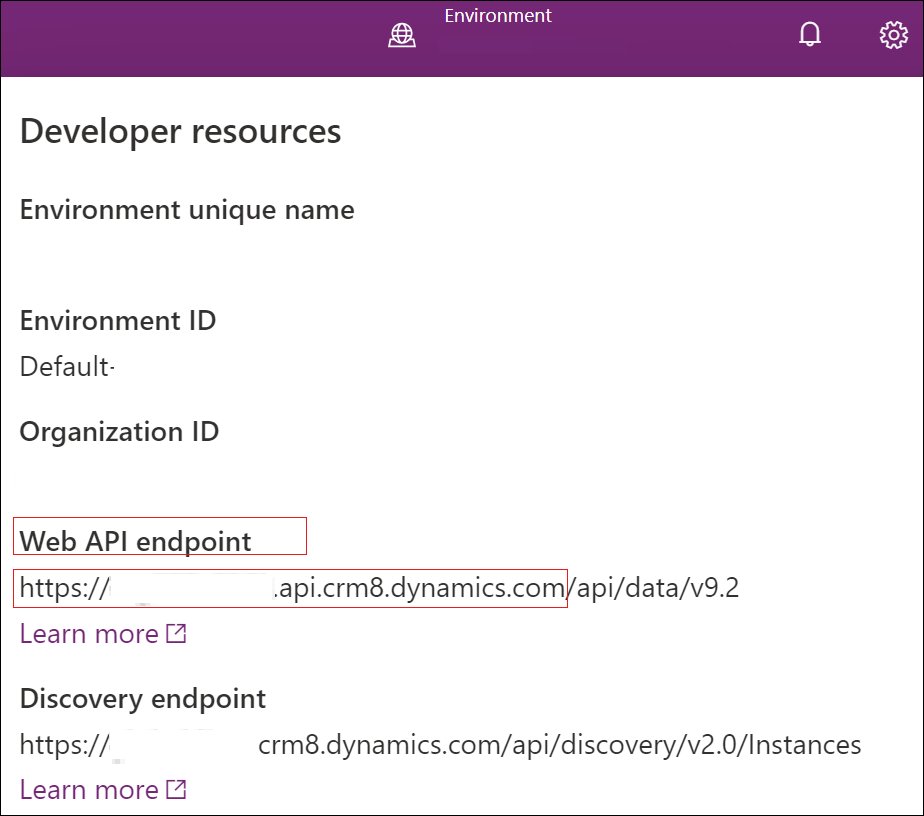
You can find the version number of your Web API endpoint by going to your environment's Developer resources in the maker portal.
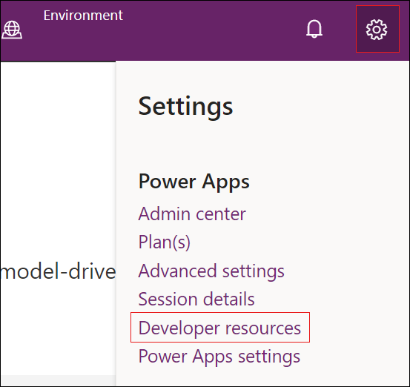
From the Developer Resources page. Your version number will be indicated under the Web API endpoint, as shown in the following image. Make note of the endpoint and the version.
Set up Postman
To start the setup process, install Postman.
After Postman has been installed, you'll use a feature that Postman has to manage environment variables so that you can cleanly manage entities such as your endpoint URLs and client IDs.
To create a Postman environment that you can use to connect with your Dataverse instance, follow these steps:
Launch the Postman desktop application.
Select the Environment Options gear icon in the top-right corner.
In the Manage Environments dialog box, select the Add button to add a new environment.
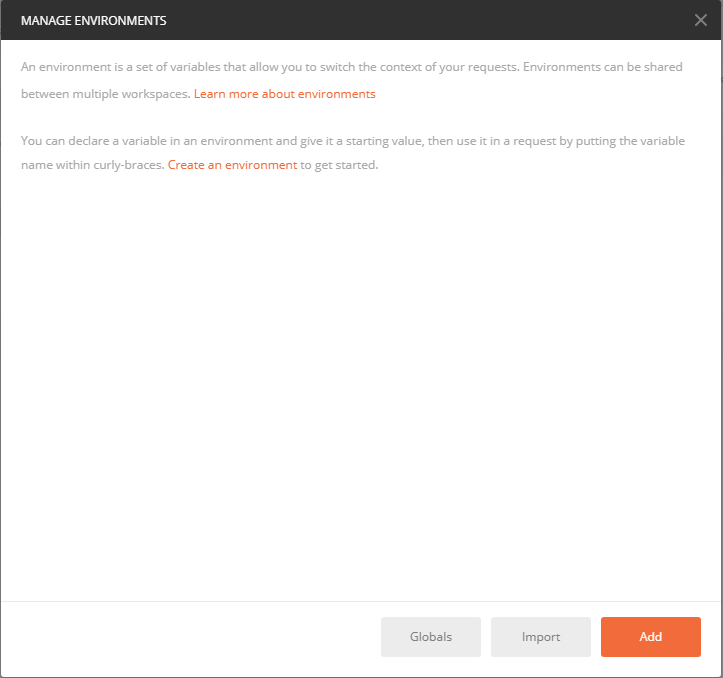
In the dialog box that opens, enter a name for the environment and then add the following key/value pairs into the editing space.
| url | https://[ORGANIZATION].api.crm.dynamics.com |
| clientid | 51f81489-12ee-4a9e-aaae-a2591f45987d |
| version | 9.2 |
| webapiurl | {{url}}/api/data/v{{version}}/ |
| callback | https://callbackurl |
| authurl | https://login.microsoftonline.com/common/oauth2/authorize?resource={{url}} |
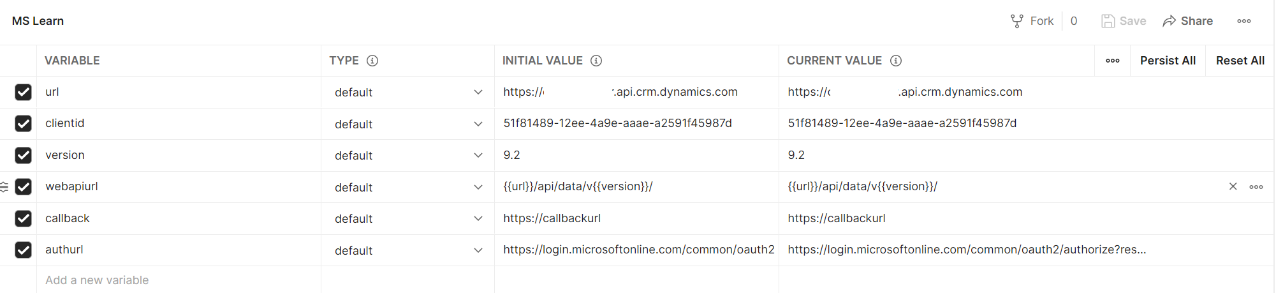
Replace the instance URL placeholder value with the URL of your Dataverse environment and then select Add to save the environment.
Close the Manage environments dialog box.
Generate an access token to use with your environment
To connect by using OAuth 2.0, you must have an access token. To get a new access token, follow these steps:
Make sure that the new environment you created is selected.
Select the Authorization tab.
Set the Type to OAuth 2.0.
Verify that you've selected the environment that you created.
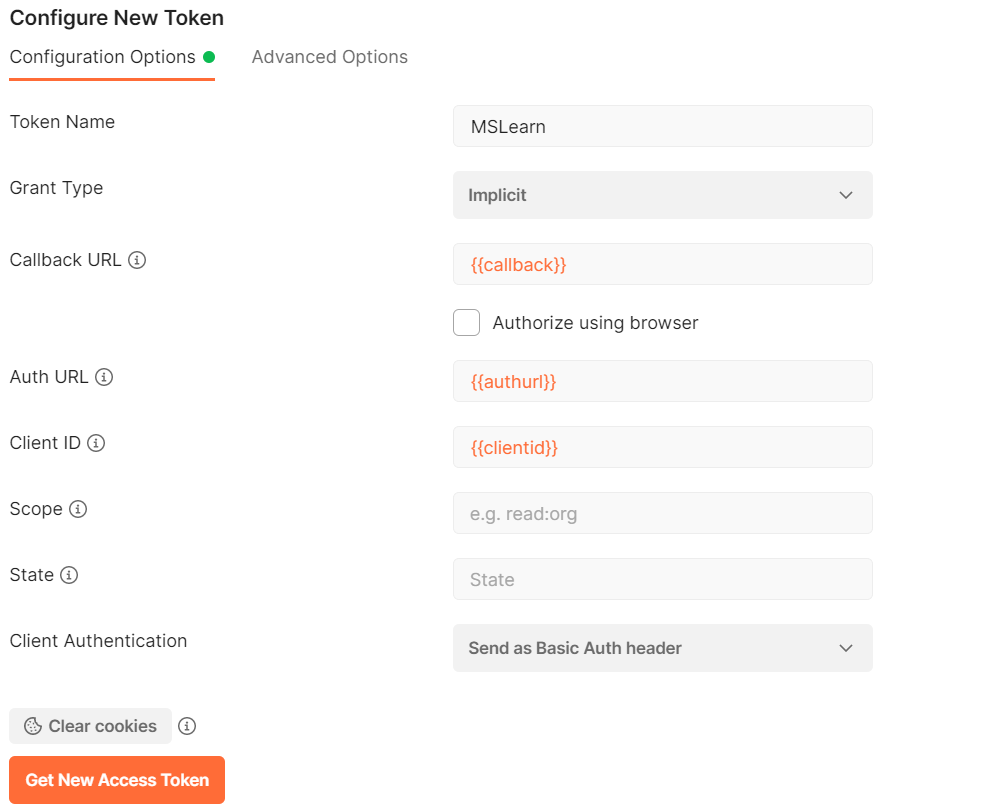
Scroll down to the Configure New Token pane.
Set the following values in the dialog box. Select Implicit from the Grant Type drop-down menu. You can set the Token Name to whatever you like and then leave other keys set to default values.
Note
If you are configuring environments in Postman for multiple Dataverse instances by using different user credentials, you might need to delete the cookies that are cached by Postman. Select the Cookies link, which can be found under the Send button, and remove the saved cookies from the Manage Cookies dialog box.

Some of these cookies are persistent. You can delete some cookies in groups, but you might have to delete others individually. You might need to complete this process twice to ensure that no cookies remain.
Select Request Token. When you make this selection, an Azure Active Directory sign-in page appears. Enter your username and password.
After the token is generated, scroll to the bottom and select Use Token. This selection closes the Manage Access Tokens dialog box.
After you've added a token, you can select which token to apply to requests. On the Available Tokens drop-down list, select the token that you've created. The Authorization header will be added to the Web API request.
Test your connection
Create a new Web API request to test the connection with your Common Data Service instance. Use the WhoAmI function by following these steps:
Select GET as the HTTP method and add {{webapiurl}}WhoAmI in the editing space.

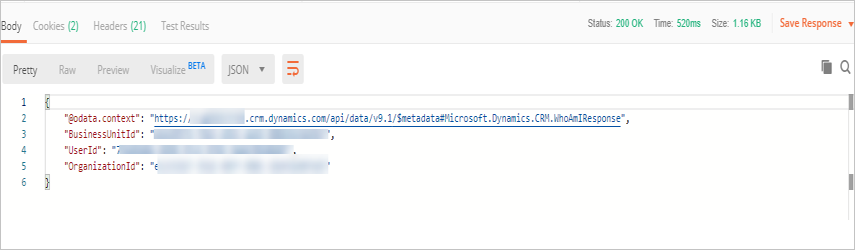
Select Send to send this request.
If your request is successful, you'll see the data from the WhoAmIResponse ComplexType that is returned by the WhoAmI Function.
Use OData to query data
100 XP
15 minutesOData is a time-tested language for querying RESTful APIs. This lesson explores a few ways of performing CRUD operations against Microsoft Dataverse data.
Create records
To create records, use the HTTP POST method.
ODataCopy
POST [Organization URI]/api/data/v9.0/accounts HTTP/1.1 Content-Type: application/json; charset=utf-8 OData-MaxVersion: 4.0 OData-Version: 4.0 Accept: application/json { "name": "Sample Account", "creditonhold": false, "address1_latitude": 47.639583, "description": "This is the description of the sample account", "revenue": 5000000, "accountcategorycode": 1 }Retrieve records
To retrieve records, use the HTTP GET method.
The following sample retrieves an account with the ID of 00000000-0000-0000-0000-000000000001:
ODataCopy
GET [Organization URI]/api/data/v9.2/accounts(00000000-0000-0000-0000-000000000001)Other methods are available for querying data by using standard OData query syntax. For more information on this process, see Retrieve an entity record using the Web API.
Update records
Depending on what you are trying to accomplish, you can choose between one of two methods for updating records:
If you're performing an update of multiple attribute values, use the HTTP PATCH method. PATCH methods provide upsert capability if you provide an ID value as part of your request, a beneficial feature when you're synchronizing data between systems.
If you're updating a single attribute value, use the HTTP PUT method. This method can't be used with navigation properties like lookups because that requires a reference to be removed as well.
The following example updates an account entity:
ODataCopy
PATCH [Organization URI]/api/data/v9.2/accounts(00000000-0000-0000-0000-000000000001) HTTP/1.1 Content-Type: application/json OData-MaxVersion: 4.0 OData-Version: 4.0 { "name": "Updated Sample Account ", "creditonhold": true, "address1_latitude": 47.639583, "description": "This is the updated description of the sample account", "revenue": 6000000, "accountcategorycode": 2 }If you want to retrieve data from the entity that you're updating, you can use the return=representation request header. If you want to control which properties are returned, you can add a $select query to your PATCH URL. In the following example, the header has been added and the $select has been amended to only include the name, creditonhold, and address1 attributes.
Request
ODataCopy
PATCH [Organization URI]/api/data/v9.2/accounts(00000000-0000-0000-0000-000000000001)?$select=name,creditonhold,address1_latitude,description,revenue,accountcategorycode,createdon HTTP/1.1 OData-MaxVersion: 4.0 OData-Version: 4.0 Accept: application/json Content-Type: application/json; charset=utf-8 Prefer: return=representation {"name":"Updated Sample Account"}Response
ODataCopy
HTTP/1.1 200 OK Content-Type: application/json; odata.metadata=minimal Preference-Applied: return=representation OData-Version: 4.0 { "@odata.context": "[Organization URI]/api/data/v9.2/$metadata#accounts/$entity", "@odata.etag": "W/"536537"", "accountid": "00000000-0000-0000-0000-000000000001", "accountcategorycode": 1, "description": "This is the description of the sample account", "address1_latitude": 47.63958, "creditonhold": false, "name": "Updated Sample Account", "createdon": "2022-09-28T23:14:00Z", "revenue": 5000000.0000, "_transactioncurrencyid_value": "048dddaa-6f7f-e611-80d3-00155db5e0b6" }The following is a sample PUT request where an account's name for a given record is updated:
ODataCopy
PUT [Organization URI]/api/data/v9.2/accounts(00000000-0000-0000-0000-000000000001)/name HTTP/1.1 Content-Type: application/json OData-MaxVersion: 4.0 OData-Version: 4.0 {"value": "Updated Sample Account Name"}Delete records
To delete records, use the HTTP DELETE method. The operation is straightforward, where you provide the URI of the entity record that you want to delete, as shown in the following request:
ODataCopy
DELETE [Organization URI]/api/data/v9.2/accounts(00000000-0000-0000-0000-000000000001) HTTP/1.1 Content-Type: application/json OData-MaxVersion: 4.0 OData-Version: 4.0Additional operations
Dataverse provides many other predefined operations that you can trigger through Web API requests. For a full inventory of the available capabilities, see Perform operations using the Web API.
Use FetchXML to query data
100 XP
10 minutesFetchXML is a robust query language that was developed by Microsoft to enable complex operations to be performed against Microsoft Dataverse data. It provides considerably more filtering options than the OData connectors, and it also allows you to see the labels for reference data such as Option Set labels or lookup fields.
You can run FetchXML queries by using the following methods:
Dataverse Web API
Organization service
You can also apply a custom FetchXML filter to a lookup field within a model-driven app. This approach allows for more complex lookup scenarios that aren't easily accomplished out of the box. For more information on how to complete this process, see the addCustomFilter Client API Reference.
Example FetchXML query
The following sample query retrieves the accountid and name fields from the account entity:
XMLCopy
" style="box-sizing: inherit; outline-color: inherit; font-family: SFMono-Regular, Consolas, "Liberation Mono", Menlo, Courier, monospace; font-size: 1em; direction: ltr; border-width: 0px; border-style: initial; line-height: 1.3571; display: block; position: relative;"><fetch mapping='logical'> <entity name='account'> <attribute name='accountid'/> <attribute name='name'/> </entity> </fetch>If you need to filter this data, for example by state, you could do something like the following sample query:
XMLCopy
" style="box-sizing: inherit; outline-color: inherit; font-family: SFMono-Regular, Consolas, "Liberation Mono", Menlo, Courier, monospace; font-size: 1em; direction: ltr; border-width: 0px; border-style: initial; line-height: 1.3571; display: block; position: relative;"><fetch mapping='logical'> <entity name='account'> <attribute name='accountid'/> <attribute name='name'/> <filter type='and'> <condition attribute='address1_stateorprovince' operator='eq' value='WA' /> </filter> </entity> </fetch>Tools to help build your queries
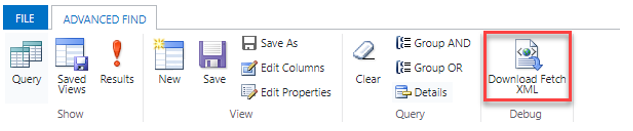
If you're querying data against a model-driven app that is built on Dataverse, the simplest method for building FetchXML queries is to use Advanced Find, which contains a Download FetchXML function. You're limited to the UI on what filters and related data that you can pull, but it's frequently an excellent first start so that you don't have to compose the XML anew.
Another notable tool, called FetchXML Builder, can be found at XrmToolBox. With this tool, you can construct FetchXML in ways that Advanced Find can't (aggregates, outer joins, "has no" queries, and attributes from multi-level linked entities). It also provides a wealth of other features, which you can find at their website: FetchXML Builder.
Additional resources
Go to Microsoft Learn to discover in-depth details on the FetchXML Query Language. The Use FetchXML to query data section covers several advanced topics such as how to handle paging, querying hierarchical data, and much more.
Call Power Automate actions from the Web API
100 XP
10 minutesDataverse contains a feature that allows power users to create their own custom sets of business logic called actions. From a developer perspective, Microsoft Learn defines an action as a "reusable operation, which may have observable side effects." These side effects include creating or updating records.
Another feature of actions is their ability to be invoked through the Web API. As a result, you can encapsulate your low-code automations in such a way that you can use them in nearly any scenario by interacting with them through their associated Web API request and response.
While this lesson doesn't cover how to create actions in detail, it's assumed that you already have a basic understanding of how to build them. If you need more information on how to create an action, you can review the documentation on them. See the Create Custom APIs section for detailed information on how to build Dataverse actions.
Run actions with the Web API
When a new action is created in your Dataverse solution, the framework also creates a corresponding Web API request message. You can run these requests by using a POST operation similar to the following example:
ODataCopy
POST [Organization URI]/api/data/v9.2/WinOpportunity HTTP/1.1 Accept: application/json Content-Type: application/json; charset=utf-8 OData-MaxVersion: 4.0 OData-Version: 4.0 { "Status": 3, "OpportunityClose": { "subject": "Won Opportunity", "opportunityid@odata.bind": "[Organization URI]/api/data/v9.2/opportunities(b3828ac8-917a-e511-80d2-00155d2a68d2)" } }The above example is an HTTP request call to the WinOpportunity action for an opportunity with an opportunityid value of b3828ac8-917a-e511-80d2-00155d2a68d2.
Call pre-built Dataverse actions
Dataverse comes with a set of existing actions that you can use to perform common operations. Some of these actions might only apply to model-driven or Dynamics 365 apps. For example, the CalculatePrice action calculates the price in an opportunity/quote/order/invoice, so it would only apply to a Dynamics 365 Sales app where that functionality exists.
For more information about which pre-built actions are available for use through the Web API, see the Web API Action Reference.
Unbound vs. bound actions
An action can be built as either unbound (meaning, it doesn't have a Dataverse entity correlated to it) or bound (meaning, the logic is tied to a specific entity record). SQL developers could
consider these actions as similar to stored procedures (unbound actions) versus triggers (bound actions). However, unlike SQL triggers, you can also run bound actions on demand by providing a corresponding entity record ID as its parameter.
Unbound actions are beneficial for generic logic that might need to run outside the context of a specific entity record, such as the WinOpportunity action that was referenced earlier. To run a bound action against a specific record, you must provide the ID of that record in the URI of your request:
ODataCopy
POST [Organization URI]/api/data/v9.2/contacts(94d8c461-a27a-e511-80d2-00155d2a68d2)/Microsoft.Dynamics.CRM.new_AddNoteToContact HTTP/1.1 Accept: application/json Content-Type: application/json; charset=utf-8 OData-MaxVersion: 4.0 OData-Version: 4.0 { "NoteTitle": "New Note Title", "NoteText": "This is the text of the note" }The preceding example calls a custom action that was previously built in the solution called new_AddNoteToContact for a contact with the ID of 94d8c461-a27a-e511-80d2-00155d2a68d2 and then passes the parameters NoteTitle and NoteText to the action. The expected behavior for this procedure would be that a new note would be added to the corresponding contact with the title and text provided.
More details
For more information on how to call actions in code, see Use Web API actions.
Use the Web API to impersonate another user
100 XP
10 minutesOccasionally, you might need to run logic for another user. Within the context of Microsoft Dataverse, the logic that you're running will apply all appropriate role and object-based security based on the user whom you're impersonating. This method can be especially effective when you're integrating external systems with a Dataverse solution where the integration account is a system account versus the user who actually invoked the request.
Implement a Web API request with user impersonation
When calling any Web API method, you can provide a CallerObjectId in your message header to indicate that you want the message to be run for that particular user. The value of this parameter is their Azure Active Directory (Azure AD) object ID. The Azure Graph API provides a method to query Azure AD user data. For more information, see the Azure AD Graph API Reference.
Determine the user who performed an operation
If you need to see the ID of the user who actually performed an operation for another user, you can query the record's createdonbehalfby value, which will contain this detail. For example, if you want to see if an account record was created through user impersonation rather than by the actual user, you could query that account record to compare their createdby and createdonbehalfby values by using the following query:
ODataCopy
GET [Organization URI]/api/data/v9.2/accounts(00000000-0000-0000-000000000003)?$select=name&$expand=createdby($select=fullname),createdonbehalfby($select=fullname),owninguser($select=fullname) HTTP/1.1 Accept: application/json OData-MaxVersion: 4.0 OData-Version: 4.0If the record was created by an impersonating account, you can expect a response similar to the following example:
ODataCopy
HTTP/1.1 200 OK Content-Type: application/json; odata.metadata=minimal ETag: W/"506868" { "@odata.context": "[Organization URI]/api/data/v9.2/$metadata#accounts(name,createdby(fullname,azureactivedirectoryobjectid),createdonbehalfby(fullname,azureactivedirectoryobjectid),owninguser(fullname,azureactivedirectoryobjectid))/$entity", "@odata.etag": "W/"2751197"", "name": "Sample Account created using impersonation", "accountid": "00000000-0000-0000-000000000003", "createdby": { "@odata.etag": "W/"2632435"", "fullname": "Impersonated User", "azureactivedirectoryobjectid": "e39c5d16-675b-48d1-8e67-667427e9c084", "systemuserid": "75df116d-d9da-e711-a94b-000d3a34ed47", "ownerid": "75df116d-d9da-e711-a94b-000d3a34ed47" }, "createdonbehalfby": { "@odata.etag": "W/"2632445"", "fullname": "Actual User", "azureactivedirectoryobjectid": "3d8bed3e-79a3-47c8-80cf-269869b2e9f0", "systemuserid": "278742b0-1e61-4fb5-84ef-c7de308c19e2", "ownerid": "278742b0-1e61-4fb5-84ef-c7de308c19e2" }, "owninguser": { "@odata.etag": "W/"2632435"", "fullname": "Impersonated User", "azureactivedirectoryobjectid": "e39c5d16-675b-48d1-8e67-667427e9c084", "systemuserid": "75df116d-d9da-e711-a94b-000d3a34ed47", "ownerid": "75df116d-d9da-e711-a94b-000d3a34ed47" } }Track entity data changes with change tracking and the Web API
100 XP
15 minutes
Commonly, organizations need to synchronize data across multiple systems. Microsoft Dataverse provides a feature to efficiently manage this scenario, called change tracking. With change tracking enabled, you can build applications to query for these changes.
Enable change tracking for a table
You can enable change tracking on a table by setting the Track changes flag on the table settings in the Power Apps maker portal, found under the Advanced options > For this table section.
Delta links
According to the OData 4.0 documentation, delta links are "opaque, service-generated links that the client uses to retrieve subsequent changes to a result." Microsoft has built this standard into change tracking in Dataverse to provide a common, standard method for interfacing with change data as it occurs over time. For more information on delta links, see OData Version 4.0 - Delta Links. After issuing a change tracking request, your response will contain a delta link, which you'll then pass to your next request to get changes that have occurred since the initial request. It will be up to your app to maintain the delta link, similarly to how you might have done tracking with date/time stamps in the past.
Retrieve changes in tables by using the Web API
After you've enabled change tracking on a table, you can retrieve its changes through the Web API by adding odata.track-changes as a preference header in your web request. The following example requests changes from the account table for a specific set of fields (name, account number, telephone1, and fax).
ODataCopy
GET [Organization URI]/org1/api/data/v9.2/accounts?$select=name,accountnumber,telephone1,fax HTTP/1.1 Prefer: odata.track-changes Cache-Control: no-cache OData-Version: 4.0 Content-Type: application/jsonOn the initial request, you'll receive the entire set of data that applies to the query because a delta hasn't been applied. However, the response will show an @odata.deltaLink value. This link contains a deltatoken parameter, which is intended to be passed into your subsequent request when you want to see what changes have been applied since this query was run. Think of this process as similar to how you would handle paging in OData.
The following example is a response to the preceding account request:
ODataCopy
{ "@odata.context":"[Organization URI]/data/v9.2/$metadata#accounts(name,telephone1,fax)/$delta", "@odata.deltaLink":"[Organization URI]/api/data/v9.2/accounts?$select=name,telephone1,fax&$deltatoken=919042%2108%2f22%2f2017%2008%3a10%3a44", "value": [ { "@odata.etag":"W/\"915244\"", "name":"Monte Orton", "telephone1":"555000", "fax":"10101", "accountid":"60c4e274-0d87-e711-80e5-00155db19e6d" }, { "@odata.context":"[Organization URI]/api/data/v9.2/$metadata#accounts/$deletedEntity", "id":"2e451703-c686-e711-80e5-00155db19e6d", "reason":"deleted" } ] }In this scenario, consider that some time has passed, and you now want to see if any other changes have been applied. You can use the @odata.deltaLink parameter to run your query (or extract its deltatoken if you're managing connection strings differently), and see what changes have happened since your last request.
The following example shows how you would retrieve changes since that last request by running the returned @odata.deltaLink:
ODataCopy
GET [Organization URI]/api/data/v9.2/accounts?$select=name,accountnumber,telephone1,fax&$deltatoken=919042%2108%2f22%2f2017%2008%3a10%3a44In this scenario, imagine that a new account was created and another one was deleted. Your response would then look similar to the following example:
ODataCopy
{ "@odata.context":"[Organization URI]/data/v9.2/$metadata#accounts(name,telephone1,fax)/$delta", "@odata.deltaLink":"[Organization URI]/api/data/v9.2/accounts?$select=name,telephone1,fax&$deltatoken=919058%2108%2f22%2f2017%2008%3a21%3a20", "value": [ { "@odata.etag":"W/\"915244\"", "name":"Monte Orton", "telephone1":"555000", "fax":"10101", "accountid":"60c4e274-0d87-e711-80e5-00155db19e6d" }, { "@odata.context":"[Organization URI]/api/data/v9.1/$metadata#accounts/$deletedEntity", "id":"2e451703-c686-e711-80e5-00155db19e6d", "reason":"deleted" } ] }As shown in the example, another delta link was provided, which you can then use the next time you need to see what changes have occurred.
Retrieve the number of changes in a delta
You can also retrieve the number of changes made in a given delta by adding the $count parameter to your request.
ODataCopy
GET [Organization URI]/api/data/v9.2/accounts/$count?$deltatoken=919042%2108%2f22%2f2017%2008%3a10%3a44Check your knowledge
200 XP5 minutes
Answer the following questions to see what you've learned.
1. What is the underlying protocol of Microsoft Dataverse’s Web API?
SOAP
OData
The underlying protocol of Dataverse’s Web API is OData.
XML
2. What is Dataverse’s XML-based query language called?
FetchXML
Dataverse’s XML-based query language is FetchXML.
XAML
QueryExpression
3. What name is used to refer to changeset data when you're tracking against a table?
Variance
Deviation
Delta
Delta is used to refer to changeset data when you're tracking against a table.
What is the underlying protocol of Microsoft Dataverse’s Web API?
SOAP
OData
The underlying protocol of Dataverse’s Web API is OData.
XML
What is Dataverse’s XML-based query language called?
FetchXML
Dataverse’s XML-based query language is FetchXML.
XAML
QueryExpression
What name is used to refer to changeset data when you're tracking against a table?
Variance
Deviation
Delta
Delta is used to refer to changeset data when you're tracking against a table.


 Bengali (Bangladesh) ·
  English (United States) ·